Theme editor

Scale Model Shop

Si B's-Meng Jagdpanther Ausf. G1

Status
Not open for further replies.

Si Benson

Active member
Joined
Apr 27, 2018
Messages
3,572
Reaction score
127
Points
63
1/3
Thread owner
Afternoon,
Back in September, I took a visit to my folks place in Spain. While there I assembled Mengs Jagdpanther and took pictures along the way. It was a while ago now, but I Thought I’d share the process with you, since I'm just getting onto the painting.

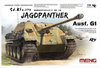
Reviews say it’s one of the most accurate renditions of a Jagdpanther available.....Here’s the box art.

View attachment 326761
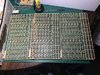
link to some sprue shots


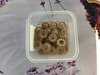
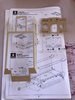
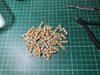
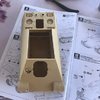
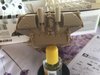
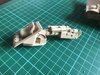
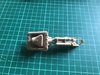
Construction starts with wheels. I was happy to see the use of polycaps in the wheels...should make tracks and paint a lot easier.

View attachment 326762

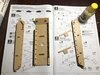
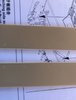
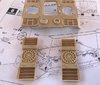
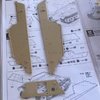
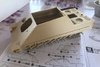
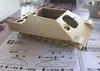
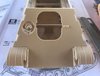
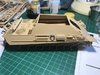
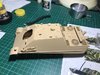
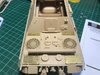
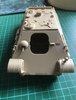
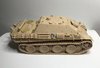
Next up the hull. A multipart affair but has some clever engineering making it very straightforward and fool proof. I believe there are extras you can buy if you want to do torsion bars and interior bits?
View attachment 326763

View attachment 326764

More to come shortly...
 

Attachments

  • IMG_0803 (Edited).jpg
    IMG_0803 (Edited).jpg
    3.7 KB · Views: 0
  • IMG_0804.JPG
    IMG_0804.JPG
    3.3 KB · Views: 0
  • IMG_1001(Edited).jpg
    IMG_1001(Edited).jpg
    4 KB · Views: 0
  • IMG_1002.jpg
    IMG_1002.jpg
    3.5 KB · Views: 0
Thread owner
Cont.....

A quick picture of the temporary bench...
View attachment 326765


Swing arms attached. Some clever location slots make sure you get the right arms in the right place and such a good fit I’ve not used any glue!

View attachment 326766

Then onto the upper hull. Starts with a clever frame and attachment of the mudguards and engine deck...some small holes to drill here.
View attachment 326767

more to come...
 

Attachments

  • IMG_1006.jpg
    IMG_1006.jpg
    4.2 KB · Views: 0
  • swing arms.jpg
    swing arms.jpg
    3.3 KB · Views: 0
  • IMG_1013.jpg
    IMG_1013.jpg
    3.4 KB · Views: 0
Thread owner
Theres always one that cant wait :smiling5:...hello Scottie:thumb2:


Fan units go onto the engine deck...
View attachment 326770

They’ve even detailed the underside of the mudguard with screw heads
View attachment 326769


Next up...tracks!
3 full sprues of tracks and two guide horns to add to each individual track...challenge accepted!

View attachment 326771

Spent about 2 hours removing and cleaning up one sprues worth (73 tracks) there are 87 links to each side according to the instructions...but we all know that could be either more of less
e415.png


Before clean up. 3 connection points per link make for an involved clean up!
View attachment 326772

All done...only another 100 or so to do:flushed:


View attachment 326773

That's it for now until I can sort some more pictures out!
 

Attachments

  • mud guards.jpg
    mud guards.jpg
    2 KB · Views: 0
  • fans.jpg
    fans.jpg
    3.2 KB · Views: 0
  • track sprue.jpg
    track sprue.jpg
    3.2 KB · Views: 0
  • snip track.jpg
    snip track.jpg
    3 KB · Views: 0
  • track pot.jpg
    track pot.jpg
    3 KB · Views: 0
Thread owner
Some track action next.
Each track requires x2 guide horns adding.
I Held a row of tracks down with some blue tac, then all I had to do was pick out a horn and drop it into place with a spot of glue. An hour saw 140 horns added...
View attachment 326776


Snipped of the remaining tracks ready for clean up tonight.
View attachment 326778


Moved on to the next step of assembly.... the casement. Before assembly you are required to drill out the correct position for various hull attachments. Being that the kit covers 4 versions, you need to pay attention to which holes go with which variant.
View attachment 326779


Then everything lined up and stuck together....
View attachment 326782View attachment 326783View attachment 326784View attachment 326785
again a nice fit of parts...
 

Attachments

  • b1.jpg
    b1.jpg
    3.5 KB · Views: 0
  • b2.jpg
    b2.jpg
    2.8 KB · Views: 0
  • b3.jpg
    b3.jpg
    2.7 KB · Views: 0
  • b4.jpg
    b4.jpg
    2.7 KB · Views: 0
  • b5.jpg
    b5.jpg
    3.6 KB · Views: 0
  • plaNS.jpg
    plaNS.jpg
    1.7 KB · Views: 0
  • IMG_1034(Edited).jpg
    IMG_1034(Edited).jpg
    3.5 KB · Views: 0
  • IMG_1033(Edited).jpg
    IMG_1033(Edited).jpg
    3.3 KB · Views: 0
  • IMG_1033(Edited).jpg
    IMG_1033(Edited).jpg
    3.3 KB · Views: 0
  • IMG_1030.jpg
    IMG_1030.jpg
    3.8 KB · Views: 0
Thread owner

Attachments

  • 1.jpg
    1.jpg
    3.1 KB · Views: 0
  • 2.jpg
    2.jpg
    3.3 KB · Views: 0
  • 3.jpg
    3.jpg
    3.3 KB · Views: 0
Thread owner

Attachments

  • inside.jpg
    inside.jpg
    3.5 KB · Views: 0
  • inside2.jpg
    inside2.jpg
    2.9 KB · Views: 0
  • insdie 3.jpg
    insdie 3.jpg
    3 KB · Views: 0
  • fin1.jpg
    fin1.jpg
    2 KB · Views: 0
Howdy Mr. Benson,

This is a fine looking build, but one thing worries me a little. Is this going to be a burnt out wreck??? In the photo of your workbench, on the right side, I noticed a gasoline canister. I think too much of Dzhon has rubbed off on you!!! Or was that for the lawnmower……….Hmmmm!!!

I will be following this as I too, love my Kittys. Which unit are you depicting in the build as I have never seen the cleaning rod tube mounted in front of the the rear intakes. On the late models it was mounted behind them in front of the exhaust pipes. Must have been a unit thing of the 654th in the Ruhr…

Prost
Allen
 
I’ll follow along too Si, Jagdpanther is one of my fav TD’s.
Nice clean build so far and brave man for tackling those tracks, looking forward to see the paint.:thumb2:

Oh and nice bench set-up over there with a great view.:smiling:
 
Si,
That is a cracking build the tracks look well worth the time and effort. Bring on the paint.
 
Hello mate. Glad you showed this one to the forum. Looks like a cracking kit. I wont give the game away with the wet stuff:thumb2::cool:
 
Hi Si
Poor you. Fancy having to work at that bench. Warm sunshine, a beautiful view, a cold one at the ready - life can be a toil!! :tongue-out3:

That looks a great kit in all respects. Meng do have a good reputation. Really neat construction so bring on the paint.
Jim
 
Thread owner
Howdy Mr. Benson,

This is a fine looking build, but one thing worries me a little. Is this going to be a burnt out wreck??? In the photo of your workbench, on the right side, I noticed a gasoline canister. I think too much of Dzhon has rubbed off on you!!! Or was that for the lawnmower……….Hmmmm!!!

I will be following this as I too, love my Kittys. Which unit are you depicting in the build as I have never seen the cleaning rod tube mounted in front of the the rear intakes. On the late models it was mounted behind them in front of the exhaust pipes. Must have been a unit thing of the 654th in the Ruhr…

Prost
Allen

Hi Allen,
Fear not mate, that picture was taken on the patio at my parents farm. Fuel was only for the garden strimmer, no Fire damage a la Mr Race :tongue-out2:

Fancy asking me a fancy question about which unit....I don’t bloomin know:smiling5:
I had to dig out the destructions just for you....it gave me four options to build, I choose the to build a tank from the 654th, battle of the Ruhr as you’ve said....10 points sir:nerd:

Hope you well mate:smiling4:
 
Thread owner
I’ll follow along too Si, Jagdpanther is one of my fav TD’s.
Nice clean build so far and brave man for tackling those tracks, looking forward to see the paint.:thumb2:

Oh and nice bench set-up over there with a great view.:smiling:

Got to admit to liking the old Jp’s...I got a tamiya one in the stash with several PE sets. Not sure it will be anywhere near as good as this kit! Paint is underway mate....pictures shortly :cool:

I was so lucky with my holiday. I left the wife and kids at home and just relaxed, built models, drank beer and ate some fantastic food....I do love Spain!
 
Thread owner
Hello mate. Glad you showed this one to the forum. Looks like a cracking kit. I wont give the game away with the wet stuff:thumb2::cool:

Hi Steve,
Well I had all the pictures so even though I finished the build last year I thought the forum might like to see as its a new kit as such.
 
Status
Not open for further replies.
Back
Top