Theme editor

Scale Model Shop

FV107 Scimitar Mk.II CVR(T) - 1/72 - Fore Hobby

vizenz

New member
Joined
Apr 19, 2024
Messages
426
Reaction score
4
Points
0
1/3
Thread owner
Hello,
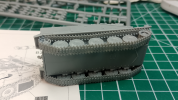
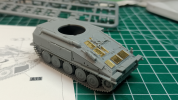
A few days ago I started gluing together the Scimitar Mk.2 from Fore Hobby (now Fore Art). I tried to build the tracks and wheels separately from the hull. However, the whole thing was too fiddly for me, so now everything is firmly glued together. This will definitely be “fun” to paint.
Best regards,
Andi
 

Attachments

  • Scimitar2 - 01.png
    Scimitar2 - 01.png
    37 KB · Views: 0
  • Scimitar2 - 03.png
    Scimitar2 - 03.png
    35.6 KB · Views: 0
  • Scimitar2 - 02.png
    Scimitar2 - 02.png
    35.6 KB · Views: 0
That is coming along very well.
And a belated welcome to the forum, spent many a night in Munster when based at Buller Kaserne.
 
I tried to build the tracks and wheels separately from the hull. However, the whole thing was too fiddly for me, so now everything is firmly glued together. This will definitely be “fun” to paint.
I don’t want to be painting wheels and tracks like that in 1:35 scale, never mind at half that scale … Good luck :)
 
Thread owner
That is coming along very well.
And a belated welcome to the forum, spent many a night in Munster when based at Buller Kaserne.
Thank you very much. I was also able to spend a few weeks of my life in Münster – not entirely voluntarily :smiling6:

I don’t want to be painting wheels and tracks like that in 1:35 scale, never mind at half that scale … Good luck :smiling3:
I'm with you with the wheels. Otherwise I have to say that I often find it very relaxing to paint small details - maybe a genetic defect in me? :tears-of-joy:
 
Thread owner
Hello,
I finally had time to build something further. The hull is now glued together. The only "upgrade" I made is to drill out the lights. The only mistake I discovered was that they forgot to mention a part in the assembly instructions (in the pictures it was simply installed at some point). However, I didn't measure or look for detail errors etc.

IMG_20240424_165352.jpg
IMG_20240424_165359.jpg

What I don't like is that the British maneuver system is attached to the model (I don't know the British name, in Germany it is AGDUS, in the US military it is MILES). In my opinion it would have made more sense to offer these parts as a choice and not to install them from the start. If you really want to remove it, you have to grind the cables from the hull and fill in the holes... It would also have been much easier to use the molds for other variants and, for example, to build the Afghanistan variant with additional armor.

IMG_20240424_165411.jpg
IMG_20240424_165417.jpg

All in all, the kit is pretty over-engineered. A huge amount of unnecessary small parts. Often so small that it is hardly possible to clean them up once they have been removed from the sprue. Without really good side cutters you would quickly be lost!
I'm already looking forward to the turret. When I look at the sprues and the parts left, it feels like it consists of a million parts...

IMG_20240424_165029.jpg
(My finger with two of the PE parts - that's not always fun!)

Best regards,
Andi
 
They're more like splinters than parts of a model :smiling:
 
PE at 1/72: you contemplate them when on the sprue, you dislike (and often search for) them while cutting, you hate those who engineered the kit when you try to glue them.:face-with-head-bandage:
But if everything goes according to your wishes and your fingers debond, then the result is superb.
Good job Andi.
 
Thread owner
Very nicely done very neat work.
Thank you very much. I just tried to glue together what the description tells me. Not comparable to your amazing detailing work!
They're more like splinters than parts of a model :smiling:
So true. Somehow the model gives the impression that it was actually designed for a larger scale.
Great work so far Andreas, it looks like a well detailed kit, for the size.
Personally, it would have been enough for me if the designer had combined some of the parts. But I also think that a really nice model will emerge from it in the end. It's just that it's already very difficult to even touch the thing, and I haven't even started painting it yet...
PE at 1/72: you contemplate them when on the sprue, you dislike (and often search for) them while cutting, you hate those who engineered the kit when you try to glue them.:face-with-head-bandage:
But if everything goes according to your wishes and your fingers debond, then the result is superb.
Good job Andi.
100% my opinion :thumb2: :smiling5:
Well done and in the small scale.
Thank you very much Mike.
 
Thread owner
After another hour, the first 25 parts of the turret are glued together. I estimate that it will come to around 60 parts in total. :thinking:

IMG_20240425_164901.jpg
IMG_20240425_164853.jpg
IMG_20240425_164847.jpg
 
Thread owner
Shouldn't model building be mostly fun? :thinking:
I finally had some time to glue a few parts on again. Unfortunately, this little "car" takes an incredible amount of time to glue together. The kit is really well constructed, but firstly the instructions are not always clear and also many of the parts are just so tiny (take a look at C1 & C2 for example) that it is difficult to remove them without losing them - and then they also need to be cleaned up somehow... I think I will need one more session and the turret could be finished.
I'm looking forward to painting. Hopefully I won't break off half of the fiddly pieces again. :smiling5:
IMG_20240503_122251.jpg

IMG_20240503_124425.jpg

I think once I've finished this one I'll be cured of wanting to build such new multi-media kits for a while. Back to the old stuff, 30 parts to a tank, built in two days! :tears-of-joy:
Best regards,
Andi
 
That almost looks like they designed it for 1:35 and then just scaled everything down ;) For those parts C1 and C2, I would cut the bit of sprue they’re on, off from the main sprue first — cut through where the 9 and the 10 are with snips, so you can get the actual parts down against your cutting mat. Then put a finger(nail) on top of the part itself to press it down, and carefully cut it off the sprue. Hopefully, that will stop it jumping away :)
 
Thread owner
Okay, I did it. The turret has even more details than the hull. I'm curious how I'm going to paint this without touching anything and breaking it off... :thinking:

IMG_20240522_141809.jpg

IMG_20240522_141825.jpg

IMG_20240522_141837.jpg

IMG_20240522_141847.jpg
 
Great job. Small scale and a kit with many very tiny, fiddly parts. Looks a neat and tidy build.
 
Great work on the build Andreas, looking forward to seeing paint thrown at this now.
 
Back
Top