Theme editor

Scale Model Shop

1/35 Tamiya Challenger 2 Desrtised

Bigfoot57

Well-known member
Joined
Jun 24, 2015
Messages
1,179
Reaction score
299
Points
83
Age
68
1/3
Thread owner
Click image for larger version  Name:	IMG_2256.jpg Views:	0 Size:	332.2 KB ID:	1241786 Click image for larger version  Name:	IMG_2256.jpg Views:	0 Size:	332.2 KB ID:	1241786 Click image for larger version  Name:	IMG_2256.jpg Views:	0 Size:	332.2 KB ID:	1241786


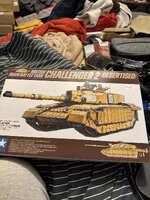
So here we go again with next build as the title says a Desert version of the Challenger 2 by Tamiya

The plastic is a sand colour and very good leaving minimal cleanup from the sprue the parts also appear to be keyed meaning they only fit one way and you shouldn’t be able to put them in the wrongc place

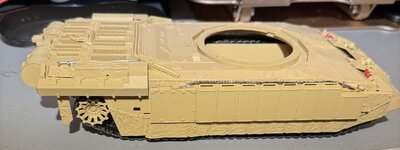
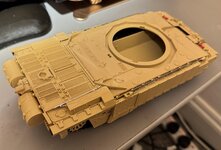
So 1st up the suspension and skirt arms are built then the wheels next will be finishing off the lower hull adding front and rear sections
 

Attachments

  • IMG_2212.jpg
    IMG_2212.jpg
    431.7 KB · Views: 0
Thread owner
Latest update now added the Idlers Sprockets and Road Wheels and cleaned them up also done the rear of the tank which includes the additional fuel barrels which unsurprisingly for Tamiya were very poorly fitting the lids did not fit the barrels properly and so required filler the rear of this tank is quite busy there are the fuel barrels there’s numerous hooks etc there’s the in-line telephone system along with the other coiled wire communication system as a first. I’ve never seen this before in a model of the tank they’ve supplied the wire to wrap around the communications holder normally just left blank and you have to wrap your own Cord Thread around them
IMG_2263.jpg IMG_2262.jpg IMG_2264.jpg IMG_2265.jpg
 
Thread owner
I thought I might as well put the instructions afterwards, just so you can see what was involved in building so far
 
I'm so tempted to build AFV's but missus Miko will give me one of her withering stares if I add more to the stash!!

Miko (unseen by missus Miko. . . hopefully!)
 
Thread owner
filedata/fetch?filedataid=244963
wAAACH5BAEKAAAALAAAAAABAAEAAAICRAEAOw==
filedata/fetch?filedataid=244960
wAAACH5BAEKAAAALAAAAAABAAEAAAICRAEAOw==
filedata/fetch?filedataid=244958
wAAACH5BAEKAAAALAAAAAABAAEAAAICRAEAOw==
IMG_2274.jpg IMG_2278.jpg
wAAACH5BAEKAAAALAAAAAABAAEAAAICRAEAOw==
​ So next come the tracks as you can see the first bit is over laid out on a piece of card with masking tape attaching them that so they can’t move then they were painted in gunmetal and then I went over the pads in a sort of rubber black colour next they are joined surprise these actually glued together and it was solid. That’s the first time I’ve ever had that happen? Normally I used to sew them together just to make sure but no not this time just used cement Tamiya Extra thin
so next will be attaching the side skirts and the additional armour
 
Last edited:
Thread owner
IMG_2285.jpg IMG_2284.jpg IMG_2283.jpg IMG_2281.jpg IMG_2280.jpg IMG_2279.jpg Next is well I’ve never seen this before Tamiya have supplied a thin sheet of plastic card with which you have to make the viewing ports and two panels that go onto the turret so you’re going to need a ruler and pencil or pen to measure out the template that has been supplied for both of these items why they’ve done this who knows because normally they supply clear plastic on the sprue for the viewing ports this time they have just a piece of white white plastic card so you’ve got to make your own
This raises another question are these ports left white as the colour of the card or do we paint them mine at the moment and left white? I may paint them a sort of purply black colour to represent the sort of infrared coating that they have on them
 
Thread owner
Click image for larger version  Name:	IMG_2292.jpg Views:	0 Size:	119.1 KB ID:	1242339 Click image for larger version  Name:	IMG_2292.jpg Views:	0 Size:	119.1 KB ID:	1242339 Click image for larger version  Name:	IMG_2292.jpg Views:	0 Size:	119.1 KB ID:	1242339 Click image for larger version  Name:	IMG_2292.jpg Views:	0 Size:	119.1 KB ID:	1242339 Right, we’re just about to finish the bottom section of hull this includes fitting the fire extinguishers, various towing hooks, Shackles and you need your ruler and pencil or pen again as you have to measure this time a piece of cord which becomes the towing cables which go down either side of the tank this incidentally is white so you need to paint it as well to make it easier and stop it unravelling when you cut it. I dipped mine into a clear matt varnish
Moving onto the turret itself starting with the recessed aerials so on this model we won’t be putting any 7 cm aerials up in the air because they’re there but they’re recessed
Next we join the top and bottom sections of the turret together along with the side pieces and back this is a very good fit it literally falls Click image for larger version  Name:	IMG_2292.jpg Views:	0 Size:	119.1 KB ID:	1242339 together as most of this model has done again. This is one of Tamiya‘s premier kits and if you want an impressive 1/35 scale model you can’t go far wrong on this one as this is a huge model when built I can quite well see why the Ukrainians were having problems with it sinking into the type of terrain that they have over there as in real life this is a 73 ton monster
 

Attachments

  • IMG_2287.jpg
    IMG_2287.jpg
    147.7 KB · Views: 0
  • IMG_2286.jpg
    IMG_2286.jpg
    225.9 KB · Views: 0
Last edited:
Thread owner
IMG_2305.jpg IMG_2300.jpg IMG_2304.jpg IMG_2302.jpg IMG_2301.jpg So apart from the wing mirrors to be fitted the bottom of the tank is finished it’s been painted and decaled and again I’ve had to use Microsol setting solution on the decals to enable them to sink down onto the contours of the hull speaking of decals, these are some of the best ones yet I’ve come across from Tamiya although the decal placement diagrams are next to useless they’ve also got something I think wrong if you’re doing version A of the schemes they say put decal 3 onto the hull of the tank these are the small chevrons and my opinion is wrong because the ones they tell you to put on the turret are too big for the turret so I swapped them around and I’ve put the 4 on the hull and 3 on the turret

The turret is also finished apart from one decal which needs to be placed on the ammo box on the back

So overall I will give this another 10 out of 10 as for the money you get a very impressive model which goes together really easy a lot of the pieces snap together and just need a little bit of glue just to hold them in place
A piece of trivia the turret of this tank is larger than the Comet tank from 1944

So the final entry into this sequence of models will be a Challenger 2 TES version this will be done in European NATO colours I believe TES stands for Threat Entry System from my understanding, it’s that little mini tower that stands on the right hand side of the turret
 
Last edited:
Thread owner
So the final entry into this sequence of models will be a Challenger 2 TES version this will be done in European NATO colours I believe TES stands for Threat Entry System from my understanding, it’s that little mini tower that stands on the right hand side of the turret
 
Back
Top