Theme editor

Scale Model Shop

1/72 Hasegawa RNZAF Bell UH-1H Iroquois

Status
Not open for further replies.

flyjoe180

SMF Supporters
Joined
Jan 18, 2012
Messages
13,275
Reaction score
1,073
Points
113
1/3
Thread owner
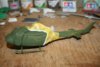
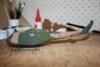
I started this one as an aside project in April last year. The intention was to model it on an RNZAF example from the 1980s in SEA camouflage as was the standard then. The Hasegawa UH-1H kit is not a good kit to build by today's standards. It lacks detail and some shape and has rivet rash. I have seen one built here before in Macedonian colours and was aware of the issues. I bought this one decades ago with some basic RNZAF markings. I have the Italeri version which is a much more modern and accurate kit, which I will build later on to represent the last scheme that the RNZAF Iroquois are wearing as they are retired. Any way this build so far:
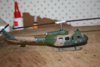
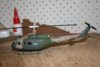
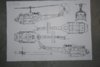
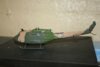
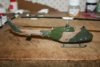
The objective:

View attachment 83883
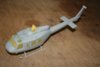
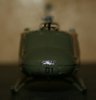

The kit:

View attachment 83884


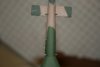
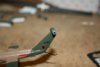
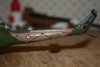
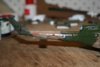
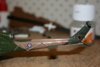
As I said this is a rather basic kit by modern standards with some issues, but overall it fits well and builds up into a reasonably clean airframe. One aspect which requires very careful planning is that the windows are fitted from the outside of the model. The top windows were painted with Humbrol clear green which I had used previously on the RAAF UH-1B model. Wire cutters and other aerials were not fitted to RNZAF Iroquois until the mid to late 1980s so I omitted them:

View attachment 83885


View attachment 83886


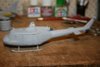
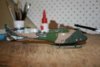
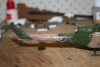
Primed and ready for paint (this was where I picked this up in 2014 as I struggled for motivation with the Sea Harrier):

View attachment 83887


View attachment 196906

View attachment 196907

View attachment 196908

View attachment 196909

View attachment 196910
 

Attachments

  • 1984.jpg
    1984.jpg
    2.3 KB · Views: 0
  • Origbox.jpg
    Origbox.jpg
    5.2 KB · Views: 0
  • IMG_1698.JPG
    IMG_1698.JPG
    1.7 KB · Views: 0
  • IMG_1743.JPG
    IMG_1743.JPG
    1.9 KB · Views: 0
  • IMG_2428.JPG
    IMG_2428.JPG
    2.4 KB · Views: 0
Thread owner
Then I moved on to the painting stage in between going crazy with the Sea Harrier.

The painting plan drawn over a 1/72 scale drawing. The SEA scheme has three colours, a tan (FS30219), a light green (FS34102), and a dark green (FS34079):

View attachment 83888


First I painted the tan in the relevant areas, then the tan was masked off and the light green was applied. Then the light green areas were masked on top of the tan already blanked off and the dark green applied. What you get is a maze of sausages and tape:

View attachment 83889


View attachment 83890


When all that was done and dried the masking was removed and I had a three colour SEA scheme as hoped for.

View attachment 196911

View attachment 196912

View attachment 196913
 

Attachments

  • IMG_2445.JPG
    IMG_2445.JPG
    1.8 KB · Views: 0
  • IMG_2448.JPG
    IMG_2448.JPG
    1.2 KB · Views: 0
  • IMG_2452.JPG
    IMG_2452.JPG
    2.6 KB · Views: 0
Thread owner
Then I had to think about some detailing. The RNZAF Iroquois carried a zig-zag HF aerial on both sides of the tail boom until the mid to late 1980s when they were modified with a straight aerial on the port side only. I had an idea and took a risk with a drill and some 15-Amp fuse wire.

View attachment 83891


It worked fine. I drilled straight through the boom sides and threaded the wire through and snipped it to length. In this scale this will give the wires plenty of surface to hang onto without fear of breakage as I would have had with plastic scratch built prongs. Then I painted them black and got on with the rest of the model.

I bought some relevant decals from a guy here in New Zealand going by the name of Oldmodels Decals. He prints specialist NZ subjects which is a very good service. However the digital decals were rather thick and some refused to adhere at all. Inthe end I used some of his decals with my own spares and for the RNZAF roundels used another NZ company, Ventura. The No.3 Squadron badges on the doors and the Maori symbol on the tail fin were all that I really needed from the Oldmodels decals anyway.

As you can see some of the decals were out of register. I had to paint them in as carefully as I could. This is definitely one down side of 1/72 scale.

View attachment 83892


View attachment 83893


View attachment 83894


View attachment 83895


View attachment 83896


View attachment 196914

View attachment 196915

View attachment 196916

View attachment 196917

View attachment 196918

View attachment 196919
 

Attachments

  • IMG_2475.JPG
    IMG_2475.JPG
    2.3 KB · Views: 0
  • IMG_2477.JPG
    IMG_2477.JPG
    2.4 KB · Views: 0
  • IMG_2467.JPG
    IMG_2467.JPG
    1.7 KB · Views: 0
  • IMG_2466.JPG
    IMG_2466.JPG
    1.6 KB · Views: 0
  • IMG_2464.JPG
    IMG_2464.JPG
    1.4 KB · Views: 0
  • IMG_2465.JPG
    IMG_2465.JPG
    1.3 KB · Views: 0
Thread owner
Aerial wires were next. The tail fin VHF aerial (5 Amp fuse wire):

View attachment 83897


The boom zig-zag HF aerials (10 Amp fuse wire):

View attachment 83898


View attachment 83899


Painted them in white:

View attachment 83900


View attachment 83901


I think this was a good solution to the problem. The fuse wire was easier to apply and handle and paint than some fishing line I intended to use initially.

So in the end I used 5-Amp wire for the tail fin aerial, 10-Amp wire for the HF aerials, and 15-Amp fuse wires for the prongs that hold them. Just as well we don't use fuse wire in the house any longer because there isn't much left.

And this is where we are at the end of play today:

View attachment 83902


Next up is a wash around those engine vents and nacelles, a flat varnish and then the application of some navigation lights. I hope you enjoyed this, apologies for the 'all at once' thread.

View attachment 196920

View attachment 196921

View attachment 196922

View attachment 196923

View attachment 196924

View attachment 196925
 

Attachments

  • IMG_2480.JPG
    IMG_2480.JPG
    2.1 KB · Views: 0
  • IMG_2479.JPG
    IMG_2479.JPG
    2.1 KB · Views: 0
  • IMG_2481.JPG
    IMG_2481.JPG
    2.3 KB · Views: 0
  • IMG_2484.JPG
    IMG_2484.JPG
    2.2 KB · Views: 0
  • IMG_2485.JPG
    IMG_2485.JPG
    2.4 KB · Views: 0
  • IMG_2487.JPG
    IMG_2487.JPG
    2.6 KB · Views: 0
Thread owner
Thanks you lot, I am actually enjoying this build very much, a nice change. More to come yet!
 
Thread owner

Attachments

  • IMG_2494.JPG
    IMG_2494.JPG
    2.4 KB · Views: 0
  • IMG_2496.JPG
    IMG_2496.JPG
    2.3 KB · Views: 0
A great build Joe on such a small scale I don't know you guys work at that scale I struggle with 1/32. Nice camo that matt coat has worked really well.
 
Status
Not open for further replies.
Back
Top