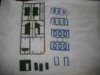
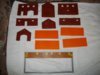
Spent a very pleasant day with this:
View attachment 89592
View attachment 89594
This is my entry for the building GB - obviously!
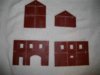
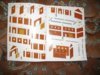
Overall I'm impressed with this kit, although it's not without its faults. Every wall section has a mould seam going all round the edges which has led to a few gaps:
View attachment 89593
View attachment 89595
These will be easy to fill so not a major problem.
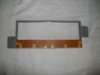
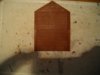
The other issue I have found is that the pieces for the base walls are all slightly warped:
View attachment 89596
Again, not a major problem. I've used the platform piece as a guide to get these corners square - once they've set I'll swap and do the other corners then I'll just need to tape the sides level when gluing them.
That's ALL the bad news. Everything else about this kit is excellent. Once the walls were cleaned up, everything fell into place nicely though you need to take care selecting the right parts.
All the doors and windows fit absolutely perfectly and will not require any filling or seam work whatsoever, and the seams on the roof parts may just disappear under the primer and paint - I may touch them up with putty though.
There are NO pin marks or sink holes on the outside and there is absolutely no flash anywhere.
So. I'll do what little filling is necessary tomorrow and start on the painting.
View attachment 202615
View attachment 202616
View attachment 202617
View attachment 202618
View attachment 202619
View attachment 89592
View attachment 89594
This is my entry for the building GB - obviously!
Overall I'm impressed with this kit, although it's not without its faults. Every wall section has a mould seam going all round the edges which has led to a few gaps:
View attachment 89593
View attachment 89595
These will be easy to fill so not a major problem.
The other issue I have found is that the pieces for the base walls are all slightly warped:
View attachment 89596
Again, not a major problem. I've used the platform piece as a guide to get these corners square - once they've set I'll swap and do the other corners then I'll just need to tape the sides level when gluing them.
That's ALL the bad news. Everything else about this kit is excellent. Once the walls were cleaned up, everything fell into place nicely though you need to take care selecting the right parts.
All the doors and windows fit absolutely perfectly and will not require any filling or seam work whatsoever, and the seams on the roof parts may just disappear under the primer and paint - I may touch them up with putty though.
There are NO pin marks or sink holes on the outside and there is absolutely no flash anywhere.
So. I'll do what little filling is necessary tomorrow and start on the painting.
View attachment 202615
View attachment 202616
View attachment 202617
View attachment 202618
View attachment 202619
") looks a very interesting little building!
looks a very interesting little building!")