hi there ...preparing to build the revell h-22 1/48 ... there r 3 figures for the aircrew and the colour denoted for their clothing on the plans is "blue grey". Is this the same as the RLM76 ....which is the light blue grey to be used for the undersurfaces ....tx Lindsey

You are using an out of date browser. It may not display this or other websites correctly.
You should upgrade or use an alternative browser.
You should upgrade or use an alternative browser.
heinkel he111 h-22 ...aircrew
- Thread starter saguy
- Start date
- Status
- Not open for further replies.
It's more of a light grey with a hint of blue that you are after. RLM 76 is too blue.
Are they wearing a flight suit or a jacket and baggy looking trousers? I'm guessing the former but you never know with model kits.
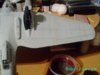
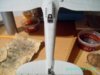
Here's a 1942 suit,looking a bit sorry for itself but the colour is only a bit faded.
Will yours be carrying a V1?
Cheers
Steve
Are they wearing a flight suit or a jacket and baggy looking trousers? I'm guessing the former but you never know with model kits.
Here's a 1942 suit,looking a bit sorry for itself but the colour is only a bit faded.
Will yours be carrying a V1?
Cheers
Steve
tx steve --- yes the kit does have a V1 although i am a little undecided on whether to fit it or not.
A further question on the flying suits - i have seen suits which are khaki / brownish in colour ... the pic on the side of the box shows one of the crew member's wearing this colour suit. Where does that colour fit in?
tx
lindsey
A further question on the flying suits - i have seen suits which are khaki / brownish in colour ... the pic on the side of the box shows one of the crew member's wearing this colour suit. Where does that colour fit in?
tx
lindsey
Hi Lindsey,that sounds like the "Kombination Sommer" which was a light weight one piece suit introduced (going by its stores number) in 1934. As the name suggests it was for warm weather use. It was discontinued in 1941 but some may well have survived until later. BoB era bomber crews are usually seen wearing this outfit.
Cheers
Steve
Cheers
Steve
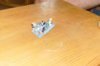
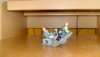
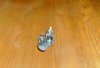
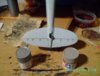
the cockpit with crew ...
righto started my heinkel he111 a few days ago with the initial painting work of the smaller bits and pieces ... here is the cockpit completed with the pilot and the bombardier ..the figure termed "officer" in the plans is also completed but considering that he is standing with a briefcase in his hand I am not quite sure where he fits into the scheme of things .....all in all a good start i think .....
View attachment 37457
View attachment 37458
View attachment 37459
View attachment 37460
View attachment 150483
View attachment 150484
View attachment 150485
View attachment 150486
Attachments

G
Guest
Guest
I suspect the guy standing with a briefcase is intended to add to a diorama setting and so could be considered as ground crew.
As for your figures, one thing I'd like to suggest is that you tone down the glossy appearrance with a thin coat of matt clear. This will stop the figures from looking so shiny and make them considerably more realistic.
As for your figures, one thing I'd like to suggest is that you tone down the glossy appearrance with a thin coat of matt clear. This will stop the figures from looking so shiny and make them considerably more realistic.
Yes it will. They look good and Richard's suggestion will make them look even better.\ said:tx Richard ... your point is well taken ... the figures are painted with both acrylic and a enamel paints .... will any matt clear do the job ...
Cheers
Steve
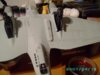
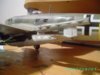
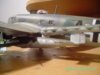
Right - will post some pics later but i am actually at work but need some help with my heinkel. I worked on the panel lines last nite on the underside of the aircraft ....i use burnt umber acrylic (life colour) and thin it quite a bit .. I run the paint brush down the panel lines and then wipe off the excess with a soft cloth .... it seems to be the right thing to do but when look at other models their panel lines are almost "perfectly" defined compared to mine (smudged a bit, thicker etc) ... any hints / tips / suggestions to help me get better at this technique.
tx a ton Lindsey
tx a ton Lindsey
pics of the panel lines .....comments, suggestions welcome .....tx
View attachment 38380
View attachment 38381
View attachment 38382
View attachment 38383
View attachment 38384
View attachment 151406
View attachment 151407
View attachment 151408
View attachment 151409
View attachment 151410
View attachment 38380
View attachment 38381
View attachment 38382
View attachment 38383
View attachment 38384
View attachment 151406
View attachment 151407
View attachment 151408
View attachment 151409
View attachment 151410
Attachments

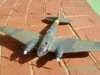
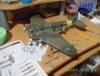
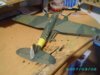
started the splinter camouflage ...just some progress pics .... Lindsey ......
View attachment 38964
View attachment 38965
View attachment 38966
View attachment 38967
View attachment 38968
View attachment 38969
View attachment 151990
View attachment 151991
View attachment 151992
View attachment 151993
View attachment 151994
View attachment 151995
View attachment 38964
View attachment 38965
View attachment 38966
View attachment 38967
View attachment 38968
View attachment 38969
View attachment 151990
View attachment 151991
View attachment 151992
View attachment 151993
View attachment 151994
View attachment 151995
Attachments
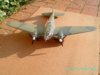
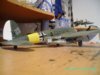
Tx Steve ... managed to finish the camouflage yesterday and some weathering and I must say I am rather pleased with the results .... The scheme now calls for light blue blotches / mottle to be spread over the upper surfaces but I am not so sure that i have the heart to do it as the splinter camo scheme looks just right to me. Just out of interest - i am building this out of the box (as per normal for me) and will obviously use the decals provided ... are the Works Numbers supplied with the decals accurate (werksnummer 3107)?? Having been on this site for a bit now I am now more curious about the history/"career" of the aircraft that I building. Tx Lindsey
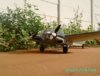
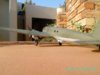
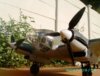
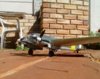
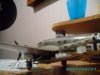
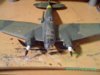
some progress pics as I go along (lovely spring day as u can see!!) ...splinter camo done, decals next ... also busy with the V1 flying bomb .... pretty sure that ther light blue blotches wil be left off this aircraft ... think the camo job looks ok ... tx 4 looking .....rgds Lindsey
View attachment 39072
View attachment 39073
View attachment 39074
View attachment 39075
View attachment 152098
View attachment 152099
View attachment 152100
View attachment 152101
View attachment 39072
View attachment 39073
View attachment 39074
View attachment 39075
View attachment 152098
View attachment 152099
View attachment 152100
View attachment 152101
Attachments
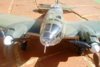

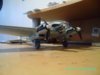
V1 bomb painted, decalled and fitted ... fitting the decals onto the aircraft .......
View attachment 39308
View attachment 39309
View attachment 39310
View attachment 39311
View attachment 39312
View attachment 39313
View attachment 152334
View attachment 152335
View attachment 152336
View attachment 152337
View attachment 152338
View attachment 152339
View attachment 39308
View attachment 39309
View attachment 39310
View attachment 39311
View attachment 39312
View attachment 39313
View attachment 152334
View attachment 152335
View attachment 152336
View attachment 152337
View attachment 152338
View attachment 152339
Attachments
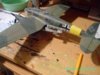
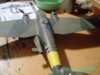
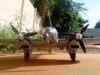
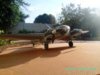
vi bomb painted, weathered, decals fiitted and positioned under the starboard wing ... now fitting the decals on the aircraft .. the luftwaffe certainly liked having their aircraft well marked that is for sure :smile:.. just some pics as i go along ...lindsey
View attachment 39417
View attachment 39418
View attachment 39419
View attachment 39420
View attachment 39421
View attachment 39422
View attachment 152443
View attachment 152444
View attachment 152445
View attachment 152446
View attachment 152447
View attachment 152448
View attachment 39417
View attachment 39418
View attachment 39419
View attachment 39420
View attachment 39421
View attachment 39422
View attachment 152443
View attachment 152444
View attachment 152445
View attachment 152446
View attachment 152447
View attachment 152448
Attachments


- Status
- Not open for further replies.
Legal Notice
scalemodelling.co.uk is a privately operated online discussion forum. All content posted by members reflects their own views and opinions and does not necessarily represent those of the forum owners or administrators. While reasonable efforts are made to moderate content, no responsibility is accepted for user-generated material. By using this site, you agree to comply with UK law and the forum rules.
Currently on our website
Threads
37,406
Messages
707,863
Members
2,652
Latest member
Waffenträger Auf E-100