Theme editor

Scale Model Shop

King Tiger

Status
Not open for further replies.

Razzie43

New member
Joined
Oct 12, 2015
Messages
397
Reaction score
0
Points
0
1/3
Thread owner
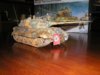
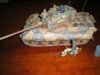
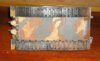
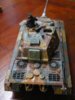
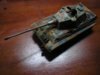
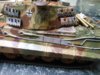
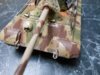
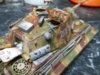
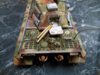
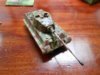
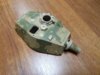
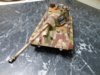
King tiger from Tamiya scale like always 1/35


I build this one in the year Sept.2010 with a brush(the air was later)


First photo's are from 2010....later i repaint the tank with my airbrush in the year October 2012


inside was a date in the hull from 1993,kit is from 2002(replace new parts)


View attachment 237982


Part I


View attachment 237983


View attachment 237984

View attachment 237985

View attachment 237986

View attachment 237987

View attachment 237988

View attachment 237989

View attachment 237990


Attachments

  • 132174-10911_zpsiqelh6a8.jpg
    132174-10911_zpsiqelh6a8.jpg
    3.4 KB · Views: 0
  • 44_zpsw2vvoakw.jpg
    44_zpsw2vvoakw.jpg
    5.6 KB · Views: 0
  • 40_zpswzrfy7hm.jpg
    40_zpswzrfy7hm.jpg
    5.6 KB · Views: 0
  • 39a_zpsgbkrlpqe.jpg
    39a_zpsgbkrlpqe.jpg
    5.3 KB · Views: 0
  • PA201243_zps3ahgkgfd.jpg
    PA201243_zps3ahgkgfd.jpg
    5.9 KB · Views: 0
  • PA201241_zpsw9xmm29d.jpg
    PA201241_zpsw9xmm29d.jpg
    5.4 KB · Views: 0
  • 5_zpsgtteecql.jpg
    5_zpsgtteecql.jpg
    5.4 KB · Views: 0
  • 4_zps3uy1iajr.jpg
    4_zps3uy1iajr.jpg
    5.7 KB · Views: 0
  • P9131041_zps7xg2wtjn.jpg
    P9131041_zps7xg2wtjn.jpg
    5.5 KB · Views: 0
Thread owner
PART II


with a sandpaper and some knife's i remove the tools and the paint to start all over again.


The problem was here also that you can see that i was using hairspray technique for the first time.


It was still wet and then you become those splitting paint on the tank.


View attachment 237991


View attachment 237992

View attachment 237993


View attachment 237994


View attachment 237995

View attachment 237996


View attachment 237997

View attachment 237998


View attachment 237999

View attachment 238000


Attachments

  • DSCN2428_zpsvgbcgniy.jpg
    DSCN2428_zpsvgbcgniy.jpg
    6.4 KB · Views: 0
  • DSCN2427_zpspby85hd7.jpg
    DSCN2427_zpspby85hd7.jpg
    6.2 KB · Views: 0
  • DSCN2425_zpsa0utaztg.jpg
    DSCN2425_zpsa0utaztg.jpg
    6.6 KB · Views: 0
  • DSCN2424_zpsgwh6hrts.jpg
    DSCN2424_zpsgwh6hrts.jpg
    6.2 KB · Views: 0
  • DSCN2412_zpsja5qbnqm.jpg
    DSCN2412_zpsja5qbnqm.jpg
    5.8 KB · Views: 0
  • DSCN2404_zpsml7eafnh.jpg
    DSCN2404_zpsml7eafnh.jpg
    5.6 KB · Views: 0
  • DSCN2403_zpsmfluvvdg.jpg
    DSCN2403_zpsmfluvvdg.jpg
    5.4 KB · Views: 0
  • DSCN2397_zpsxomtzg8u.jpg
    DSCN2397_zpsxomtzg8u.jpg
    5.7 KB · Views: 0
  • DSCN2392_zps5epn6jco.jpg
    DSCN2392_zps5epn6jco.jpg
    5.6 KB · Views: 0
  • DSCN2436_zpsatavozqf.jpg
    DSCN2436_zpsatavozqf.jpg
    6.1 KB · Views: 0
Wow! The first version is good...but the second one is terrific!!!


Great work ;) I really like it!


Cheers


Polux
 
The first version you built looks like oob and to me a little too clean but all the same fantastic and awesome as Polux described. Now you have gone back to it it looks very realistic and worn, more detail with less if that makes sense. I like the hairspray tech and I also like the streaking you have done on the frontal/ side armour. Truly awesome.


A great build on both times


It's builders like you I wish I could reproduce the same tech ( but I still fall short


Regards


Robert
 
It takes courage to strip a model back and start again. Most of us would simply buy another!


The first attempt was superb, particularly as it was done with a brush but the second one is a cracker. Thanks for sharing the pictures.
 
Thread owner
Thx Robert,Dave,Richard.....


I spend the full price on this kit into the store and i was not happy with the results.


But to buy 2x Tigers II !?! ,my wife kills me :oops::oops:
 
what a great job the 1st was,the camo looked great,and to be done by brush as well,very well done,


the second is more my style of work,and how I see things,and I did discover,that method as well of


painting over the wet hairspray,by mistake but real liked the effect you get,great job with the camo


and weathering and wear and trier on her job well done,thks for showing us, :D
 
Thread owner
I'm glad you like it all my types (even with a brush)


Thanks Peter,Steve,Ian,Monica,Scott!!
 
Cracking stuff! Really love the attention to detail in the wear and tear - this, imho, makes or breaks a build!!
 
Status
Not open for further replies.
Back
Top