John kindly sent me two tubs of MIG MUD and asked that I post a review of the results, this is a report on my findings........
I was sent one one of each - European Dry Mud (Rough texture) and Sub Sahara Wet Mud (Fine texture)
This review is of the Sub Sahara....The European I will use on a vignette and post when finished, but obviously it's the same product, but different colour and texture.
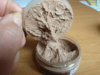
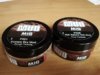
So what do you get in the 70mm x 35mm plastic tub?
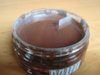
75ml of mud. One screw on lid, that hides a tight, push fit insert with a nice little pull tab to pull the thing out with...this keeps the mud fresh for future use.
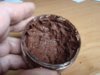
The actual mud is a resin based mastic type substance. There are no instructions on the tub, other than suggesting you go on the MIG website for more info - I did this but could only find pictures! So, right or wrong, I gave the mud a bit of a stir.
Application.
The use of rubber gloves is recommended in the product pictures. I didn't bother and what little that ended up on my fingers was soon removed with warm water.
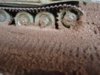
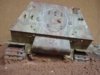
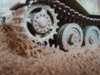
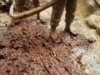
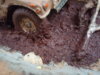
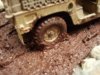
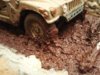
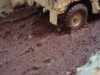
Using an old paint brush, I applied the mud to my sealed base. No need to colour the base prior to applying the mud, it more than covers anything! Once spread, I worked it into the shape I wanted. For the finer detail I used a cocktail stick dipped in water - this stops the mud clinging to the stick....Although it goes on semi runny, it can be built up quite high particularily around the tyres and doesn't collapse into a wet lump, but holds it's detail really well.
I experimented with it and made all sorts of tracks, thick , thin, deep, trying to get it to misbehave, but it kept it's shape throughout.
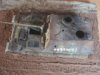
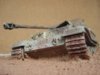
When first applied it looked far too shiny, but as it dried it dulled down.....
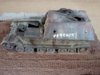
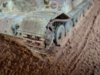
At first, due to lack of instructions, I was concerned about the drying time, but as it turned out it took 3 hours to set, so no need to hurry. Although I did notice it took considerably longer where I stacked it up. Once dried it is rock hard.
Coverage.
Obviously this depends what sort of diorama - thick or thin mud - I used roughly half the tub on an area 25cm x 10cm creating varying thicknesses.
Conclusion.
It holds whatever shape you throw at it, and with a small brush or cocktail stick quite intricate shapes and detail can be achieved, also it has more than enough working time. The push in insert should ensure the mud has a good shelf life once opened.
An excellent product from MIG.
The pictures show the two colours - the light colour is the European and the dark is the Sub Sahara - the tub insert - then the mud is when first applied and the last shots show the mud fully cured - sorry for the slightly blurred last shots.
Thanks again to John for entrusting me with a review.
Ron
View attachment 61289
View attachment 61290
View attachment 61291
View attachment 61292
View attachment 61293
View attachment 61294
View attachment 61295
View attachment 61296
View attachment 61297
View attachment 61298
View attachment 174315
View attachment 174316
View attachment 174317
View attachment 174318
View attachment 174319
View attachment 174320
View attachment 174321
View attachment 174322
View attachment 174323
View attachment 174324
I was sent one one of each - European Dry Mud (Rough texture) and Sub Sahara Wet Mud (Fine texture)
This review is of the Sub Sahara....The European I will use on a vignette and post when finished, but obviously it's the same product, but different colour and texture.
So what do you get in the 70mm x 35mm plastic tub?
75ml of mud. One screw on lid, that hides a tight, push fit insert with a nice little pull tab to pull the thing out with...this keeps the mud fresh for future use.
The actual mud is a resin based mastic type substance. There are no instructions on the tub, other than suggesting you go on the MIG website for more info - I did this but could only find pictures! So, right or wrong, I gave the mud a bit of a stir.
Application.
The use of rubber gloves is recommended in the product pictures. I didn't bother and what little that ended up on my fingers was soon removed with warm water.
Using an old paint brush, I applied the mud to my sealed base. No need to colour the base prior to applying the mud, it more than covers anything! Once spread, I worked it into the shape I wanted. For the finer detail I used a cocktail stick dipped in water - this stops the mud clinging to the stick....Although it goes on semi runny, it can be built up quite high particularily around the tyres and doesn't collapse into a wet lump, but holds it's detail really well.
I experimented with it and made all sorts of tracks, thick , thin, deep, trying to get it to misbehave, but it kept it's shape throughout.
When first applied it looked far too shiny, but as it dried it dulled down.....
At first, due to lack of instructions, I was concerned about the drying time, but as it turned out it took 3 hours to set, so no need to hurry. Although I did notice it took considerably longer where I stacked it up. Once dried it is rock hard.
Coverage.
Obviously this depends what sort of diorama - thick or thin mud - I used roughly half the tub on an area 25cm x 10cm creating varying thicknesses.
Conclusion.
It holds whatever shape you throw at it, and with a small brush or cocktail stick quite intricate shapes and detail can be achieved, also it has more than enough working time. The push in insert should ensure the mud has a good shelf life once opened.
An excellent product from MIG.
The pictures show the two colours - the light colour is the European and the dark is the Sub Sahara - the tub insert - then the mud is when first applied and the last shots show the mud fully cured - sorry for the slightly blurred last shots.
Thanks again to John for entrusting me with a review.
Ron
View attachment 61289
View attachment 61290
View attachment 61291
View attachment 61292
View attachment 61293
View attachment 61294
View attachment 61295
View attachment 61296
View attachment 61297
View attachment 61298
View attachment 174315
View attachment 174316
View attachment 174317
View attachment 174318
View attachment 174319
View attachment 174320
View attachment 174321
View attachment 174322
View attachment 174323
View attachment 174324
Attachments
-
 mig review 004.jpg3.4 KB · Views: 10
 -
 mig review 016.jpg3.1 KB · Views: 13
 -
 mig review 006.jpg3.4 KB · Views: 12
 -
 mig review 007.jpg3.3 KB · Views: 11
 -
 mig review 011.jpg2.7 KB · Views: 9
 -
 mig review 008.jpg2.3 KB · Views: 9
 -
 mig review 012.jpg2.7 KB · Views: 10
 -
 mig review 013.jpg2.5 KB · Views: 11
 -
 mig review 014.jpg2.5 KB · Views: 12
 -
 mig review 015.jpg2.8 KB · Views: 11