
Back in 2010, I did a large diorama of Iwo Jima. This proved too big to keep, so I kept the plastic bits and binned the base. I recently found the tank that was on the original, lost and forgotten in a box, so as it was raining, I decided yesterday to make a small 1/35 dio. resurrecting the tank.
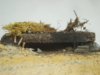
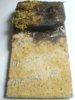
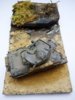
I had in my minds' eye a Japanese concrete bunker that had been attacked with a flame thrower and then had a satchel charge thrown in to it. The vegetation has caught fire and the bunker scorched with the heat from the flame thrower.
Lately, I've had enough of seeing media pictures of dead bodies lying around, so for this model, I didn't include any dead or 'alive' people......The build is made up of bits and bobs, plus some sand from a bag in the shed.
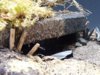
Here is the destroyed, scorched bunker.
View attachment 251995
View attachment 251996
View attachment 251997
View attachment 251998
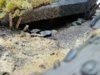
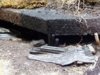
...and tank tracks added whilst the sand was still wet.
View attachment 251999
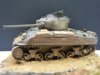
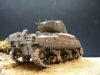
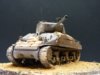
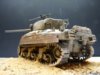
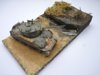
The tank was a bit battered with bits missing and knocked off, so I've re-vamped it, added bits and re-painted and weathered it too. It is olive drab under all the s**t!
I had great fun slinging sand at the running gear (PVA'd first) The boards look as though they are sitting on the tracks, but they are actually outboard of them. The sandbags are home made.
Anyway, here is the finished Sherman. I know nothing about this type of tank, so if any 'experts' spot 'owt wrong don't blame me, I just have fun sticking things together!
View attachment 252000
View attachment 252001
View attachment 252002
View attachment 252003
View attachment 252004
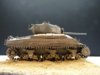
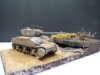
Here is the finished model. Just a nice size to fit on a shelf in my den.
View attachment 252006
View attachment 252008
View attachment 252009
I hope you approve of this 'quicky', shelf size resurrection.
Thanks for looking.
Ron
I had in my minds' eye a Japanese concrete bunker that had been attacked with a flame thrower and then had a satchel charge thrown in to it. The vegetation has caught fire and the bunker scorched with the heat from the flame thrower.
Lately, I've had enough of seeing media pictures of dead bodies lying around, so for this model, I didn't include any dead or 'alive' people......The build is made up of bits and bobs, plus some sand from a bag in the shed.
Here is the destroyed, scorched bunker.
View attachment 251995
View attachment 251996
View attachment 251997
View attachment 251998
...and tank tracks added whilst the sand was still wet.
View attachment 251999
The tank was a bit battered with bits missing and knocked off, so I've re-vamped it, added bits and re-painted and weathered it too. It is olive drab under all the s**t!
I had great fun slinging sand at the running gear (PVA'd first) The boards look as though they are sitting on the tracks, but they are actually outboard of them. The sandbags are home made.
Anyway, here is the finished Sherman. I know nothing about this type of tank, so if any 'experts' spot 'owt wrong don't blame me, I just have fun sticking things together!
View attachment 252000
View attachment 252001
View attachment 252002
View attachment 252003
View attachment 252004
Here is the finished model. Just a nice size to fit on a shelf in my den.
View attachment 252006
View attachment 252008
View attachment 252009
I hope you approve of this 'quicky', shelf size resurrection.
Thanks for looking.
Ron
Attachments
-
 odds and sods 2 124.jpg2.2 KB · Views: 0
 -
 odds and sods 2 119.jpg3.4 KB · Views: 0
 -
 odds and sods 2 117.jpg3 KB · Views: 0
 -
 odds and sods 2 118.jpg3.3 KB · Views: 0
 -
 odds and sods 2 123.jpg2.7 KB · Views: 0
 -
 odds and sods 2 106.jpg2.7 KB · Views: 0
 -
 odds and sods 2 112.jpg2.5 KB · Views: 0
 -
 odds and sods 2 111.jpg2.3 KB · Views: 0
 -
 odds and sods 2 107.jpg2.4 KB · Views: 0
 -
 odds and sods 2 113.jpg2.7 KB · Views: 0
 -
 odds and sods 2 110.jpg2.3 KB · Views: 0
 -
 odds and sods 2 116.jpg2.8 KB · Views: 0
 -
 odds and sods 2 121.jpg2.4 KB · Views: 0
")
")
