Theme editor

Scale Model Shop

Porsche RSR 1:24 'Jagermeister' (Revell)

mrtintheweb

New member
Joined
May 16, 2020
Messages
292
Reaction score
0
Points
0
1/3
Thread owner
So...............
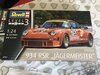
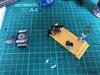
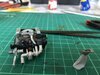
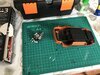
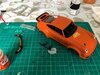
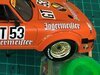
Having got fed up doing my PAK40 I took a break and after a week dove into this. I was inspired to get going on it having seen the total amazement of kpnuts' 1:12 Porsche kit (link below).
https://www.scale-models.co.uk/threads/tamiya-1-12-porsche-934.35530/page-3
I know my skillset will not come close to that but so far the kit has impressed me with its quality of moulds.

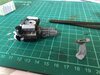
Actually about a 3rd into it but not been on the forum for a bit due to finally coming out of furlough and other stuff.

T
 

Attachments

  • IMG_5719.JPG
    IMG_5719.JPG
    3.5 KB · Views: 0
  • IMG_5720.JPG
    IMG_5720.JPG
    4.3 KB · Views: 0
  • IMG_5722.JPG
    IMG_5722.JPG
    4.6 KB · Views: 0
Thread owner
Progress to last Friday looks like this.......
Used a grey primer under the orange but I think with hindsight a white primer would have been a better choice. You live and learn.
Engine came out better than expected. Looks better than the pics in the real world I feel.
T
 

Attachments

  • IMG_5718.JPG
    IMG_5718.JPG
    3.8 KB · Views: 0
  • IMG_5739.JPG
    IMG_5739.JPG
    3.9 KB · Views: 0
  • IMG_5906.JPG
    IMG_5906.JPG
    4 KB · Views: 0
  • IMG_5907.JPG
    IMG_5907.JPG
    3.8 KB · Views: 0
  • IMG_5908.JPG
    IMG_5908.JPG
    3.7 KB · Views: 0
  • IMG_6272.JPG
    IMG_6272.JPG
    2.1 KB · Views: 0
Thread owner
This is the base coat of the body and chassis.

For anybody else doing one of these go ahead and cut out the hole in the bonnet before paint, though in the manual I missed this action so had to respray the bonnet again later.

T
 

Attachments

  • IMG_6269.JPG
    IMG_6269.JPG
    4.2 KB · Views: 0
  • IMG_6270.JPG
    IMG_6270.JPG
    4 KB · Views: 0
Superb work, thing you have to remember is you're working at half the scale I am I couldn't dream of doing this at this scale.
 
Thread owner
Engine done and added to the sub frame. The decal for the engine belt was a tough one to fit right as even a qtr mm out looked wrong but set it right (enough) in the end.
Under the front bonnet nearly done here. Didn't want to by the exact paint for the fuel tank so used some left overs from my WW2 Willy's jeep (desert sand). Looks close enough.
T
 

Attachments

  • IMG_E6279.JPG
    IMG_E6279.JPG
    3.4 KB · Views: 0
  • IMG_6276.JPG
    IMG_6276.JPG
    4.2 KB · Views: 0
  • IMG_6275.JPG
    IMG_6275.JPG
    4.1 KB · Views: 0
Thread owner
Front and rear areas that will get covered up and lost to history are done.
T
 

Attachments

  • IMG_E6279.JPG
    IMG_E6279.JPG
    3.4 KB · Views: 0
  • IMG_6289.JPG
    IMG_6289.JPG
    4.2 KB · Views: 0
Thread owner
Interior now finished.
Thanks to whomever it was that suggested I use a fine-liner pen to add detail to the seats in another thread (which I now can't find).
The dash I realised I missed the chrome part on the dash but was able to fit it after I installed it into the bodywork.
Next is to marry up the body, interior cage and lower chassis.

T
 

Attachments

  • IMG_6299.JPG
    IMG_6299.JPG
    3.7 KB · Views: 0
  • IMG_6300.JPG
    IMG_6300.JPG
    3.8 KB · Views: 0
Nice work! As a 1/24 kit, it's got more than average details in my opinion and you nailed them. I have a 1/12 kit of this car, not started yet. Looking at your work makes me wanna jump into it,
 
Thread owner
Thanks. Deffo the most detailed kit I’ve worked on, though most of my other builds were 32’s and 35’s.
 
Thread owner
Nearly done. I got overzealous with the black paint on the underside of the rear spoiler but think I may not bother with a fix as it will be out of view when down.
With the wheels on and glass going in I don't have much left to do beyond the decals, wipers, wing mirrors and some tidying up.
Been an enjoyable build for sure. Might do another Revell 1:24 kit soon. Well fitting, excellent instructions and despite a couple of Darwin award self-nominations (like putting the front 3/4 door windows in the wrong side and VERY nearly putting the rear wheels on the front) it's gone well.

T
 

Attachments

  • IMG_6312.jpg
    IMG_6312.jpg
    3.4 KB · Views: 0
  • IMG_6315.jpg
    IMG_6315.jpg
    3.5 KB · Views: 0
  • IMG_6318.jpg
    IMG_6318.jpg
    3.6 KB · Views: 0
  • IMG_6320.jpg
    IMG_6320.jpg
    3.6 KB · Views: 0
Thread owner
Nearly there. Took some time away as I have been back at work trying to make a business stay afloat. But having been 95% there finally found some time to finish off. A few here then moving to completed.
The decals are always my worst thing to do. This had some horrid little F'ers that lineate the wheel arch add ons and bolts. Trying to fit them exactly as per the diagram was a nightmare. Didn't help they didn't seem to match the correct length. The rear ones had to be cut in half and put on in two bits that meet in the middle. The join is thankfully near invisible. Fronts were easier. Also didn't help I have lost my decal softener and didn't want to get more just for this as I know I have some somewhere! But that was only really needed for the Jager logo above the rear wheel arches. I just used patience to fit them.
Question...... Will the softener still be a good option even if these decals sit in place for a while?
Toby
 

Attachments

  • IMG_6463.JPG
    IMG_6463.JPG
    3.5 KB · Views: 0
  • IMG_6464.JPG
    IMG_6464.JPG
    3.7 KB · Views: 0
  • IMG_6465.JPG
    IMG_6465.JPG
    3.9 KB · Views: 0
  • IMG_6466.JPG
    IMG_6466.JPG
    3.9 KB · Views: 0
  • IMG_6467.JPG
    IMG_6467.JPG
    4.5 KB · Views: 0
Back
Top