Theme editor

Scale Model Shop

RP models 1/10th Douglas Bader & Spitfire Cockpit

Status
Not open for further replies.

Steve Brodie

New member
Joined
Sep 17, 2014
Messages
4,652
Reaction score
0
Points
0
1/3
Thread owner
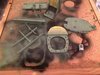
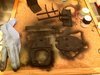
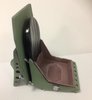
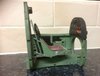
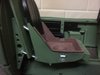
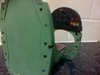
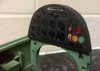
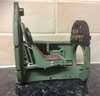
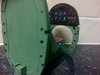
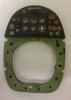
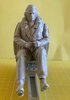
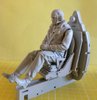
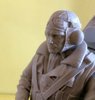
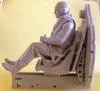
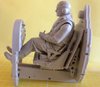
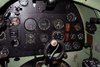
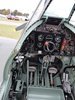
Next up for me is the 1/10th model of Douglas Bader sitting in a spitfire cockpit, released as a limited edition run by RP Models, I wont go into the full details as their is a lot of fantastic resin,but suffice to say even in dry fit without any trimming/ sanding it goes together like a dream, only small fit issue i have noticed is the googles, not matching up to the straps, but once sanded and cleaned the resin inside the googles may be a perfect fit, few photos of how it looks, its a chunky and not a light piece of resin.
I will build the cockpit first then the great man himself.

View attachment 323978

View attachment 323978View attachment 323979View attachment 323980View attachment 323981View attachment 323982View attachment 323983View attachment 323984View attachment 323985View attachment 323986
 

Attachments

  • 08FB23F0-3B22-4467-87A3-6AD0B9EC6DD4.jpeg
    08FB23F0-3B22-4467-87A3-6AD0B9EC6DD4.jpeg
    6.5 KB · Views: 0
  • FACBAE71-AED1-461E-B490-78F5DD434A60.jpeg
    FACBAE71-AED1-461E-B490-78F5DD434A60.jpeg
    2.7 KB · Views: 0
  • E48CD60B-50C7-4E86-85D4-821D2846EA0F.jpeg
    E48CD60B-50C7-4E86-85D4-821D2846EA0F.jpeg
    6.2 KB · Views: 0
  • 07D5414F-838D-4668-BE42-C296BC4A3737.jpeg
    07D5414F-838D-4668-BE42-C296BC4A3737.jpeg
    6.7 KB · Views: 0
  • B3F998B5-AA0C-46DA-995E-4E01A3E1C7B3.jpeg
    B3F998B5-AA0C-46DA-995E-4E01A3E1C7B3.jpeg
    5.8 KB · Views: 0
  • C5212C2F-3187-40F2-8BD1-FEF95B01F4E4.jpeg
    C5212C2F-3187-40F2-8BD1-FEF95B01F4E4.jpeg
    7.1 KB · Views: 0
  • 166C7002-EE77-4A60-AF8B-EBF28E871059.jpeg
    166C7002-EE77-4A60-AF8B-EBF28E871059.jpeg
    6.4 KB · Views: 0
  • E4605CE0-364C-49FA-8657-E61784EB49C2.jpeg
    E4605CE0-364C-49FA-8657-E61784EB49C2.jpeg
    6.7 KB · Views: 0
  • 76FDFFD5-E085-485B-AF2D-04C98D8F24D9.jpeg
    76FDFFD5-E085-485B-AF2D-04C98D8F24D9.jpeg
    6.7 KB · Views: 0
Hi Steve
This looks a superb kit. Great subject. The film with Kenneth Moore is a favourite of mine. I look forward to seeing this progress.
Jim
 
Wow, what a fantastic kit Steve. I've painted only one RP Models bust so far and the detail and finish were the best I've ever come across. Will following with envy.
 
The sculpting is very good indeed. This will certainly help with the wet stuff Steve. Good luck with those decals.

Is it me or does he have the touch of the Trevor Howard's about him??
 
Thread owner
So, with the Christmas and New Year Festivities out of the way, I started cleaning up the major cockpit components, just the usual seam line here and there, opening up some of the holes. The hardest part was where the compass slots onto the instrument fascia, the slot is too small to get a file in so it’s a case of scrapping away the inside with a sharp blade. It is apparent that there is a bit of warpage on the main structural items, including the ‘keel’. Think it’s going to take some careful reshaping in boiling water. I did notice that if I was to glue the seat structure to the rear bulkhead and then glue this to the keel it should pull that part into alignment to attach the instrument panel bulkhead.

‘Douglas’ just required some scrapping and sanding of a few mould lines on his arms and back of his one leg, the googles required some time in cleaning out the back of the left lens, a bit of resin was lodged in here, again tricky to get rid of, but perseverance paid off, along with removing some of the resin on his helmet so the lens sat better. Will just need a smidgen of filler to join the googles to the strap.
 
That looks like a lovely bit of kit, I look forward to seeing this one come together. :)
 
Thread owner
Got the big resin pieces sorted, sanded and a few dips in boiling water to straighten a few. A putting it all together it’s was all asquif
 
Thread owner
Into the spray area last night (utility room) and got a black base coat on ;

View attachment 325867


Then the interior green ;

View attachment 325869

Work on the instrument panel next along with painting the composite seat
 

Attachments

  • 3F32C22D-C740-459D-B663-B9F371F50CA1.jpeg
    3F32C22D-C740-459D-B663-B9F371F50CA1.jpeg
    3 KB · Views: 0
  • 1C947F79-7678-4972-989C-EC318AE2AA66.jpeg
    1C947F79-7678-4972-989C-EC318AE2AA66.jpeg
    3.3 KB · Views: 0
Thread owner
Finally got round to getting some paint on the SRBP (Synthetic Resin-Bonded Paper) last night, custom mix of tamiya earth, flat red, flat yellow and flat white, overlayed the brush strokes to try and create a pattern of sorts. A futile exercise really as once the pilot is seated it will never be seen again :tired::sad: But i enjoyed the couple of hours painting. :tongue-out3::smiling5:

View attachment 326334View attachment 326335View attachment 326336
 

Attachments

  • IMG_3474.jpg
    IMG_3474.jpg
    1.6 KB · Views: 0
  • IMG_3475.jpg
    IMG_3475.jpg
    2.2 KB · Views: 0
  • IMG_3476.jpg
    IMG_3476.jpg
    2.1 KB · Views: 0
its ok so far have not done anything to it but look so I cant really give you an honest opinion .
RICK
 
Thread owner

Attachments

  • IMG_3532.jpg
    IMG_3532.jpg
    3 KB · Views: 0
  • IMG_3534.jpg
    IMG_3534.jpg
    2.3 KB · Views: 0
  • IMG_3536.jpg
    IMG_3536.jpg
    2.1 KB · Views: 0
  • IMG_3539.jpg
    IMG_3539.jpg
    2.5 KB · Views: 0
Status
Not open for further replies.
Back
Top