Theme editor

Scale Model Shop

Rusting effect with brush acrylics?

  • Thread starter Thread starter Guest
  • Start date Start date
Status
Not open for further replies.
G

Guest

Guest
Thread owner
This is my first post to the forum and my first model attempt.


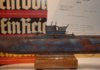
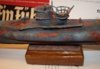
My model of choice is the Tamiya Austin Cooper Mini Rally which I managed to pick up from ebay.


So my question is about which is a good way to achieve the rust through effect when using brush and acrylic paint.


Searching the forum and youtube has gave me three possibilities.


1. Enamel / hairspray / acrylic - using thinners to re-activate the enamel


2. Acrylic / humbrol maskol / acrylic - rub off mask to reveal rust


3. As above with sugar to mask rust.


Which method would I find gives best results if I'm using acrylics and a brush?


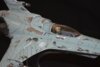
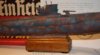
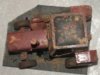
I've primed the floor panel with Halfords plastic primer after using a dremel to add some rust holes.


The acrylics I'm using are Vallejo Model Color which I've read are great for brushing.

View attachment 109052

View attachment 222075
 
I've used the Maskol method to reveal the baremetal on a build I did last year and was very happy with the results.


There is also a Rust and Dusk set that you can buy that I've heard good things about, or perhaps why not use pigments with a pigment fixer to create the rust effect you need?


Here's the model I used the Maskol effect on.


View attachment 109053


Hope this helps and I'm sure there will be many others posting to help you out :)


Adrian

View attachment 222076
 

Attachments

  • 009.JPG
    009.JPG
    2.1 KB · Views: 0
Firstly, welcome to the forum.


Personally I use rust pigments-rail rust, old rust and new rust and I use pigment fixer-more control. The ideas you have are great for chipping effects.


Here is my 1/12 tractor with various rust effects, also it has had the 'salt method' this is water on the base coat with added salt, then you spray over your top coat and knock the salt off leaving a worn look. I also rub the paintwork down using a old toothbrush-this scuffs and dulls the paint.


View attachment 109054


View attachment 109055


View attachment 109056


Here it is in a smaller scale a 1/125 U-Boat wreck.


View attachment 109057


View attachment 109058


View attachment 109059


I use Microbrush applicators as well as a fine brush to apply the rust pigments.


Your method I would prime your model, then add your rust colour to where you want it, then salt over the top and add your top coat-knock off and you will get the rust colour showing through.


Si:)

View attachment 222077

View attachment 222078

View attachment 222079

View attachment 222080

View attachment 222081

View attachment 222082
 

Attachments

  • p5047123-jpg.118713.jpg
    p5047123-jpg.118713.jpg
    2.5 KB · Views: 0
  • p5047116-jpg.118711.jpg
    p5047116-jpg.118711.jpg
    2.5 KB · Views: 0
  • p5047111-jpg.118709.jpg
    p5047111-jpg.118709.jpg
    2 KB · Views: 0
  • dscf4079-jpg.91744.jpg
    dscf4079-jpg.91744.jpg
    2.2 KB · Views: 0
  • dscf4068-jpg.91675.jpg
    dscf4068-jpg.91675.jpg
    3.2 KB · Views: 0
  • dscf4072-jpg.91671.jpg
    dscf4072-jpg.91671.jpg
    2.6 KB · Views: 0
you might one of jon's vid quite useful......i know i did! :)


it makes rusty steaking seem easy
 
Thread owner
Thanks guys, I'm using a brush because I don't have an airbrush / compressor.


I'm not sure I can brush over the salt method, after seeing videos of the salf being blown off by the pressure of the airbrush.


Wouldn't a brush simple brush away the salt?
 
Thread owner
Welcome to the forum. Just put your first name in your profile and it will come up onall your postings


Here is another way. I suppose a lot depends on the scale you are building at.


http://www.acrylicosvallejo.com/en_US/creating-a-rust-texture-with-vallejo-texture-brown-earth./blog/1/51.


Laurie
 
Thread owner
I'm edging towards the simple hairpspray method in the video above.


The inside of the boot looks like a good place to start.
 
Thread owner
Halfords primer , rust colour base ie vallejo you can mix it up doing different shades , only one light coat of hairspray then your top coat then do your weathering , more than one coat of hairspray will make it a nightmare to get through to the rust colour ( guess how I know ),


thats the easiest way that i know . one more thing before you start weathering make sure the top coat has fully cured and don`t use hot water the top coat will come off stringy ( again guess how I know ).


Richy
 
Thread owner
\ said:
Halfords primer , rust colour base ie vallejo you can mix it up doing different shades , only one light coat of hairspray then your top coat then do your weathering
Richy
After them weathering, I suppose then I can apply some powders and rust streaks with a wash if needed?
 
Thread owner
Thanks for all the photos for reference guys, if my model comes out half as good as these, I'll be a happy modeller lol.
 
I've never tried the hairspray technique. I prefer using oils, washes, pigments or enamels as I find them more forgiving and versatile compared to acrylics. Depending on the finish you are trying to achieve there are various methods of getting there. Oils are good for chipped paint with streaking rust leaching out and can be used for a wash. Pigments are also useful for this effect but also for a rust covered surface, I use both of these techniques on railway wagons.


With enamels all of the above effects can be created but if you decide that you don't like what you have achieved or want to tone it down enamels can be "reactivated" with thinners to adjust your work.


Take a look at some of my railway wagons on my blog; www.rickysrailway.blogspot.com


The slab sided ballast hopper wagon was weathered with oil spotted onto the side then a brush wetted with thinner dragged downwards.


The second ballast hopper was weathered using Deluxe Materials scenic rust. Both hoppers had the interior done with pigments.


The locomotive body was sprayed with enamel rust colours and also pigments.

View attachment 109119

View attachment 109120

View attachment 109121

View attachment 222142

View attachment 222143

View attachment 222144
 

Attachments

  • C__Data_Users_DefApps_Windows Phone_AppData_INTERNETEXPLORER_Temp_Saved Images_DSC01969.JPG
    C__Data_Users_DefApps_Windows Phone_AppData_INTERNETEXPLORER_Temp_Saved Images_DSC01969.JPG
    3.6 KB · Views: 0
  • C__Data_Users_DefApps_Windows Phone_AppData_INTERNETEXPLORER_Temp_Saved Images_DSC_0367.JPG
    C__Data_Users_DefApps_Windows Phone_AppData_INTERNETEXPLORER_Temp_Saved Images_DSC_0367.JPG
    2.4 KB · Views: 0
  • C__Data_Users_DefApps_Windows Phone_AppData_INTERNETEXPLORER_Temp_Saved Images_DSC03417.JPG
    C__Data_Users_DefApps_Windows Phone_AppData_INTERNETEXPLORER_Temp_Saved Images_DSC03417.JPG
    1.9 KB · Views: 0
Thread owner
Very impressive Rick.


As it's my first model and I have no paints or equipment, I'm limited to what I want to spend :(


I don't want to fork out £100 on a compressor to spray my first £11 kit, so after reading that acrylics are better for brush work, that's what I went for.


If I enjoy the build and decide to try a few more, a compressor and various other types of paint and finishes will be top of my list.


Until then, I'll have to look at the work of yourself and others on the forum with envy lol.


Phil
 
Thread owner
Just remember that realistic rust, will probably require a texture , not just colour, and once that the rust breaks through any paint surface, it will be matt, and it's the differentials between surfaces that will add hugely to the overall realism! Si's tractor and sub illustrate this perfectly (nice one Si!) I'd have a long look at pigments! On this subject, has anyone made their own pigments from real rust?
 
Thread owner
Thanks John, I take a good look and study the effects.


Rust also has a tendency to bubble up under the paint before it breaks through. So I'm thining is there a way tip to add a texture to certain parts of base coat in particular along the bottom of the doors and skuttle panels. Then paint over with the top coat to leave a bubble of rust just underneath the paint.


Lets see if I can link to a photo of what I mean.


View attachment 109144


View attachment 222167
 
Thread owner
That'd be a cool effect to achieve! Great for most UK built cars of the 70s ;)
 
You could try using superglue with a pin to dab onto the sills and arches, then just paint over the top that would show a slight rise-remember the scale-these would be highlights so forget trying to replicate the above piccie-never going to happen.
 
Status
Not open for further replies.
Back
Top