G
Guest
Guest
Hello All! Haven't been here for while. But always missing you :1newwink:.
Project started few weeks ago. Some problems as it's only Italeri but i hope I've fixed it.
Have a look. Opinions and comments are welcome.
Beginning
View attachment 56564View attachment 56565View attachment 56566View attachment 56567View attachment 56568View attachment 56569View attachment 56570View attachment 56571View attachment 56572View attachment 56573View attachment 56574
Above last 4 pictures showing my probes to fix zimmerit coat- green stuff on the front and putty filler on the back. In future I recommend green stuff.
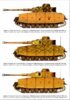
The next step is SHURZEN -site skirts. Original ones are to thick in my opinion. To upgrade this part of action I've decided to make them of 0,3mm brass sheet.
View attachment 56575View attachment 56576
This is difference between original and made by me. View attachment 56577
View attachment 56578View attachment 56579View attachment 56580View attachment 56581View attachment 56582View attachment 56583
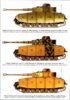
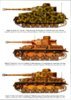
Painting action and very hard choice of basic colour+ camouflage.
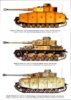
This is Panzer IV type H of 12 Armoured Division of Wehrmacht. Photograph taken at summer 1944 in Russia. Everything (including painting schemes from Italeri) there are two colours panzer grey and dark yellow. I'm not sure which one is a basic coat and which one is for camouflage...
View attachment 56584View attachment 56585
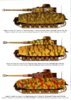
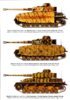
To make life harder and full of ambushes I've found this. Opposite to previous version this one says clearly: dark yellow as a basic coat and olive green for camo patterns.
View attachment 56586
That's all for now. Tell me my dear Friends. What scheme could be most right? Is it possible? Could all options existed? I'll be great if anybody share his opinion. Many thanks.
To be continued...
View attachment 58612
View attachment 58613
View attachment 58614
View attachment 58615
View attachment 58616
View attachment 58617
View attachment 58618
View attachment 58619
View attachment 58620
View attachment 58621
View attachment 58622
View attachment 58623
View attachment 58624
View attachment 58625
View attachment 58626
View attachment 58627
View attachment 58628
View attachment 58629
View attachment 58630
View attachment 58631
View attachment 58632
View attachment 58633
View attachment 58634
View attachment 171638
View attachment 171639
View attachment 171640
View attachment 171641
View attachment 171642
View attachment 171643
View attachment 171644
View attachment 171645
View attachment 171646
View attachment 171647
View attachment 171648
View attachment 171649
View attachment 171650
View attachment 171651
View attachment 171652
View attachment 171653
View attachment 171654
View attachment 171655
View attachment 171656
View attachment 171657
View attachment 171658
View attachment 171659
View attachment 171660
Project started few weeks ago. Some problems as it's only Italeri but i hope I've fixed it.
Have a look. Opinions and comments are welcome.
Beginning
View attachment 56564View attachment 56565View attachment 56566View attachment 56567View attachment 56568View attachment 56569View attachment 56570View attachment 56571View attachment 56572View attachment 56573View attachment 56574
Above last 4 pictures showing my probes to fix zimmerit coat- green stuff on the front and putty filler on the back. In future I recommend green stuff.
The next step is SHURZEN -site skirts. Original ones are to thick in my opinion. To upgrade this part of action I've decided to make them of 0,3mm brass sheet.
View attachment 56575View attachment 56576
This is difference between original and made by me. View attachment 56577
View attachment 56578View attachment 56579View attachment 56580View attachment 56581View attachment 56582View attachment 56583
Painting action and very hard choice of basic colour+ camouflage.
This is Panzer IV type H of 12 Armoured Division of Wehrmacht. Photograph taken at summer 1944 in Russia. Everything (including painting schemes from Italeri) there are two colours panzer grey and dark yellow. I'm not sure which one is a basic coat and which one is for camouflage...
View attachment 56584View attachment 56585
To make life harder and full of ambushes I've found this. Opposite to previous version this one says clearly: dark yellow as a basic coat and olive green for camo patterns.
View attachment 56586
That's all for now. Tell me my dear Friends. What scheme could be most right? Is it possible? Could all options existed? I'll be great if anybody share his opinion. Many thanks.
To be continued...
View attachment 58612
View attachment 58613
View attachment 58614
View attachment 58615
View attachment 58616
View attachment 58617
View attachment 58618
View attachment 58619
View attachment 58620
View attachment 58621
View attachment 58622
View attachment 58623
View attachment 58624
View attachment 58625
View attachment 58626
View attachment 58627
View attachment 58628
View attachment 58629
View attachment 58630
View attachment 58631
View attachment 58632
View attachment 58633
View attachment 58634
View attachment 171638
View attachment 171639
View attachment 171640
View attachment 171641
View attachment 171642
View attachment 171643
View attachment 171644
View attachment 171645
View attachment 171646
View attachment 171647
View attachment 171648
View attachment 171649
View attachment 171650
View attachment 171651
View attachment 171652
View attachment 171653
View attachment 171654
View attachment 171655
View attachment 171656
View attachment 171657
View attachment 171658
View attachment 171659
View attachment 171660