Theme editor

Scale Model Shop

Sherman M4A2 '' US Marines'' Academy 13203

Status
Not open for further replies.

Gary MacKenzie

SMF Supporter
Joined
Apr 28, 2018
Messages
1,059
Reaction score
1
Points
38
Location
Forres , Moray , Scotland
1/3
Thread owner
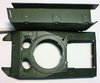
View attachment 330118 For a 2004 model kit i am impressed by the quality of the pieces.

Very little flash , and until I got to engine cover stage i had not hit any " Dragon Models " instruction mistakes.

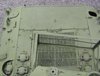
View attachment 330119 The fuel/water tank inlet covers appear to have the handles molded at wrong angle compared to instructions

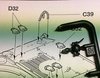
View attachment 330120 <<< angle the ''handles ???? " end up at

View attachment 330121

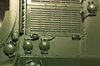
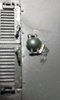
View attachment 330122 However , found a picture online where the ''handles'' are removed / never installed.

More research being done
 

Attachments

  • WIN_20190217_09_01_53_Pro.jpg
    WIN_20190217_09_01_53_Pro.jpg
    3 KB · Views: 0
  • M4A2_Engine deck.JPG
    M4A2_Engine deck.JPG
    2.6 KB · Views: 0
  • WIN_20190217_15_03_46_Pro.jpg
    WIN_20190217_15_03_46_Pro.jpg
    2.1 KB · Views: 0
  • WIN_20190217_15_03_43_Pro.jpg
    WIN_20190217_15_03_43_Pro.jpg
    2.4 KB · Views: 0
  • WIN_20190217_15_03_35_Pro.jpg
    WIN_20190217_15_03_35_Pro.jpg
    3.4 KB · Views: 0
As far as I know, those “handles” are securing pins that can be (and need to be) pulled out to allow the lid to be opened, and can go in either direction.
 
Thread owner
Yes.
Problem is most good photos I can find show either broken or without long arm.
I assume long arm versions rotate a cam like lock.
Am going to make new handles/pins and have facing different rotation/direction.
 
Thread owner
fuel cap orig.jpg <<< original kit part , pin lhs
View attachment 330442 << copper tube to replace pin , to represent pin inserted from rhs side
fuel cap-2.jpg << primer coat on
 

Attachments

  • fuel cap.jpg
    fuel cap.jpg
    1.9 KB · Views: 0
Thread owner
WIN_20190327_16_18_03_Pro.jpg
Primer on body.
First set of suspension installed and only body mounted panels plus inner section for all 5 other sections installed.
Will now repaint the underside/body with a second coat , tidy up the painting on the wheels and paint and install the remaining
5 sets.
WIN_20190327_16_18_30_Pro.jpg

Large subassemblies done.

Now its just all the litle things needing removed from sprues , painted up and installed.

Then time to weather the vehicle lightly.
 
Status
Not open for further replies.
Back
Top