Following on from my introduction thread, I thought I'd throw up a thread on my progress on my first proper kit in rather a long time. I built a 1/72 Gloucester Gladiator starter kit last year but this is all pretty much starting again after a break of about 17 years.
So I decided to have a little look on ebay to see what took my fancy and settled on a Tamiya 1/12 RGB500, paid my money and awaited delivery.
View attachment 95545
Awesome.
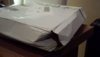
Opening the box showed that while the majority of the kit was OK some things had taken a hit:
View attachment 95546
The seller was great about it, provided a refund and said I could keep the kit. I wrote to Tamiya in case the screen was still around but no luck. After pondering for a bit I decided to crack on. Most things could be repaired and I could live with the screen crack if I had to, and I was clearly going to learn lessons along the first kit anyway, so may as well get started.
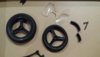
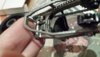
One of the motorcycle frame rails was broken but a little glue got me started. This is one of the first motorbike kits Tamiya did and the decal sheet seems to have been printed up in about '88. Generally it's gone together well, but a small file got a fair bit of work cleaning up flash lines and evening out joins.
View attachment 95547
I'd mentioned my build on a Facebook thread about motorbikes, rather than modelling, and got a contact from a guy called Graham, who said he might have a spare screen from an old Tamiya RGB500 model he'd had years ago and probably wouldn't complete. I told him there was no hurry but if he had it I'd happily pay as the other parts could probably be fixed. A shoebox turned up containing the majority of a partially assembled & built Tamiya RGB500 & what I suspect is a Matchbox RG500. Beyond generous, and as it turned out very helpful. The screen was in great condition, and I'd just discovered the rear brake caliper was missing in my kit, this was promptly plundered from the donor bike, and I carried on with my build.
View attachment 95548
View attachment 95549
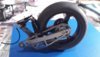
It was at this point that I decided that the gaps in the swing arm joins were not OK, so decided to get some putty in there. Top tip I remembered from back when I did think kind of stuff regularly. Do the modelling, then do the painting & assembly. Off comes the rear again, thankfully I had used only a very small amount of glue.
The exhausts have holes in them too so I decided to fill those and the joins in the fairing halves too.
View attachment 95550
View attachment 95551
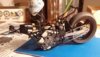
And that brings us up to date. There are a fair few challenges ahead, including a broken clutch lever which is going to require me to fabricate something or live with it, the use of decals from 1988, and the fact I don't have an airbrush so will be championing the hairy stick approach as I believe it's termed here.
Jambo
View attachment 208568
View attachment 208569
View attachment 208570
View attachment 208571
View attachment 208572
View attachment 208573
View attachment 208574
So I decided to have a little look on ebay to see what took my fancy and settled on a Tamiya 1/12 RGB500, paid my money and awaited delivery.
View attachment 95545
Awesome.
Opening the box showed that while the majority of the kit was OK some things had taken a hit:
View attachment 95546
The seller was great about it, provided a refund and said I could keep the kit. I wrote to Tamiya in case the screen was still around but no luck. After pondering for a bit I decided to crack on. Most things could be repaired and I could live with the screen crack if I had to, and I was clearly going to learn lessons along the first kit anyway, so may as well get started.
One of the motorcycle frame rails was broken but a little glue got me started. This is one of the first motorbike kits Tamiya did and the decal sheet seems to have been printed up in about '88. Generally it's gone together well, but a small file got a fair bit of work cleaning up flash lines and evening out joins.
View attachment 95547
I'd mentioned my build on a Facebook thread about motorbikes, rather than modelling, and got a contact from a guy called Graham, who said he might have a spare screen from an old Tamiya RGB500 model he'd had years ago and probably wouldn't complete. I told him there was no hurry but if he had it I'd happily pay as the other parts could probably be fixed. A shoebox turned up containing the majority of a partially assembled & built Tamiya RGB500 & what I suspect is a Matchbox RG500. Beyond generous, and as it turned out very helpful. The screen was in great condition, and I'd just discovered the rear brake caliper was missing in my kit, this was promptly plundered from the donor bike, and I carried on with my build.
View attachment 95548
View attachment 95549
It was at this point that I decided that the gaps in the swing arm joins were not OK, so decided to get some putty in there. Top tip I remembered from back when I did think kind of stuff regularly. Do the modelling, then do the painting & assembly. Off comes the rear again, thankfully I had used only a very small amount of glue.
The exhausts have holes in them too so I decided to fill those and the joins in the fairing halves too.
View attachment 95550
View attachment 95551
And that brings us up to date. There are a fair few challenges ahead, including a broken clutch lever which is going to require me to fabricate something or live with it, the use of decals from 1988, and the fact I don't have an airbrush so will be championing the hairy stick approach as I believe it's termed here.
Jambo
View attachment 208568
View attachment 208569
View attachment 208570
View attachment 208571
View attachment 208572
View attachment 208573
View attachment 208574