Theme editor

Scale Model Shop

The Twenty-Minuters

  • Thread starter Thread starter Guest
  • Start date Start date
Status
Not open for further replies.
G

Guest

Guest
Thread owner
I thought it was time for a change of pace. Yesterday I bought myself this kit:

View attachment 302824

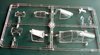
for the princely sum of €3.75 (normally €7.50, half off due to a sale at the shop). I’ve built one of these Hobby Boss easy assembly kits before, so the contents didn’t surprise me this time round:

View attachment 302825

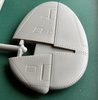
A few minutes’ work on the two main parts results in:

View attachment 302826

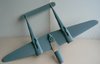
and from that we can skip to the completed model:

View attachment 302827

because there’s really very little in-between steps that I could show even if I wanted to :)

There are only three snags I could find. One is that the engine cowling is hard to fit right unless you either ream it out a bit, or file/scrape down the piece it is to go on. Another is that you can damage the propeller by taking it out of the plastic, according to a review I read. The solution is simple: use a tool to press the “bump” of black plastic at the end of one of the blades in, so the tip can pop out. Finally, like on the other kit I built, the open canopy (the kit comes with both open and closed ones) won’t fit over the rear fuselage, so that decided which one I was going to fit.

It took me all of 20 minutes to get to this stage, hence it made me think of Blackadder :)

Now it’s just waiting for the glue to dry so I can add some paint.
 
I'm quite taken by these easy assembly models - I did the 1/48 P-40 Kittyhawk earlier this year ( and I have the P-38 in the stash ),OK, they're simplified, but overall shape is acceptable, and you can concentrate on the finish, I would recommend these to anybody. With some AM decals and some scratching or the cockpit, you can use these as a basis for a very nice model. I would also say, they would be ideal first model for a youngster!
Dave
 
Thread owner
Agreed completely, they’re simple and quick to build but they look like what they’re supposed to (at least the few I own do :)) so don’t be put off by the box art. I also find them good as wargames models, since they’re quite sturdy, though for that they have the small issues of having no pilot and a landing that can’t be built retracted without surgery.
 
The HB Easy assemble 1/48 P-38 is very nice - no problems in wing/boom/tail alignment!
View attachment 302872
The bottom is also in one piece.........................
Some nice inscribed detail
View attachment 302871

and, as usual HobbyBoss provide their ultra clear canopy
View attachment 302870
The P-38 is a little more complicated, but the P-40 was very simple. One danger is in dry fitting - the fit is so tight, you may have difficulty in getting the bits apart!
Dave
 

Attachments

  • p-38 canopy.jpg
    p-38 canopy.jpg
    2.4 KB · Views: 0
  • p-38 tailplane.jpg
    p-38 tailplane.jpg
    2.8 KB · Views: 0
  • p-38 uppers.jpg
    p-38 uppers.jpg
    1.7 KB · Views: 0
Thread owner
I had noticed that too with the Hurricane I built before, so I was careful this time round :)

By now I’ve put some paint onto the model. This will be cheap and cheerful too, using nothing but spraying cans for the main colours.

View attachment 302919

First a coat of Army Painter white primer over much of the model, though it doesn’t show up that well in the photo to be honest. The white is mainly as preparation to make sure the next colour, yellow, covers well. It also helped with the white stripes on the wings and fuselage, as I could just mask those off.

View attachment 302920

And that’s with the yellow sprayed onto the upper wings and the forward undersides as well. This is from some “almost-white-label” brand I found in the garage, whose cap indicates it to be RAL 1003 Signal Yellow; it seemed like good colour for US Navy Chrome Yellow so I went with it.

Tomorrow, when the yellow has dried, I’ll mask off the wings and either spray the aircraft silver, or spray the tail green if I can find a can with that colour in the garage :)
 
Thread owner
Here’s the model with masked wings and a blue tail:

View attachment 302988

According to the kit it should be green, but I’ve decided to build the model as representing an aircraft of VF-41 during their almost unknown, short tour on the USS Enterprise (NCC-1701). Yeah, that’s it, that sounds convincing. A lot better than admitting I couldn’t find a green spraying can and like blue better anyway, or saying, “It’s a €3.75 quickie, I can take some artistic liberties, who cares?” :)

Then with the blue tail also masked off:

View attachment 302989

And the silver sprayed:

View attachment 302990

That, though, didn’t go as well as I would have liked, so I now have the world’s least aerodynamic, but also the world’s most artistically craquelé’d, F4F:

View attachment 302991

Paint incompatibility is the cause. The yellow (which is RAL 1023 Traffic Yellow, by the way, not Signal Yellow — I remembered it wrong in myself last message) is from a different manufacturer than the blue and silver, and apparently, the latter doesn’t like the former much. I’ll try sanding the cowling down to get it smooth again, since it needs to be painted grey anyway. There’s some more craquelé on the upper fuselage, but it’s nowhere near as bad or obvious as on the engine cowling.

But I can’t be bothered to strip the paint and do it all again, so I just took the masking off to reveal a finish I’m otherwise quite happy with:

View attachment 302992

View attachment 302994

I painted the undersides of the horizontal tailplanes silver as well. The instructions would have them in blue — I mean green as well, but from an article I read on US Navy aircraft colours of the 1930s, I got the impression only the upper sides were to be painted.
 
Nice work so far mate, and love those colors. Pitty the silver crackled, hope you can set it straight ^^

Cheers
 
Thread owner
Well, at least it can’t get much worse, can it? :) I like the colours too, I must say. I had my doubts about the white — I wanted something that I felt would be more visible against the silver, but that would have meant changing the number on the aircraft side. However, there was very little I could do with it since Hobby Boss only provides one (41-F-4). Luckily, the white shows up quite nicely after all.
 
Metallic paint is always tricky, and unforgiving in showing up any flaws. I've used fine wire wool to remove crackle, and 'orange peeling' in the past. A bit of undercoat, then you're back on track.....................hopefully
Dave
 
Thread owner
Nah, too much trouble for this one. It’s not very obvious unless you’re looking closely at the model, so like I said, a bit of sanding on the cowling, that needs to be painted grey anyway, and it’s hopefully mostly solved.
 
Love the bright colours Jakko.:smiling:
Neat paintjob too:thumb2:, masking such a small plane is always tricky.

Fernando
 
Thread owner
Thanks all :)

I find masking things like planes actually pretty easy. They’re mostly smooth, so you have an easy surface to put the tape onto, and few obstructions when you need to cut it for things like the curve below the tail in this example.

Also, I must say I’m impressed with the decals: you can’t see the carrier film at all even if you look very closely, not even on the silver where I had expected it to show quite prominently. (Their main minor problem is that the red discs on the nationality markings were printed slightly off-centre, but I solved that by making sure they were “shifted” to the top, which makes it less obvious.)
 
Status
Not open for further replies.
Back
Top