Theme editor

Scale Model Shop

Trumpeter's AS-90 and some extra's.

Status
Not open for further replies.

RM6239

New member
Joined
May 1, 2018
Messages
343
Reaction score
0
Points
0
1/3
Thread owner
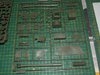
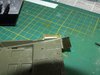
Next to hit the bench is this oldy.

View attachment 306903

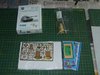
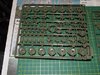
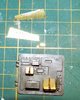
After saying how much I don't like PE in the Luchs build, I have a nice little lot of PE coming up.

View attachment 306904

I will be stealing an idea from an old MM member when he built this beast with all the PE, glue the PE to styrene strips and then stick that to the model. Also a shout out to anybody that has built the RB models gun, I've had a practice of putting it together but there are a couple of pieces I just can't work out where they go, so any help or advice is greatly appreciated.

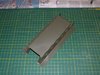
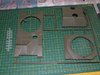
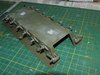
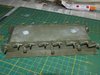
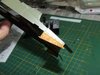
I'll get some sprue shots up as soon as possible.

cheers
Ross
 

Attachments

  • as-90.jpg
    as-90.jpg
    3.5 KB · Views: 0
  • as-90 a.jpg
    as-90 a.jpg
    3.4 KB · Views: 0
Morning Ross
I have this unopened in a drawer somewhere waiting for inspiration.
Does that RB barrel come with a sagged recoil sleeve- looks like it in your photo.
Looking forward to seeing your work on this and hopefully nudge me into having a go at it.
Jon.
 
Just had a look on Scalemates at the RB barrel and there's a helpful review on Armorama which may help put it together.
Jon.
 
Thread owner
Hi Jon, Yes it does have the sagged recoil sleeve, I will check out that review and see thanks mate.

cheers
Ross
 
Hi Ross
I'm in. Nice set of extras. I am interested to see how that PE idea works out. Been racking my brains to remember who suggested the method? Sounds like it should work with very thin styrene.
Jim
 
Thread owner
Jim, I can't remember his name either, I think he came from around Gloucestershire, he built a number of these self propelled artillery on the site but he was really into building true life railway scenes, you know buildings, road, lines etc and then putting a train together that would use that line. He was a computer programmer working on an upgrade or something to one of the current British Army vehicles. As you can see I remember a bit about him, except his name :unamused:. Very thin strips was the go, I remember he used it for the mud guard, which are those 2 big bits of etch in the picture.

Ian, welcome along for the ride mate.

cheers
Ross
 
Ross
Hi mate, I will join the gang for this. Must have been before my time in " the other house ". Sounds and intriguing method with the pe.
John
 
Simon Hammerton mentioned this last.By using thin plastic card superglued to the PE part you can use ordinary liquid cement to glue the part to the model.Gives you more control and time to correctly position it.
Also,if needed,you've got the makings of a weld bead by softening the plastic.
Jon.
 
Simon Hammerton mentioned this last.By using thin plastic card superglued to the PE part you can use ordinary liquid cement to glue the part to the model.Gives you more control and time to correctly position it.
Also,if needed,you've got the makings of a weld bead by softening the plastic.
Jon.

I’d like to hear more about this to understand the method, is there a video or photos to illustrate this technique?
 
Thread owner

Attachments

  • as-90 1d.jpg
    as-90 1d.jpg
    3.1 KB · Views: 0
  • as-90 1c.jpg
    as-90 1c.jpg
    3.5 KB · Views: 0
  • as-90 1b.jpg
    as-90 1b.jpg
    3.9 KB · Views: 0
  • as-90 1a.jpg
    as-90 1a.jpg
    3.7 KB · Views: 0
  • AS-90 1.jpg
    AS-90 1.jpg
    4.2 KB · Views: 0
Hi Ross, I'll watch this one too. I don't remember that trick to using PE but it sounds good.
 
Ross.
Think everyone will want to know how it works, no pressure then !
John .
 
Thread owner
Jon H, I checked out that Armorama and also went to the RB website, between both sets of pictures, should be able to put the gun together correctly.

Mick, hope so mate.

John, as you say no pressure. :worried:

Worked on the lower hull last night, roughed up the lower hull a bit, it will probably all disappear under primer but maybe not, also filled in the pinch spots on the lower hull.

View attachment 307289

The idler wheel arm is moveable, so I can adjust the tracks if needed.

View attachment 307290

Wheels tonight.

cheers
Ross
 

Attachments

  • as-90 2a.jpg
    as-90 2a.jpg
    3.9 KB · Views: 0
  • as-90 2.jpg
    as-90 2.jpg
    3.7 KB · Views: 0
Thread owner
Michael, that's it exactly.

Paul, welcome along mate.

cheers
Ross
 
Thread owner
Cheers Ian.

Well made a start on the etch tonight, most of it is normal bend and glue etc. There are 2 flaps on the front of the side skirts that gluing plastic to the PE helped with lining things up. I wasn't too worried about getting things perfect as it would all be hidden, perfect will have to come for the back mudflaps.

Pictures are a bit scrappy but you should be able to get the gist of what I did.

View attachment 307416
What you can't see very well is the strip of styrene is mounted a bit lower than the top of the etch. The next pictures will show what I was after.
Inside.

View attachment 307417
Outside
View attachment 307418

cheers
Ross
 

Attachments

  • as-90 3a.jpg
    as-90 3a.jpg
    3.5 KB · Views: 0
  • as-90 3.jpg
    as-90 3.jpg
    4 KB · Views: 0
  • as-90 3b.jpg
    as-90 3b.jpg
    3.7 KB · Views: 0
Looking good Ross. :)

Interesting technique with the PE & styrene card, might have to nick that one.
 
Status
Not open for further replies.
Back
Top