Scale Model Shop

Collapse

Italeri 1/24 Bugatti Royale Coupe Napoleon Town Car

Collapse
X
 
  • Time
  • Show
Clear All
new posts
  • Dave Ward
    • Apr 2018
    • 10549

    #1

    Italeri 1/24 Bugatti Royale Coupe Napoleon Town Car

    I acquired this pre-owned kit many years ago - I think from ebay - the box is OK, but there are no instructions & no decals, and a load of bits off the sprue ( thankfully only the larger parts )
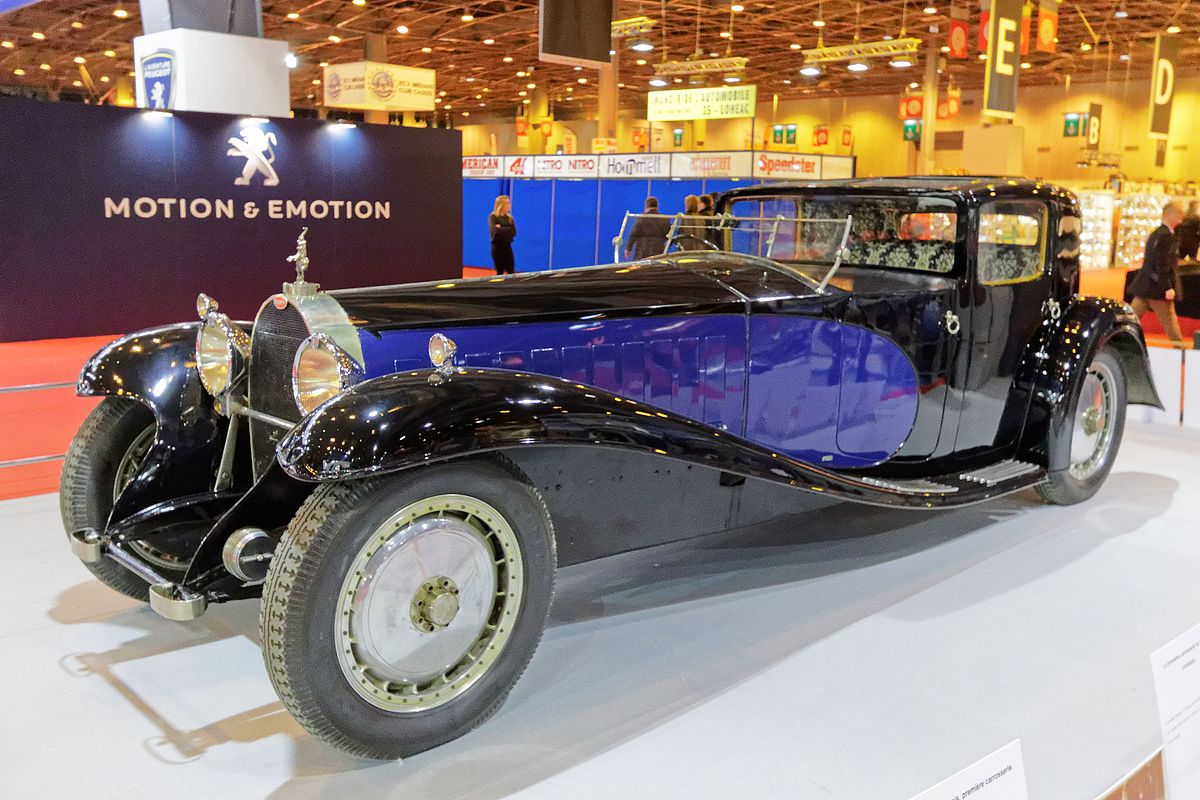
    The Royale was made late 20's, early 30's - was 6.5m long, weighed 3t & had a 12.7L straight 8 engine! These were all handmade & the coachwork varied from car to car. The boxart shows silver & black, but I'm going to go with blue & black.
    Click image for larger version

Name:	italeri coupe napoleon.jpg
Views:	6
Size:	3.7 KB
ID:	1144161
    This boxing & tooling dates from 1984. I think I opened the box, saw the truly horrible 'chrome' parts & consigned it to the back of the stash. I've enjoyed making the older cars recently, like the Model T & the Delage D8, that I'm ready to give this a go
    Click image for larger version

Name:	DSCF1395.JPG
Views:	5
Size:	4.0 KB
ID:	1144158
    Sorry for the picture - a combination of poor light & chrome - the camera didn't like it. Doesn't matter as I intended to strip all the chrome off........................
    To find out if it was worth continuing - I put a sample of parts into my bleach jar, If I couldn't get the chrome off, then I'd not bother going any further.Click image for larger version

Name:	DSCF1401.JPG
Views:	7
Size:	4.0 KB
ID:	1144159
    Not bad, just a few patches of chrome left - I then cut up all the major chrome bits & dumped them into the jar overnight...........
    Click image for larger version

Name:	DSCF1403.JPG
Views:	7
Size:	3.0 KB
ID:	1144160
    At the moment, all the smaller parts, door handles etc are sitting in the bleach jar - I'll take them out tonight.
    If you're wondering why bleach? I used to use Fairy Power Spray - at about £3 a 1/2 litre bottle. I now use Tesco Lemon Fresh Bleach at 90p for 2 litres ( which I already used for domestic use! ). It may take a bit longer, but is actually easier to use - a glass pickle jar with parts & bleach, tightly capped & left overnight works well ( I give it a bit of a shake now & then ). The smell is a bit overpowering, but dunk the whole lot into fresh water & rinse.......................
    I'm going to wait until all the bits are dechromed before I make a start. No instructions mean that it's a bit of a puzzle, but I've found that the Bandai 1/16 Bugatti Royale instructions will help - The Italeri model seems to be a much simplified version of the Bandai model
    Dave
  • Jim R
    SMF Supporters
    • Apr 2018
    • 16027
    • Jim
    • Shropshire

    #2
    Hi Dave
    Now this really is a car :smiling2: You'd have to have a BIG, BIG lottery win to afford one - getting up towards £20million maybe. Watching with interest after the great job you made of the Delage.
    Jim

    Comment

    • Dave Ward
      • Apr 2018
      • 10549

      #3
      After a bit of a debacle with my MiG-3, I've decided to pick this up. I found two pictures of the Bugatti with the colour scheme I wanted
      Click image for larger version

Name:	Bugatti_Royale_Coupé_Napoléon.jpg
Views:	7
Size:	3.0 KB
ID:	1146412Click image for larger version

Name:	Bugatti_Royale_Sinsheim.jpg
Views:	8
Size:	3.6 KB
ID:	1146413
      They are probably the same car - at different times - not sure about the mannequins!
      Dave

      Comment

      • Tim Marlow
        SMF Supporters
        • Apr 2018
        • 19026
        • Tim
        • Somerset UK

        #4
        That’s a great look8ng beast. The drop loop door handles are very “horsed coach” looking aren’t they! Never noticed them on a car before, only horse drawn and railway coaches!

        Comment

        • Dave Ward
          • Apr 2018
          • 10549

          #5
          OK a few pictures of bits some still on sprue, some off
          Click image for larger version

Name:	DSCF1509.JPG
Views:	6
Size:	2.4 KB
ID:	1146440Click image for larger version

Name:	DSCF1510.JPG
Views:	5
Size:	3.7 KB
ID:	1146441Click image for larger version

Name:	DSCF1511.JPG
Views:	7
Size:	2.6 KB
ID:	1146442
          The rest of the bits - most of these were chromed, which was removed by bleach bath.
          Click image for larger version

Name:	DSCF1512.JPG
Views:	9
Size:	2.7 KB
ID:	1146443
          I have located a set of instructions - which should save me a lot of grief! No decals, though - the only one I'll have difficulty with is the red Bugatti badge on the radiator, but that's very small. The dashboard instruments - I'll have a search in my decal box.
          There aren't that many parts, but some are very big! ( floorpan/wings ). The main factor will be the finish - no weathering! Showroom immaculate will be the aim.................
          Dave

          Comment

          • Dave Ward
            • Apr 2018
            • 10549

            #6
            Started assembly - all fitted reasonably well.......................
            Click image for larger version

Name:	DSCF1515.JPG
Views:	8
Size:	1.6 KB
ID:	1146816
            One thing is the plastic - the black plastic is soft & 'soapy' - the grey ( which had been plated ) hard & brittle - both show resistance to TET, so Contacta is the fallback. I'll prime the chassis black ( the chrome rocker box was put on to hold the engine block together! ), then detail paint the relevant parts before moving up to the interesting bits.
            Off to have my first COVID jab this afternoon.....................
            Dave

            Comment

            • minitnkr
              SMF Supporters
              • Apr 2018
              • 7652
              • Paul
              • Dayton, OH USA

              #7
              Looks like the straight eight from hell, what a brute. Beautiful coachwork. PaulE

              Comment

              • Dave Ward
                • Apr 2018
                • 10549

                #8
                No idea how accurate the Italeri model is, but the straight 8 doesn't seem to have a flywheel! - drive shaft goes to the gearbox, which seems large enough to have a flywheel/clutch/starter motor incorporated into it!
                Dave

                Comment

                • stillp
                  SMF Supporters
                  • Nov 2016
                  • 8222
                  • Pete
                  • Rugby

                  #9
                  From Wikipedia: " Strangely for the modern day observer, the aluminium clutch box was attached to the chassis - not to the engine - and the gearbox (also aluminium) was attached to the rear axle"

                  Pete

                  Comment

                  • Ian M
                    Administrator
                    • Dec 2008
                    • 18286
                    • Ian
                    • Falster, Denmark

                    #10
                    From a time when luxury wasn't just a comfy chair and a good glass of (add favored tipple here).
                    The two photos at the start of the thread. Surprise the second one is a replica. Well made one though.
                    Group builds

                    Bismarck

                    Comment

                    • Dave Ward
                      • Apr 2018
                      • 10549

                      #11
                      After careful consideration of the instructions - yes - the 'gearbox/clutch' is attached to the floorpan & the rear axle diff. I'll put off priming until all those bits are added...................
                      Dave
                      edit - Covid Vaccine was administered - very smooth, and painless!

                      Comment

                      • Dave Ward
                        • Apr 2018
                        • 10549

                        #12
                        Underside all primed
                        Click image for larger version

Name:	DSCF1516.JPG
Views:	7
Size:	2.0 KB
ID:	1146965
                        One of those days - I managed to get black primer on my hands - how, I've no idea! Done this hundreds of times, invariably ending spotless - today paint on both hands.....................
                        Dave

                        Comment

                        • Dave Ward
                          • Apr 2018
                          • 10549

                          #13
                          Lots more detail painting, and preparing part for painting...................
                          Click image for larger version

Name:	DSCF1524.JPG
Views:	8
Size:	2.1 KB
ID:	1147094
                          Click image for larger version

Name:	DSCF1522.JPG
Views:	5
Size:	3.3 KB
ID:	1147093

                          First steps in applying the AK True Metal silver on the radiator surround, and the wheel discs....................
                          Click image for larger version

Name:	DSCF1525.JPG
Views:	7
Size:	3.1 KB
ID:	1147095Click image for larger version

Name:	DSCF1526.JPG
Views:	7
Size:	4.5 KB
ID:	1147096
                          They're never going to be mirror finish, but I think are more to scale appearance
                          More masking before hitting the black topcoat
                          Dave

                          Comment

                          • Dave Ward
                            • Apr 2018
                            • 10549

                            #14
                            After careful masking, spraying, there's always that moment when the masking is peeled back......................
                            Click image for larger version

Name:	DSCF1528.JPG
Views:	6
Size:	3.3 KB
ID:	1147160
                            Not that bad.
                            The bodypan has also been given it's topcoat of Hataka Night Black, and I couldn't resist trying a few dry fit parts
                            Click image for larger version

Name:	DSCF1527.JPG
Views:	9
Size:	2.3 KB
ID:	1147159

                            For these parts, there will be a succession of gloss varnish coats, with perhaps an extra fine rub down in any problem areas. I'm still working on the main passenger area but there's not a lot more of assembly to do, just painting.............
                            Dave

                            Comment

                            • Dave Ward
                              • Apr 2018
                              • 10549

                              #15
                              Continuing - I'm building up the gloss coat, with thin sprays, then after drying, examination to see if any rough, or orange peel patches have developed ( they did in the bonnet & I had to strip all the paint off :sad: ) Now on the fourth coat..................
                              Click image for larger version

Name:	DSCF1534.JPG
Views:	11
Size:	3.3 KB
ID:	1147400
                              Click image for larger version

Name:	DSCF1535.JPG
Views:	12
Size:	4.7 KB
ID:	1147401
                              The wheels are ready to fit. I had to make a new radiator grille, as the last one has vanished ( I suspect it attached itself to a piece of discarded masking tape & was disposed of ).
                              Click image for larger version

Name:	DSCF1533.JPG
Views:	9
Size:	3.5 KB
ID:	1147399
                              I had to use filler on the joint between the roof & the passenger cab, it looks a mess at the moment, so I won't put up a picture until it's rubbed down. Just a matter of more coats of varnish and the little details.....
                              Dave

                              Comment

                              Working...