If this is your first visit, be sure to
check out the FAQ by clicking the
link above. You may have to register
before you can post: click the register link above to proceed. To start viewing messages,
select the forum that you want to visit from the selection below.
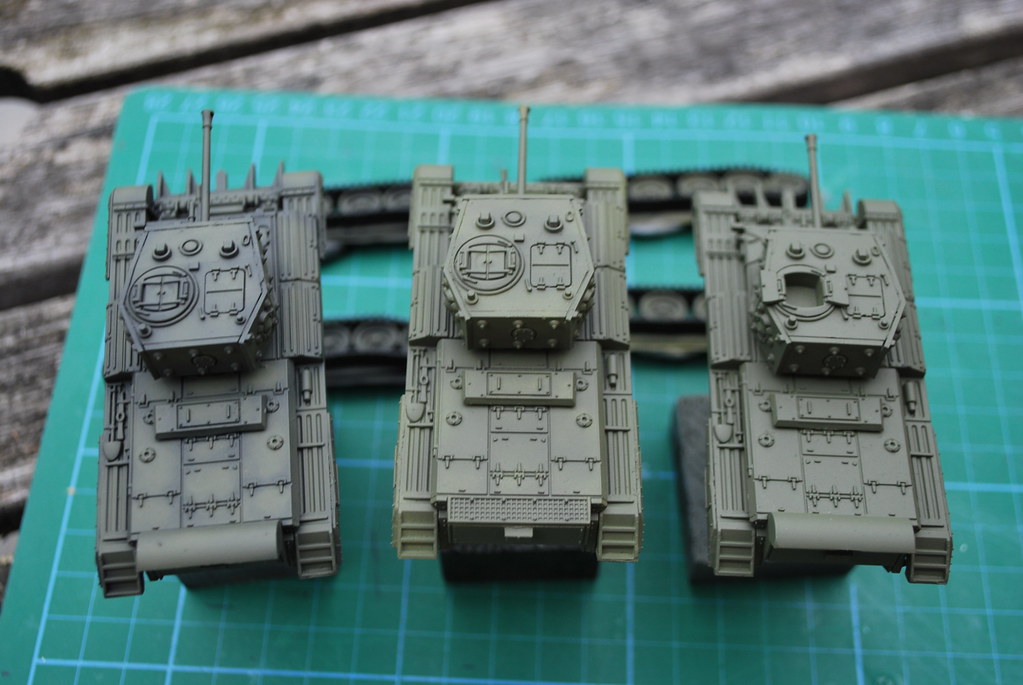
So managed to get some primer on this weekend and having three kits means I can experiment with different bases for painting.
I normally go with straight grey, so did one that way to act as a baseline. I want to refine my pre-shading technique not having done much, so did that on the second one - hull pre-shading is a bit darker in real life and the turret didn't work out as I would have liked - still got to work out the best balance of paint consistency and air pressure. And I don't think I've done one with black primer since getting an AB, so third one got that treatment.
Nice idea Andrew. Its amazing how a lighter primer changes the look of the same base coat on the darker primer. Great work my friend
Thanks Steve. It will be interesting so see how it works out and will of course give a bit of variation on the battlefield..... That of course assumes I don't screw it up!! :smiling5:
Originally posted by grumpa
While not a big fan of anything smaller than 1/35, (old eyes) I must say these are coming along very nicely indeed.
Jim.
Thanks Jim. I'll let Junior know!! Glad to have you along for the ride!!
To be honest though, my eyes aren't up to all but the largest pieces at 1/72 and so you often see me wearing an optivisor!
I'm not fussy about being accurate but there is an SCC 15 mix made up of Vallejo Model Colour at a 1:1 ratio of 70.924 Russian Uniform and 70.888 Olive Grey that Mike Starmer came up with.....his Humbrol and Tamiya mixes were far too complicated for my taste. I've been using it for a while now and it looks ok, so why not?
As I didn't have a lot of time and more importantly didn't want to rush it, I have only got the initial the initial layer of green down and pretty thinly at that, so the colours you'll see below are somewhat 'off' the final finish - plus it was getting a bit dark outside - but I'm more interested in the effect than the exact colour at this stage.
The all grey 'baseline' tank has obviously just had a light all over coat, as had the grey with pre-shading. I'll obviously very slowly coat it in hopefully even layers, so as not to kill the pre-shading. In this case I did a bit of pre-shading on the bottom half of the turret sides to hopefully create a slightly darker area compared to the top which might see a bit more light - at least that's the theory!
As you'll hopefully see with the black, it's had a mottled layer of green laid down, hopefully to create darker areas in the right spaces. In areas that see more light like the front of the track covers and the top of the exhaust covers, I put a bit more green down than in most other places. The idea is that hopefully with the even layers of green subsequent going over the whole tank, these 'exposed' areas it will be a bit lighter than the less exposed ones. I did the same thing on the tops half of the turret sides and the turret top for the same reason.
Then once I have the base coats down, where I think necessary I might do some highlights of a slightly lightened mix of my base SCC15 - just a thought.....
Whilst I still have a way to go, I'm pleased with the start I've made.
All comments welcome.
ATB
Andrew
PS - ignore the grey rings around the turret holes, that's were they're blue tacked to my DIY paint stands.
Looks great Andrew. Glad I’m not the only one using blue tack for this purpose either….
Thanks Tim...... I've still not worked out a better way of holding a vehicle so I can paint it in one go. I normally use something like the stand below with a little bit of blue tack on the end, which is pushed through the turret mounting hole to stick to the base of the hull but in this case it wasn't quite long enough for what I needed hence the Blu-Tack around the hole....
I’ve got many little blocks like that, differing in some ways, used for various projects over the years. Can’t beat golf tees for small figures though…..
I’ve got many little blocks like that, differing in some ways, used for various projects over the years. Can’t beat golf tees for small figures though…..
Agreed.....I just need to stick the magnets I recently bought to the tees I already have.
So a bit more progress this week and a bit of a mini-breakthrough on the AB front for me.
Although I've had a compressor and ABs (of varying quality) for three and half years now, because of my set up (and family life), getting consistent use has not always been easy and in some case there are literally months between an AB seeing paint/primer. This means that I'm not as far along as I should be with it and whilst I generally get on ok with general spraying, I have struggled with the really fine stuff in particular.
In the last couple of weeks I've been rereading some online articles and watching a couple of YouTube vids and experimenting again - not quite going back to basics but a definite reworking of my 'technique'. As a result, I feel like I've almost cracked the Holy AB Trinity of needle size, pressure and paint consistency - sPending half hour or more on Wednesday just doodling on a piece of paper working out again how far I could and couldn't push things, and getting some really fine lines even with my 0.4mm needle. Obviously I realise paper is a lot more absorbent than plastic and so it's less likely to run but it's definitely progress and I'm seeing a lot less of the dreaded dry tip!!!
Anyway back to the models.......
I've finished the base coats now to my satisfaction and even started on the tracks (by hand).
The grey pre-shaded version has not quite worked as I was hoping but you can see some tonal variation, I perhaps wasn't heavy enough with the pre-shade. I'm really pleased with how the black primed version turned out in terms of the effect, although I suspect it's too dark for this scale.
Most of the pictures were taken with our digital SLR outside, so the colours are pretty close but the shading effects didn't come out so well, so I took a final shot under lamplight so you can see the effects - albeit it's a bit washed out.
I was planning to go over all of the areas that see a bit more light in a slightly lightened version of my SCC 15 mix to give a bit more depth before a final light drybrush on the raised areas.
As before - flat grey primed kit left, grey with pre-shade centre and black primed right.....
Reverse order.....
Usual order but under lamplight......
My doodling....it may be old hat to some of you but it was real progress for me...and even my wife was watching me do it in genuine interest!:smiling3:
02.mm needle first (green paint was a bit too thin for such close work - another lesson learnt). In some cases I had the end of the AB on the paper as I drew it across....couldn't have done that before......also get a very good idea of how long I could linger in one spot before I started to flood it, even on the paper :smiling3:


 :smiling3:


Comment