Scale Model Shop

Collapse

1/35 MINI-ART Ya - 12 SOVIET ARTILLERY TRACTOR. 35052

Collapse
X
 
  • Time
  • Show
Clear All
new posts
  • Guest

    #91
    Originally posted by scottie3158
    John,
    All looking very nice mate.
    Originally posted by scottie3158
    John,
    All looking very nice mate.
    Cheers Paul .
    Originally posted by Mini Me
    That's going by the "numbers" JR. :nerd: ...........can't help with engine detail shots...I suspect if you search 4 cyl. GMC engines it should come up in images....one would think:thinking:.....good hunting:thumb2: Rick H.
    Most confusing Rick , but think Paul has found the right thing.
    Originally posted by outrunner
    You are doing a great job there John, keep it coming.

    Andy.
    Thanks mate, actually going well at the moment .

    Originally posted by Steve Jones
    As I am sure you are aware it is a GMC 7-41 four cylinder, two stroke engine of 110 hp engine. Reading other peoples build blogs they have been unsuccessful in finding detailed photos of the engine. Hopefully our friends across the pond may be able to help

    [ATTACH]427115[/ATTACH]
    Steve, I'm relieved to read what you say about other people not finding them either.

    Originally posted by minitnkr
    U-tube video 'Detroit Diesel test run' has clear 360 degree views of GMC 4-71 2cycle 4 cylinder engine.
    Thanks Paul, will do :thumb2::thumb2::thumb2::nerd:.
    Originally posted by Isitme
    John,
    Just caught up on your build, and in full admiration. You can now get your pointy shoes on and hit the town....
    Mike.
    Thank you oh Wise One, do you mean these shoes

    :smiling2::smiling2::smiling2:
    Originally posted by Jakko
    This one?

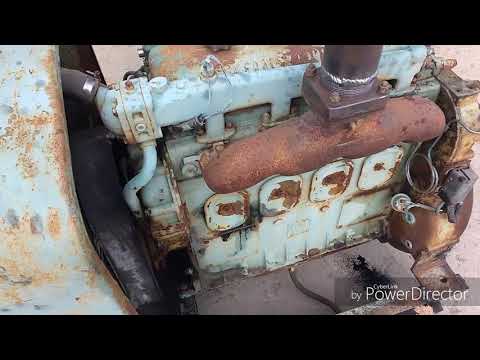
    Look right to the kit engine, when I've finished fitting the engine in I can start to plumb it .
    Originally posted by Jim R
    Hi John
    I can see you're going to go to town on this engine. Looking forward to all the plumbing.
    Jim
    Yes Jim , it's so detailed it's just calling for some extras.That video is going to be really helpful that Paul has found. Will be spending some time looking at it , most likely in pause and 1/2 speed :smiling2:

    Originally posted by Lee Drennen
    Hey John this is me driving one of these Detroit’s but it’s a 8v/71 this is my brothers truck I was raised on these engines and worked on several of them as well as drove them.
    It's a great video Lee, I've got it in my watched list. Love the sound.

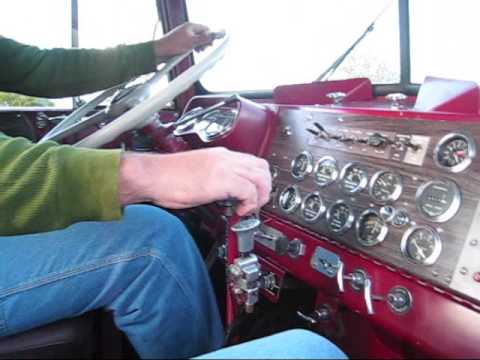
    A big thanks to Paul for the recommendation and to Jakko for finding it. Will be fun doing the detailing.
    Attached Files

    Comment

    • monica
      • Oct 2013
      • 15169

      #92
      nice build so far John,sorry so late in on this one i do have this monster as well ,still waiting

      Comment

      • RonGlass
        • Apr 2018
        • 801

        #93
        Originally posted by Jakko
        It’s why Death stopped using a skeletal steed and got Binky instead: no more need to stop to wire bits back on.
        Lol, well I had to google Binky....

        Comment

        • RonGlass
          • Apr 2018
          • 801

          #94
          Looks super, John !

          Comment

          • David Lovell
            • Apr 2018
            • 2186

            #95
            Got my eye you:nerd: :thumb2:

            Comment

            • Guest

              #96
              Originally posted by monica
              nice build so far John,sorry so late in on this one i do have this monster as well ,still waiting
              Hi Moni welcome, hope your ok down there in Aus. Still a long way to go, so you've not missed much.:smiling3:

              Originally posted by RonGlass
              Lol, well I had to google Binky....
              Hi Ron, I still have no idea , even after looking at Google !

              Originally posted by RonGlass
              Looks super, John !
              Thanks Ron.

              Originally posted by David Lovell
              Got my eye you:nerd: :thumb2:
              Welcome Dave, getting a bit tricky this morning, as the photos will show !

              ---------------------------------------------------------------------------------------------------------------------------------------------------------------------------------------------------------------------------------------------


              It would be easier if the instructions were slightly clearer, just having a couple of arrows pointing down as in thew photo is not very clear.
              Click image for larger version

Name:	2021.jpg
Views:	5
Size:	1.9 KB
ID:	1154437
              Part no A13 X2 has 3 small pins, well blobs more like. You don't apply glue to the mount its self to the engine, so it can angle. If they are left flat on the torsion bar frame the fan belt rests on the front frame. Decided to fit the exhaust pipe as the mounting brackets should set the hight of the engine. Well they don't , at this point trying to line up the engine was pointless, so I glued the prop shaft in place. This has to be straight with the rear transfer so using this as a reference point I glued the whole lot into place. In fighting with the frame I've lost the bottom hose sections , 2 of them. Soon made a replacement from stretched sprue. This can wait until the engine is fully detailed and painted. Not going to fit the rad at this point either , because of the painting.

              Click image for larger version

Name:	2021_2.jpg
Views:	3
Size:	2.8 KB
ID:	1154438
              Yes well and truly wrangled into place. The exhaust pipe mounting at the front is about 3mm up Any lower and the engine would fowl on thew front x bar.
              Now going to start the detailing of the engine.

              Dzhon.

              Comment

              • Neil Merryweather
                • Dec 2018
                • 5274
                • London

                #97
                Looks like fun, John...

                Comment

                • Guest

                  #98
                  Originally posted by Neil Merryweather
                  Looks like fun, John...
                  Hi Neil, :smiling3: you could call it that :fearful: Of course I'm hoping the top will fit now.

                  Comment

                  • Dave Ward
                    • Apr 2018
                    • 10549

                    #99
                    John,
                    keep going!!!
                    Dave

                    Comment

                    • Guest

                      #100
                      Originally posted by Dave Ward
                      John,
                      keep going!!!
                      Dave
                      Thanks Dave, I intend too :smiling::nerd:

                      Comment

                      • Mark1
                        • Apr 2021
                        • 4156

                        #101
                        Originally posted by John Race
                        Hi Moni welcome, hope your ok down there in Aus. Still a long way to go, so you've not missed much.:smiling3:


                        Hi Ron, I still have no idea , even after looking at Google !


                        Thanks Ron.


                        Welcome Dave, getting a bit tricky this morning, as the photos will show !

                        ---------------------------------------------------------------------------------------------------------------------------------------------------------------------------------------------------------------------------------------------


                        It would be easier if the instructions were slightly clearer, just having a couple of arrows pointing down as in thew photo is not very clear.
                        [ATTACH=CONFIG]n1154437[/ATTACH]
                        Part no A13 X2 has 3 small pins, well blobs more like. You don't apply glue to the mount its self to the engine, so it can angle. If they are left flat on the torsion bar frame the fan belt rests on the front frame. Decided to fit the exhaust pipe as the mounting brackets should set the hight of the engine. Well they don't , at this point trying to line up the engine was pointless, so I glued the prop shaft in place. This has to be straight with the rear transfer so using this as a reference point I glued the whole lot into place. In fighting with the frame I've lost the bottom hose sections , 2 of them. Soon made a replacement from stretched sprue. This can wait until the engine is fully detailed and painted. Not going to fit the rad at this point either , because of the painting.

                        [ATTACH=CONFIG]n1154438[/ATTACH]
                        Yes well and truly wrangled into place. The exhaust pipe mounting at the front is about 3mm up Any lower and the engine would fowl on thew front x bar.
                        Now going to start the detailing of the engine.

                        Dzhon.
                        Looks like steady progress :thumb2:
                        It's certainly not gonna make a run for it under that lot.:smiling:

                        Comment

                        • Mini Me
                          • Jun 2018
                          • 10711

                          #102
                          I hope this works JR......looks like you've been throwing your "weight" around again.....you'll have it whipped into submission in no time! :tongue-out3: Bring on the engine details Sir! Rick H.

                          Comment

                          • Guest

                            #103
                            Originally posted by Mark1
                            Looks like steady progress :thumb2:
                            It's certainly not gonna make a run for it under that lot.:smiling:
                            Quite right Mark, apart from the only things I had to hand I thought you'r not going to move while you dry.:nerd:


                            Originally posted by Mini Me
                            I hope this works JR......looks like you've been throwing your "weight" around again.....you'll have it whipped into submission in no time! :tongue-out3: Bring on the engine details Sir! Rick H.
                            I've just taken some stills of the video Paul found, so can use those to refer too while fighting detailing Rick .

                            Comment

                            • Guest

                              #104
                              Up early this morning to spray the top coat on, having sprayed primer on the engine last night.
                              In detailing of course you find you need to make things up to do a dry fit so you could make up the fuel lines.

                              The fuel tanks are not fixed, will need to be painted as well I think before the final fit.

                              Last night.

                              Click image for larger version

Name:	2021_16.jpg
Views:	4
Size:	2.7 KB
ID:	1154531

                              Click image for larger version

Name:	2021_6_2ASW.jpg
Views:	4
Size:	2.7 KB
ID:	1154529
                              Colour is a light Russian blue .

                              Click image for larger version

Name:	2021_7_2AS.jpg
Views:	4
Size:	3.0 KB
ID:	1154530

                              Looking at the pipe dia now thinking its a bit thick ?

                              Thanks for looking in.

                              Dzhon.

                              Comment

                              • Mini Me
                                • Jun 2018
                                • 10711

                                #105
                                Hi JR, What diameter wire are you using for the pipe?...it doesn't appear to look too big to my eyes. Once you get it under the hood, it should look good, along with whatever else you you are adding. Rick H.

                                Comment

                                Working...