
You are using an out of date browser. It may not display this or other websites correctly.
You should upgrade or use an alternative browser.
You should upgrade or use an alternative browser.
Bronco 1/35 Schwerer Wehrmachtschlepper (SWS) armoured version halftrack
- Thread starter Panzerwrecker
- Start date
- Joined
- Mar 2, 2022
- Messages
- 599
1/3
A great update. Looking excellent.
Thanks Jim
- Joined
- Mar 2, 2022
- Messages
- 599
1/3
Looking very convincing so far.
Cheers Paul
- Joined
- Mar 2, 2022
- Messages
- 599
1/3
Nice progress, the foam base looks very nicehave fun
Thank you Steven
- Joined
- Mar 2, 2022
- Messages
- 599
1/3
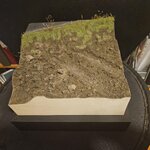
To ensure the small stretch of raised road conformed right to the edge the piece first required framing. I had purchased some oak veneer but test fitting it exposed an issue with the cut of the Styrofoam on one of the sides. I had used a foam cutter, and I had started from what I figured was a nice straight edge. Unfortunately, I didn't spot a couple of wavy undulations in it and adding the veneer would only expose the flaw. So, to plan B and I had just enough Basswood left from a previous project. These are 1.6mm thick. I marked, cut and added these four side pieces instead. I cut them a tad long so I could sand them square...or as sqaure as I managed to cut the Styrofoam! 


Once they had cured to the styrofoam with the aid of UHU Por glue, and each other, with wood glue, AK Asphalt was added in two thin layers, the cracks appeared all on their own, which was nice AK dark mud mixed with garden soil, tea leaves and scatter was added into any small gaps that were left around all the edges, and blended into the existing terrain.
The corners of the basswood framing were then sanded as square as possible ready for some matt black paint. A much-needed splash of colour was then added onto the raised embankment, care off static grass and MK35 wild grass. I’m not a fan of the slightly shiny grass colour out of the bag so once laid down with the grass applicator and fixed, these were airbrushed in different mixes of Tamiya Flat Green and Yellow Green.


I’m currently working on a small fence section utilising both cocktail sticks for the stakes and some broken and discarded Proton foam wire. A telegraph pole is also getting assembled to give the scene some height
I’m still in two minds about adding a small tree. It wasn’t in the original plan, and it might obscure the vehicle too much, but I’m willing to have a play around to see if it will add or distract from the overall look.
Once they had cured to the styrofoam with the aid of UHU Por glue, and each other, with wood glue, AK Asphalt was added in two thin layers, the cracks appeared all on their own, which was nice
AK dark mud mixed with garden soil, tea leaves and scatter was added into any small gaps that were left around all the edges, and blended into the existing terrain.The corners of the basswood framing were then sanded as square as possible ready for some matt black paint. A much-needed splash of colour was then added onto the raised embankment, care off static grass and MK35 wild grass. I’m not a fan of the slightly shiny grass colour out of the bag so once laid down with the grass applicator and fixed, these were airbrushed in different mixes of Tamiya Flat Green and Yellow Green.
I’m currently working on a small fence section utilising both cocktail sticks for the stakes and some broken and discarded Proton foam wire. A telegraph pole is also getting assembled to give the scene some height
I’m still in two minds about adding a small tree. It wasn’t in the original plan, and it might obscure the vehicle too much, but I’m willing to have a play around to see if it will add or distract from the overall look.
Attachments
Last edited:
- Joined
- Mar 2, 2022
- Messages
- 599
1/3
Wow, that's looking great, very realistic
Cheers Steven
Nice when it happens

Los
- Joined
- Mar 2, 2022
- Messages
- 599
1/3
- Joined
- Mar 2, 2022
- Messages
- 599
1/3
Cheers Richard
- Joined
- Apr 27, 2018
- Messages
- 15,122
1/3
Los,
very realistic scenery, I may have missed it but what did you use for the tarmac?
very realistic scenery, I may have missed it but what did you use for the tarmac?
- Joined
- Mar 2, 2022
- Messages
- 599
1/3
Los,
very realistic scenery, I may have missed it but what did you use for the tarmac?
Cheers Paul
The road surface is made with one of AK's excellent acrylic based diorama texture paste's. https://ak-interactive.com/product-category/textures-dioramas-building-material/dioramas-textures/
It is called Terrains Asphalt. Speed up the drying process and it can give some nice natural cracks

- Joined
- Mar 2, 2022
- Messages
- 599
1/3
Looking fantastic
Thank you
- Joined
- Mar 2, 2022
- Messages
- 599
1/3
Its nearing the time when the vehicle needs permenantly fixing in place so I’m gathering together all the stowage and accessories to get them painted and weathered. I have been guilty of rushing this step in the past so I’m really going to try and focus on treating each one as an individual project. so I may be some time......
I'm also after a suitably small chain (not PE) for the rear tow pintle. Any recommendations on where to source the smallest size link chain available as the PE stuff is often too flat and unconvincing?
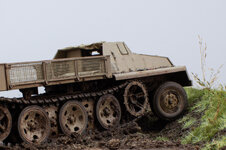
Here are a few last few test fit snaps of it on the groundwork before the bodywork is fixed permanently to the chassis so I can get the stowage added.


I'm also after a suitably small chain (not PE) for the rear tow pintle. Any recommendations on where to source the smallest size link chain available as the PE stuff is often too flat and unconvincing?
Here are a few last few test fit snaps of it on the groundwork before the bodywork is fixed permanently to the chassis so I can get the stowage added.
Attachments

- Joined
- Apr 27, 2018
- Messages
- 15,122
1/3
Los,
the groundwork is stunning mate, as to the chain I make my own I twist the thinnest wire I have until i reach the tightness I require then gently flatten it with some pliers. IMHO it looks a lot better than etch chain.
the groundwork is stunning mate, as to the chain I make my own I twist the thinnest wire I have until i reach the tightness I require then gently flatten it with some pliers. IMHO it looks a lot better than etch chain.
- Joined
- Mar 2, 2022
- Messages
- 599
1/3
Already great pictures Los, nice weathering and groundwork!
Thank you
Legal Notice
scalemodelling.co.uk is a privately operated online discussion forum. All content posted by members reflects their own views and opinions and does not necessarily represent those of the forum owners or administrators. While reasonable efforts are made to moderate content, no responsibility is accepted for user-generated material. By using this site, you agree to comply with UK law and the forum rules.
Currently on our website
Threads
37,635
Messages
710,272
Members
2,678
Latest member
sprues_and_spitfires