Theme editor

Scale Model Shop

Dragon,1.35 Sd.Kfz.164 Nashorn ,

Status
Not open for further replies.

monica

New member
Joined
Oct 30, 2013
Messages
15,169
Reaction score
0
Points
0
1/3
Thread owner
well this will be my next build, :D


going to have a few days off,building ,building,still sorting out what I,m doing any way,and it looks a very nice kit,and i,just lov Dragons,


not so good instructions, :$

View attachment 261272
 

Attachments

  • 20160904_152744.jpg
    20160904_152744.jpg
    2.4 KB · Views: 0
Thread owner

Attachments

  • 20160904_152845.jpg
    20160904_152845.jpg
    1.8 KB · Views: 0
  • 20160904_172243.jpg
    20160904_172243.jpg
    2.9 KB · Views: 0
  • 20160904_172239.jpg
    20160904_172239.jpg
    2.7 KB · Views: 0
  • 20160904_172221.jpg
    20160904_172221.jpg
    2.7 KB · Views: 0
  • 20160904_172153.jpg
    20160904_172153.jpg
    2.3 KB · Views: 0
not so good instructions, :$


View attachment 261272

lol......ive just clicked off one forum and came here, first thread i open is yours...........on the other forum the last thread i was in someone was doing their first Dragon kit......he was saying the same thing!!....felt like deja vu! lol


ive always found the instructions a little 'challenging' and it seems to be a common complaint......you would thing they would do better
 
Thread owner
haha oh lol,don,t we,just love to B---ch about there,not so good, instructions,,if I get stuck,I google the kit,and can work out


from someones,build, :D real ,they must have someone reading ,forum,s to see what people think,so they would know,


maybe they get a good lough,s ,come look what this ones said,and fall of there chairs,rolling on the floor lol, :D  
 
I'm glad you've got this one & not the earlier DML kit which is a bit of a dog!


In case you haven't seen it, there are some mistakes in the instructions. Here's a list of corrections taken from the PMMS website:


Instructions:
The instructions are the now normal colour photos of the parts during assembly but I found that some of the sequences were a little confusing especially with the gun assembly. The photos show a number of the smaller parts already assembled with only arrowed numbers pointing to the individual parts and careful study of the instructions before gluing would be advisable.


The big question is “has Dragon fixed the many errors in the Hornisse instruction sheet?” The answer is yes and no…..


The errors in the Hornisse kit instructions are shown in italics with the Nashorn equivalent in normal red type.

  • Step 4; H19 and H20 should not be glued to C1. Parts H19, H20 are meant as jigs only for placement of part H1 in Step 24 (see also below)
    Step 5; Parts M14 and M15 (equivalent to H19 and H20) are clearly shown not to be glued to part C1.
  • Step 9; D37, which is glued to D39 (breech), is shown up side down in the instructions.
    Step 9; D37, shown the correct way up in the instructions.
  • Step 11; For elevating the gun, D53 should not be glued to D2 and D3.
    Step 11; Clear indications given not to glue parts D53 and D2/D3 together.
  • Step 17; The tracks in the instruction are in the wrong directions. You should put them the other way around.
    Step 17; The tracks are still shown the wrong way around.
  • Step 18; C4 is shown backwards in the instructions.
    Step 17; C4 is still shown backwards in the instructions.
  • Step 19; The location of H30 should be on upper right of the muffler, underneath the cleaning rods. It is actually a crew step.
    Step 19; Part of H30 not included in new kit.
  • Step 19; H5 and H6, lifting eyes on the rear plate of fighting compartment, are shown the wrong way around in the instructions. Their upper end should face inward not outward as shown, H5 should be installed where H6 is shown and visa versa.
    Step 18; L4 (replacements for H5 and H6), lifting eyes on the rear plate of fighting compartment, these are correct but the instructions show them facing slightly outwards, they should be vertical.
  • Step 20/21; Parts C20 (side periscopes) are shown the wrong way around in the instructions, they should be facing outwards, not inwards.
    Step 20/21; Parts C20 (side periscopes) are still shown the wrong way around in the instructions.
  • Step 22/23; The head light mounts are shown on the wrong sides in the instructions. Part B39 should be on left fender and B40 on right fender. Following the instructions will end up head lights facing backward.
    Step 22; Only one headlight mount on the left fender is used on this version but it still indicates the wrong part which faces the wrong way. Use part B39, not B40 as the instructions indicate.
  • Step 24; H1 is shown backwards in the instructions.
    Step 24; H1 is not included in this kit.


Thread owner
oh my Patrick,thank you for the heads up with this one,oh what can you say,about them,will need to be refusing


back to this list quite a bit, O.o
 
I've done theirs so called "premium kit" and yes - it was an amazing kit, very well detailed ad stuff, but their instructions are a big mess. You do one step, then two steps further you see couple parts attached, that were not menioned.. wtf? 


And the gun.. just go for a decent reference photos and use them instead of instuctions.


Good luck anyways!
 
Thread owner
I've done theirs so called "premium kit" and yes - it was an amazing kit, very well detailed ad stuff, but their instructions are a big mess. You do one step, then two steps further you see couple parts attached, that were not menioned.. wtf? 


And the gun.. just go for a decent reference photos and use them instead of instuctions.


Good luck anyways!

 think i will ,take that advice,and find a build of this one, :D


thank you for the head up as well,
 
Thread owner
well under the watchful eyes,of Mr tom cat the seat sealer,I finished off the cannon yesterday morning before going out,


and got some color on it last night,and started the tracks,as well,


let the glue set in the middle part of the tracks over night,then about 30 mins ago ,did the end parts of about 70mm or so,


that bend up and around ,then will make up the middle top bits of track to fit, :D


so once the tracks are done the better I real don't mind doing them, 9_9


next will be start the inside


hope your liking this so far, 9_9

View attachment 261376

View attachment 261375

View attachment 261374

View attachment 261373

View attachment 261372

View attachment 261371
 

Attachments

  • 20160906_064954.jpg
    20160906_064954.jpg
    2.3 KB · Views: 0
  • 20160906_064951.jpg
    20160906_064951.jpg
    2.3 KB · Views: 0
  • 20160906_064938.jpg
    20160906_064938.jpg
    2.9 KB · Views: 0
  • 20160906_064929.jpg
    20160906_064929.jpg
    2.5 KB · Views: 0
  • 20160906_065024.jpg
    20160906_065024.jpg
    2.6 KB · Views: 0
  • 20160906_065036.jpg
    20160906_065036.jpg
    2.6 KB · Views: 0
Thread owner

Attachments

  • 20160906_074840.jpg
    20160906_074840.jpg
    2.1 KB · Views: 0
  • 20160906_074013.jpg
    20160906_074013.jpg
    2.2 KB · Views: 0
  • 20160906_073857.jpg
    20160906_073857.jpg
    2.3 KB · Views: 0
  • 20160906_072746.jpg
    20160906_072746.jpg
    2.7 KB · Views: 0
Thread owner
well today's update, :D


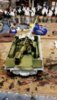
with going to the shops and dropping off and picking up,I did manage to get some done, on this one, 9_9


and when at the shops forgot to get hairspray/stick, O.o


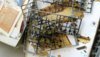
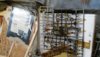
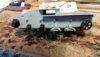
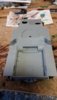
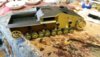
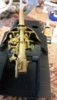
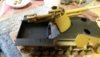
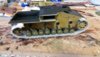
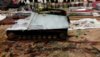
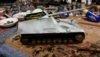
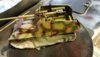
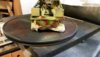
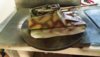
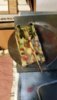
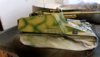
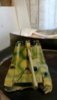
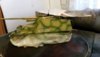
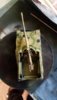
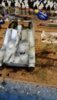
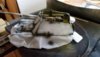
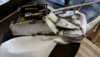
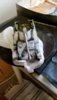
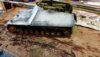
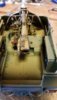
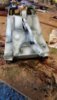
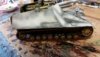
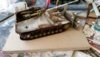
and the next part only the big guy upstairs know why I did,camo first and then whitened it out, :o O.o


the whole time before thing of not doing it,oh why, :$


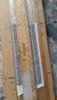
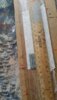
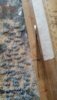
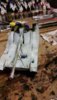
tried a new way with, the white was,use a sandy off white,then a aged white,and last of all a watered down dead white,


just in bursts ,so it ran a little,and was on and not in other spots, I,will come back over with a sponge,after putting the making on,


and blend it a little better,as I,m after the look of it beaning redone a few times,not all fresh, :D


well hope you like my progress so far, O.o

View attachment 261394

View attachment 261393

View attachment 261392

View attachment 261391

View attachment 261390

View attachment 261389

View attachment 261388

View attachment 261387

View attachment 261386

View attachment 261385

View attachment 261384

View attachment 261383
 

Attachments

  • 20160906_181039.jpg
    20160906_181039.jpg
    2.8 KB · Views: 0
  • 20160906_181030.jpg
    20160906_181030.jpg
    2.6 KB · Views: 0
  • 20160906_181019.jpg
    20160906_181019.jpg
    3 KB · Views: 0
  • 20160906_181015.jpg
    20160906_181015.jpg
    2.7 KB · Views: 0
  • 20160906_175457.jpg
    20160906_175457.jpg
    2.6 KB · Views: 0
  • 20160906_175453.jpg
    20160906_175453.jpg
    2.5 KB · Views: 0
  • 20160906_175444.jpg
    20160906_175444.jpg
    2.4 KB · Views: 0
  • 20160906_175438.jpg
    20160906_175438.jpg
    2.3 KB · Views: 0
  • 20160906_174943.jpg
    20160906_174943.jpg
    2.2 KB · Views: 0
  • 20160906_174937.jpg
    20160906_174937.jpg
    2 KB · Views: 0
  • 20160906_174934.jpg
    20160906_174934.jpg
    2.1 KB · Views: 0
  • 20160906_174929.jpg
    20160906_174929.jpg
    2.4 KB · Views: 0
Thread owner
real not a real lot in it,the tracks,and cannon were the two major bits, 9_9
 
Thread owner
ta Terry,glad your liking it so far, :D


going to try some think different as well with this,will see if it works or I like it, O.o
 
Thread owner
tried some think different with this one, O.o


did the shape joins with a grey green then over with a cold grey,the retouch up some bits


with a dead white,which is not working in the AB,gone all caggy :o


as I did not give it a coat of hair stick/spray,will not be able to do that method,of weathering so went for gray tones,

View attachment 261465

View attachment 261464

View attachment 261463

View attachment 261462

View attachment 261461

View attachment 261460

View attachment 261459

View attachment 261458

View attachment 261457
 

Attachments

  • 20160907_070117.jpg
    20160907_070117.jpg
    2.7 KB · Views: 0
  • 20160907_064638.jpg
    20160907_064638.jpg
    2.4 KB · Views: 0
  • 20160907_064632.jpg
    20160907_064632.jpg
    2.4 KB · Views: 0
  • 20160907_064627.jpg
    20160907_064627.jpg
    2.5 KB · Views: 0
  • 20160906_181039.jpg
    20160906_181039.jpg
    2.8 KB · Views: 0
  • 20160907_070123.jpg
    20160907_070123.jpg
    2.7 KB · Views: 0
  • 20160907_070130.jpg
    20160907_070130.jpg
    2.6 KB · Views: 0
  • 20160907_070144.jpg
    20160907_070144.jpg
    2.6 KB · Views: 0
  • 20160907_070137.jpg
    20160907_070137.jpg
    2.6 KB · Views: 0
Thread owner
today's update before I have to go out all day again, >:( :(


made a start on the figures and base,so need time for the glue to set with the base anyway,


need to add a few more bits of beach,to the front,part,then build the rest up with snow,and some hedgers,


well that's my plan, :D


hope you like my idea for this setting the eastern front,winter 43/44,

View attachment 261519

View attachment 261518

View attachment 261517

View attachment 261516

View attachment 261515

View attachment 261514

View attachment 261513

View attachment 261512
 

Attachments

  • 20160908_082311.jpg
    20160908_082311.jpg
    2.2 KB · Views: 0
  • 20160908_082302.jpg
    20160908_082302.jpg
    2.2 KB · Views: 0
  • 20160908_082245.jpg
    20160908_082245.jpg
    2.7 KB · Views: 0
  • 20160908_082234.jpg
    20160908_082234.jpg
    2.6 KB · Views: 0
  • 20160908_082224.jpg
    20160908_082224.jpg
    2.6 KB · Views: 0
  • 20160908_082214.jpg
    20160908_082214.jpg
    2.3 KB · Views: 0
  • 20160908_082153.jpg
    20160908_082153.jpg
    2.7 KB · Views: 0
  • 20160908_082214.jpg
    20160908_082214.jpg
    2.3 KB · Views: 0
Great start Monica, that was quick, that Nashorn looks great, looking forward to the next update ;)
 
Status
Not open for further replies.
Back
Top