Theme editor

Scale Model Shop

1/16 MUNITIONS/SPARES TIGER.

Status
Not open for further replies.

eddiesolo

New member
Joined
Jul 2, 2013
Messages
11,193
Reaction score
0
Points
0
1/3
Thread owner
I had a look and found nothing regarding a recovery Tiger, the Bergetiger is a one off and not really a recovery vehicle, although is disputed as its crane was not designed for towing another tank.

The Germans were excellent at tank recovery of their P-III and P-IV's and others except for their heavy armour battalions, hence many Tigers and Tiger II's ended up abandoned.

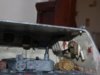
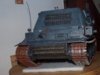
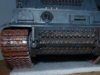
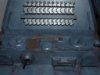
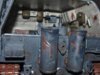
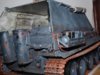
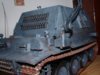
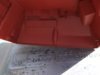
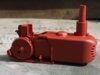
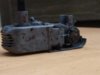
So, I decided to come up with a Tiger version, not a recovery vehicle as such but a combined, munitions carrier-like the P-III and Hummel and a spares carrier, spare tracks, wheels, tools etc. The idea is that this would follow the main heavies and provide oil, fuel, ammo and parts when a main maintenance area was not viable.

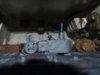
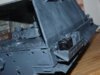
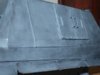
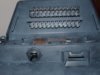
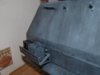
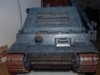
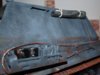
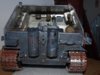
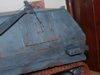
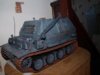
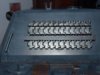
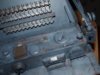
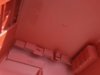
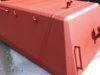
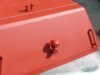
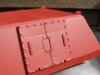
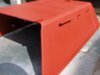
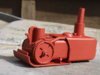
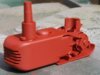
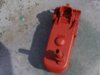
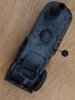
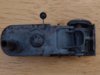
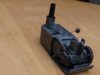
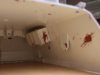
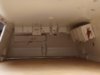
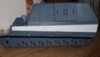
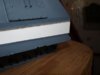
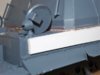
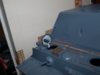
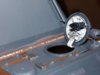
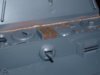
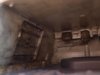
I made a armoured top hull, the main ammo would be stored inside the main hull like the P-III. The turret will be gone and a cover made. I scratched made some parts and had a go at weld seams-not the best but once painted and weatherd they will do. I added some stowage boxes inside and a sight with twin periscopes. This will sit on the top of the main hull just behind the driver and gunners hatches...well, that is the theory :D

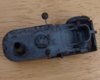
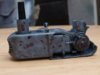
I also made a compressor from old inhaler parts that will go inside.

This is what I have done so far and this took me four days.
 

Attachments

  • P1011843 - Copy.JPG
    P1011843 - Copy.JPG
    1.5 KB · Views: 0
  • P1011842 - Copy.JPG
    P1011842 - Copy.JPG
    2.1 KB · Views: 0
  • P1011841 - Copy.JPG
    P1011841 - Copy.JPG
    2 KB · Views: 0
  • P1011839 - Copy.JPG
    P1011839 - Copy.JPG
    2.4 KB · Views: 0
  • P1011837 - Copy.JPG
    P1011837 - Copy.JPG
    2.2 KB · Views: 0
  • P1011845 - Copy.JPG
    P1011845 - Copy.JPG
    1.8 KB · Views: 0
  • P1011854 (2).JPG
    P1011854 (2).JPG
    2.6 KB · Views: 0
  • P1011853.JPG
    P1011853.JPG
    2.6 KB · Views: 0
  • P1011851 (2).JPG
    P1011851 (2).JPG
    2.3 KB · Views: 0
  • P1011848.JPG
    P1011848.JPG
    2.4 KB · Views: 0
I like this idea Si and to say those weld seams look so awesome it looks straight out of the works factory ( really like this )
You have an eye for the detail

Regards

Robert
 
Thread owner
I like this idea Si and to say those weld seams look so awesome it looks straight out of the works factory ( really like this )
You have an eye for the detail

Regards

Robert

Cheers Robert, waiting for the hull parts then the two can be married up, hopefully I have made my calculations correct and they will fit okay :confused:
 
Thread owner
oh so sorry to hear your not so well,hope you feel better soon,

Thank you Moni, I have been struggling sleeping due to pain, could be a flare up, also on Diazepam to help, but they don't seem to be. Hopefully I will be better soon and can start working on this again.
 
Thread owner
Have felt a tad better so worked on the portable compressor.

I painted, chipped and weathered the compressor and that is now finished.

I also painted and chipped the interior of the top hull section, this needs weathering and will be padded out with packs etc.
 

Attachments

  • P1011856.JPG
    P1011856.JPG
    2.3 KB · Views: 0
  • P1011857.JPG
    P1011857.JPG
    2.1 KB · Views: 0
  • P1011858.JPG
    P1011858.JPG
    2 KB · Views: 0
  • P1011869.JPG
    P1011869.JPG
    1.8 KB · Views: 0
  • P1011867.JPG
    P1011867.JPG
    1.7 KB · Views: 0
  • P1011866.JPG
    P1011866.JPG
    2.1 KB · Views: 0
  • P1011860.JPG
    P1011860.JPG
    2.3 KB · Views: 0
  • P1011859.JPG
    P1011859.JPG
    1.9 KB · Views: 0
Thread owner
UPDATE.

Got a fair amount done. Interior worked on and finished, top hull seated, measurements slightly off by 2mm so had to use plasticard to make a extra armour piece ( well, that is what I am calling it :D ).

Painted the hatches and the tools, added the side piece-got the other to do then it is re-paint time.
 

Attachments

  • P1011919.JPG
    P1011919.JPG
    1.7 KB · Views: 0
  • P1011917.JPG
    P1011917.JPG
    1.9 KB · Views: 0
  • P1011916.JPG
    P1011916.JPG
    2.3 KB · Views: 0
  • P1011915.JPG
    P1011915.JPG
    1.9 KB · Views: 0
  • P1011914.JPG
    P1011914.JPG
    2.2 KB · Views: 0
  • P1011913.JPG
    P1011913.JPG
    1.7 KB · Views: 0
  • P1011906.JPG
    P1011906.JPG
    1.9 KB · Views: 0
  • P1011905 - Copy.JPG
    P1011905 - Copy.JPG
    2 KB · Views: 0
Looks great so far Si, will keep an eye on this thread as you develop it :)
 
Thread owner
Bit more of an update.

Got both sides on and painted, interior finished and the casement is fitted.

Interior has radio fitted with earphones, large tarp cover and compressor added and a ammo box.

First round of weathering on initial P-grey using a slightly lighter grey to give a worn effect, then a black oil was sponged on and left to dry.

Side carrier made housing grease tins and Jerry-cans.
 

Attachments

  • P1011966.JPG
    P1011966.JPG
    2.4 KB · Views: 0
  • P1011964.JPG
    P1011964.JPG
    2.1 KB · Views: 0
  • P1011961.JPG
    P1011961.JPG
    2.5 KB · Views: 0
  • P1011958.JPG
    P1011958.JPG
    2 KB · Views: 0
  • P1011957.JPG
    P1011957.JPG
    2 KB · Views: 0
  • P1011956.JPG
    P1011956.JPG
    2.1 KB · Views: 0
  • P1011955.JPG
    P1011955.JPG
    1.8 KB · Views: 0
Thread owner
A lot more done to this, it has taken time but we are slowly getting to the end.

Crane added, electrics installed, tracks now on, lower hull completed. 90% painted and weathered with just some touch-ups in painting and weathering to do.
 

Attachments

  • P1012171.JPG
    P1012171.JPG
    2.2 KB · Views: 0
  • P1012156.JPG
    P1012156.JPG
    2.3 KB · Views: 0
  • P1012157.JPG
    P1012157.JPG
    2.5 KB · Views: 0
  • P1012158.JPG
    P1012158.JPG
    2.3 KB · Views: 0
  • P1012159.JPG
    P1012159.JPG
    2.3 KB · Views: 0
  • P1012169.JPG
    P1012169.JPG
    3 KB · Views: 0
  • P1012168.JPG
    P1012168.JPG
    2.5 KB · Views: 0
  • P1012167.JPG
    P1012167.JPG
    3 KB · Views: 0
  • P1012165.JPG
    P1012165.JPG
    2.7 KB · Views: 0
  • P1012164.JPG
    P1012164.JPG
    2.3 KB · Views: 0
  • P1012163.JPG
    P1012163.JPG
    2.3 KB · Views: 0
  • P1012162.JPG
    P1012162.JPG
    2.8 KB · Views: 0
  • P1012161.JPG
    P1012161.JPG
    2.4 KB · Views: 0
  • P1012160.JPG
    P1012160.JPG
    2.7 KB · Views: 0
Status
Not open for further replies.
Back
Top