Theme editor

Scale Model Shop

Tamiya 1/32 P51D Mustang - Passion Wagon

Status
Not open for further replies.
Thread owner
A short update today.

I finished masking and sprayed the black.

I made a mistake turning the 'fine pressure control' on my airbrush the wrong way and ended up blasting the black paint at 25-30 psi instead of 10-15 psi.

No problems, for MRP it was just another day at the office. The outcome was the usual level smooth finish.

View attachment 284799

The masking came away cleanly, no tearing, scratches, blemishes or residue left behind. There are the tiniest bits of touch up to do, not much at all and, in fact no-one would notice if I did not do it!

I just cannot praise these paints enough.
 

Attachments

  • IMG_2360.JPG
    IMG_2360.JPG
    1.9 KB · Views: 0
Looks like the paints are very good Barry, thanks for the testing. I hope all is well with the wife also.
 
Thread owner
Just a very quick update. I have been getting on with the detail painting for the cockpit and I will produce some pictures when I get a little more progress but, for now, I have one pic of some parts detailed and weathered simply by drybrushing with Ushi crome powder. That said, I can now see a small touch up needed on the i.p. looking at the picture. No probs, I will do that tonight.
View attachment 284884

I can report the following however:
  • The water based acrylics are fine brush painted over the MRP for the details. I was concerned that I would get some 'beading' of the paint but that is not the case.
  • When I look at the MRP painted surface through my optivisor you can really appreciate the fine pigment, it actually looks as if it is the plastic itself, not a painted surface. Very impressive. One thing about such a thin, fine paint - it really shows up build flaws in the same way metalisers do. So you need to treat these paints as if doing a Natural Metal Finish in respect of surface preparation. That is not a bad thing, on the contrary, it means that the model details really show up, which we really want to happen. On the side of the seat are some cement marks that are so minor VMA would have obscured them but they are emphasised by this paint. I simply need to be a little more careful than in the past.
  • MRP paint is also very resistent to scratches and can be handled without fear of damaging the surface.
  • These paints are no good for brushing and can only really be used with an airbrush but, for minor touch ups, I found that by putting a few drops of the paint in a pallet and leaving it to thicken for a few minutes, you can do some minor touch ups with a brush. Be delicate with it to avoid the solvent lifting the base coat. It worked really well for me but remember these paints dry quickly so dont leave it to thicken too long.
  • In other places where I needed to touch up I found I could wet the tip of a cotton bud (the extra small Tammy buds are excellent for this) and wipe the water based acrylic off the surface of the MRP paint with ease.
I am progressing well with the detailing and will show more pics soon.
 

Attachments

  • IMG_2362.JPG
    IMG_2362.JPG
    3.6 KB · Views: 0
progress is looking good.

It is amazing how good photographs are at highlighting flaws we missed with the naked eye.
 
Thread owner
Well, I did that touch up and have finished the detail painting, added a few decals and have applied a MRP gloss varnish as a sealing coat before applying washes which I will do tonight.

The gloss coat leaves a beautiful level even gloss. It is as good as the paint and, of course, dries quickly. I could have applied the enamel washes in the same modelling session it dries so quickly but I ran out of time...

Fuselage sidewalls.....
View attachment 284953

View attachment 284954

The internals - or some of them....
View attachment 284955

I found that Mr S Cement bonds well without needing to scrape this paint away and, what is more, does not leave any blemishes on painted areas near where it was applied. I would recommend applying the cement sparingly and with care though.

I will be applying a semi-matt varnish once the washes are done before dry brushing etc. I will also be using some water based matt and gloss acryilic varnish to vary the sheen as and where needed.
 

Attachments

  • IMG_2368.JPG
    IMG_2368.JPG
    3.5 KB · Views: 0
  • IMG_2369.JPG
    IMG_2369.JPG
    3.4 KB · Views: 0
  • IMG_2370.JPG
    IMG_2370.JPG
    3.9 KB · Views: 0
Thread owner

Attachments

  • IMG_2371.JPG
    IMG_2371.JPG
    3.6 KB · Views: 0
  • IMG_2372.JPG
    IMG_2372.JPG
    3.1 KB · Views: 0
  • IMG_2373.JPG
    IMG_2373.JPG
    2.9 KB · Views: 0
  • IMG_2375.JPG
    IMG_2375.JPG
    2.8 KB · Views: 0
Thread owner
I have spent a large part of the weekend preparing sub-assemblies, some filling and sanding at joins as well.

The fuse halves held together with tape and 'tacked' in places around the tape with drops of Mr S Cement. Once dry I will remove the tape and run the Mr S Cement down the join between the 'tack' points.
View attachment 285075
A close up of the interior
View attachment 285076
You notice that I have not added detail - this build is all about the paint, straight out of the box except for markings, the seatbelts and the odd adjustment to make the aircraft true to the subject.

A pic of some of the sub-assemblies so far:
View attachment 285077

This is what the fuselage looks like now after treating the seams.
View attachment 285078

I will finish pulling together more sub-assemblies ready for the next paint session.
 

Attachments

  • IMG_2377.JPG
    IMG_2377.JPG
    3.3 KB · Views: 0
  • IMG_2378.JPG
    IMG_2378.JPG
    4 KB · Views: 0
  • IMG_2379.JPG
    IMG_2379.JPG
    3 KB · Views: 0
  • IMG_2380.JPG
    IMG_2380.JPG
    3.3 KB · Views: 0
As always Barry following your builds is always a pleasure. A true artist you are! I hope everything went well with your wife too.
 
Thread owner
Thanks Bob. I brought her home yesterday and I am spending most of the day with her at home. She is quite bright and cheerful after a good nights sleep, a bit bruised and sore though! I might even get a bit of extra bench time today.
 
Thread owner
I have started work on the main canopy. Three are supplied by Tamiya offering different styles for different options. They are clear and well molded but there is a fine seam along the middle. It can be seen in this picture.
View attachment 285116

I used different fine' grades of sanding stick to remove the seam and then I dipped the canopy.

The result:
View attachment 285117
I now need to drill a small hole for the aerial and mask it up.

The aircraft I am building need a small round mirror but none of the options offered by the kit has one. But, taking a good look at the sprues, I found one!!!! You can trust Tamiya San to produce a very comprehensive set of parts with his 1/32s....
View attachment 285115

I have now removed all parts from their sprues, pulled together my initial sub-assemblies ready for the next painting stage. I have some work on the canopy to do and a seam to sand before I prep the parts for the next paint session.

Here are all the parts done and ready....

View attachment 285118
 

Attachments

  • IMG_2381.JPG
    IMG_2381.JPG
    3.8 KB · Views: 0
  • IMG_2382.JPG
    IMG_2382.JPG
    3.6 KB · Views: 0
  • IMG_2383.JPG
    IMG_2383.JPG
    3.6 KB · Views: 0
  • IMG_2384.JPG
    IMG_2384.JPG
    3.1 KB · Views: 0
Thread owner
My second session with the MRP paints and they did not disappoint. In this session I had 8 colour changes over about 50 miniutes spraying. If this was Vallejo I would have had to stop at least once probably two or three times to clean the airbrush to prevent tip drying. I did not have to stop once and suffered no tip drying at all. All I did was spray a cup or two or i.p.a. between colours. At the end of the session I did a strip clean and once again found the inside of the airbrush a lot cleaner than I would have with the Vallejo. I am using a lot less cotton buds than previously!!!

To be fair only 6 of the colour used were MRP, the other two were AKI metallisers, dark aluminium and titanium. These AKI metalisers share a lot of the same properties as the MRP paint. Given that MRP metalisers are also getting good reviews I will consider swapping to them once my supply of AKI have run out or depleted.

View attachment 285208
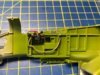
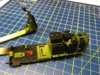
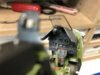
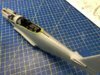
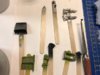
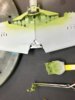
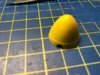
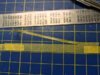
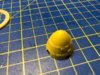
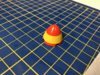
We all know how yellow can be problematical. I found previously that using a yellowish primer improved coverage and the amount of paint and coats used. MRP is no exception. I first sprayed the MRP Sand Yellow primer and then the MRP RAF Marking Yellow. The result, as you can see, is a flawless finish. I will be masking off the tips of the prop tonight to spray the rest black. I sprayed the spinner base yellow simply to ensure that I had a consistency of red across the spinner. The trick tonight will be to mask the yellow band ready to spray red. That is always trickey but I have a method that has worked before and I will post that in some detail.

View attachment 285209
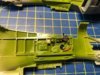
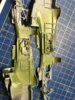
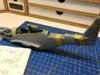
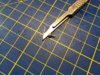
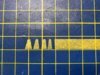
Inside the wheel wells, sprayed interior green plus the tail wheel strut. Some more masking and detail painting to do there tonight.

View attachment 285210
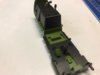
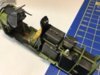
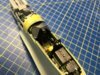
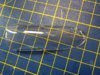
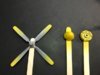
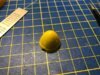
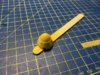
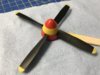
MRP Tyre Rubber on the tyre wheel looks a good tyre colour to me. I clearly put the mirror in the wrong batch and painted that with the black primer.... not an issue as it saved me from doing it later when I black base the airframe. The wheel legs were painted AKI Dark Aluminium to a beautiful even finish.

View attachment 285211
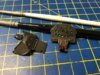
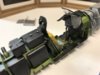
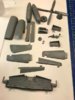
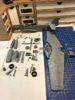
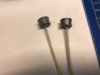
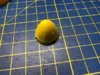
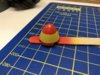
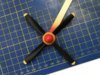
A few more parts above. The inside of the wheel well doors are painted AKI Titanium and when I took this shot one was still a bit wet. I overdid it a bit on that one but, fortunately, when I looked later the finish was fine, like MRP the AKI metaliser was very forgiving. This was at the end of the session and I was a bit over-confident!!!

View attachment 285212
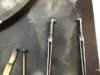
AKI Dark Aluminium again....

View attachment 285213
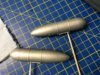
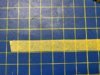
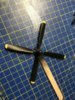
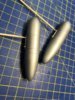
These I painted with the GMP silver primer simply because I expected to show up some corrective work to be needed on the seams and wanted to check out its appearance. I was not wrong! I will be treating the seams when I get a chance. I also rather like the colour for these drop tanks that I believe were not actually metal but were painted silver. I think I will repaint with the primer and leave it that colour, apart perhaps from what I believe to be metal bands which I will paint another metaliser shade.

that is it for last night.

Once I have painted the detail I will be glossing and weathering these parts.
 

Attachments

  • IMG_2389.JPG
    IMG_2389.JPG
    2.7 KB · Views: 0
  • IMG_2390.JPG
    IMG_2390.JPG
    1.8 KB · Views: 0
  • IMG_2393.JPG
    IMG_2393.JPG
    3.6 KB · Views: 0
  • IMG_2388.JPG
    IMG_2388.JPG
    2.3 KB · Views: 0
  • IMG_2387.JPG
    IMG_2387.JPG
    2.4 KB · Views: 0
  • IMG_2386.JPG
    IMG_2386.JPG
    2.2 KB · Views: 0
Looking good. Just picked up a couple of the MRP paints for my next kit, so will see how I get along with them.
Something I do not believe you mentioned the MRP paints appear to have an object to aid mixing in the bottle.
 
Thread owner
Looking good. Just picked up a couple of the MRP paints for my next kit, so will see how I get along with them.
Something I do not believe you mentioned the MRP paints appear to have an object to aid mixing in the bottle.
Yes, an agitator in the bottle, which is really needed. I thought I mentioned it!
I hope you get along with them as well as I do, please post your experience Dave.
 
Thread owner
I spent my session masking up ready for the next paint job.

A lot of time was spent masking the spinner which will need to be sprayed red once I have masked off a yellow band. Masking spinners like this is always trickey and I thought I would post how I did mine.

First I applied a very thin masking tape to create a base line. Fortunately I could use the end of the 'holes' where the prop fits as a guide. Nevertheless getting a smooth even 'ring' was not easy.
View attachment 285257

Next I needed to make some 'spacers'.

I laid a wide piece of masking tape on my cutting board matched to the lines on the board to ensure it was straight.
View attachment 285258
I made sure I had more than I really need in case I went wrong.

Next I worked out how wide the yellow band needs to be and at each end of the tape place another thinner tape as below. This gave me a guideline that is easier to work with, I laid my metal ruler between these guidepoints and worked it out to the right width, these guide made it easier to judge the width needed along the length of the tape. this was all Mk 1 eyeball. I then cut along the rule.
View attachment 285259
The bottom piece of tape is the right width so I removed the guide tapes and cut four pieces as below.
View attachment 285260

These were positioned on the spinner as below. One above each 'prop hole'.
View attachment 285261

I then cut more pieces of tape and added four more spacers between this in place.
View attachment 285262

Next I needed to run a piece of thin masking tape around the spinner even with the top of the spacers. Again it was not easy to keep a smooth run of tape.
View attachment 285263

Then I just needed to fill the spaces between with more tape.
View attachment 285264

Ready to spray. How well it turns out we shall soon see. It looks good but only when the contrasting colour is sprayed and the masking removed can I be sure.

Tonight I will be doing a spot more painting, mostly spraying MRP again though I have some detail to do with brushes and Vallejo.
 

Attachments

  • IMG_2394.JPG
    IMG_2394.JPG
    3.2 KB · Views: 0
  • IMG_2395.JPG
    IMG_2395.JPG
    2.9 KB · Views: 0
  • IMG_2397.JPG
    IMG_2397.JPG
    2.9 KB · Views: 0
  • IMG_2398.JPG
    IMG_2398.JPG
    2.9 KB · Views: 0
  • IMG_2399.JPG
    IMG_2399.JPG
    3.5 KB · Views: 0
  • IMG_2400.JPG
    IMG_2400.JPG
    3.5 KB · Views: 0
  • IMG_2401.JPG
    IMG_2401.JPG
    3.7 KB · Views: 0
  • IMG_2402.JPG
    IMG_2402.JPG
    33 KB · Views: 0
Thread owner
I have been getting on with the detail painting. MRP are performing flawlessly and I am gradually getting used to how you get the best out of them.

Here is the progress for the spinner and prop.

After masking the tips I sprayed black and was able to remove the masking quickly thanks to its quick drying time.
View attachment 285323

This is the spinner with the masking removed. The line was spot on but there was some bleed of the red to deal with as you can see. It is not a very sharp line. On the top edge. Perfect along the bottom.
View attachment 285322

So I did a spot of masking and sprayed
The result
View attachment 285325
Much better, not perfect, but not far off and once the weathering is done it will be fine.
View attachment 285326
Worth looking at it straight down and you can see how even the band is around the spinner.
View attachment 285327

I also treated the seams in the drop tanks and researched. Unfortunately,as I think you can see, I have some more work to do on them. A bit more Mr Dissolved Putty and a bit of sanding will finish them off.
View attachment 285324

More detail painting and weathering to do.
 

Attachments

  • IMG_2405.JPG
    IMG_2405.JPG
    3.5 KB · Views: 0
  • IMG_2404.JPG
    IMG_2404.JPG
    3.5 KB · Views: 0
  • IMG_2409.JPG
    IMG_2409.JPG
    3.4 KB · Views: 0
  • IMG_2410.JPG
    IMG_2410.JPG
    4.1 KB · Views: 0
  • IMG_2411.JPG
    IMG_2411.JPG
    2.5 KB · Views: 0
  • IMG_2413.JPG
    IMG_2413.JPG
    3.1 KB · Views: 0
Nice work on the spinner, looking forward to the next instalment.
 
Status
Not open for further replies.
Back
Top