Theme editor

Scale Model Shop

Trumpeter .Ch tz s65 Tractor Diorama

  • Thread starter Thread starter Guest
  • Start date Start date
Status
Not open for further replies.
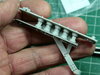
Tracks resin and Conversion now that’s my kinda build. Great pick John
Steve can I stand on your shoulders to see Mr Races build?
 
Thread owner
Morning Lee. .
Let the fun begin ....might not be my kind of build by the middle of the tracks ! Let alone the resin:flushed:. Bring on the mud and water !Thats the part I'm looking fwd to.

John
 
Mornin John--nice to see u dive straight into another build--look forward to seeing the story of the dio developing---lots of luvly mud ????--im with Allen as I have just recently got this one for the stash --I think its ur influence on all things green!!!---and in fact only received the LZ engine set last week so ill be holding onto Steves ladder at the back trying to take notes....cheers, Marty
 
This Russian thing may be contagious. I recently obtained a T-62 from Petner's Panzers in 1/87. PaulE
 
Morning Lee. .
Let the fun begin ....might not be my kind of build by the middle of the tracks ! Let alone the resin:flushed:. Bring on the mud and water !Thats the part I'm looking fwd to.

John
John
I’m sure you will exacute this build just fine with your fine modeling skills. I’ll be watching somewhere in the crowd. Have fun. Lee
 
Hi John
Most interesting. What gets me is a "an 18.5lt engine and only 65hp" - maybe Russian horses are stronger than weedy western ones :smiling5:
Jim
 
Thread owner
A good evening from Race Towers.
A few thank you's are some progress photos.
Marty.........Yes mud, common stuff in Russia, and some water. Hope that sounds good.Glad to read you also have the engine set. Its a shame that Trumpeter didn't bother with the engine, must have been the additional cost, as most Russian Tractors ran with them off.
Paul.....Welcome, you as well :thumb2:, well l'm sure you will do a cracking job, a dio maybe ?
Lee.... Cheers, glad you have that feeling:upside:
Jim......Yes I though it would have been quite high, but looking at the other models of tractors , for example the stz3 , its engine size and output were 7.46 ltr Gasoline engine with the output rated at 52 . hp @1250 rpm.Going back to the St 65 the out put of 65bp was @ 850 rpm..

A few shots of progress.
View attachment 304200
Taking suggestion from PMMS I carefully cleaned the outer edge of A9. It was so tight, remember to fit it the correct way round, with tha lip at the back.

View attachment 304201
To the right can be seen the inner rollers to the side frames.

View attachment 304203
Now fitted into the two part frame, very clean moldings with the slightest flash, you only notice it when lugs won't accept the part.

View attachment 304205
That angled section has two pin sat the top right to locate, yes I can see the molding indents, but as this is going to be underneath I can't see ant point in filling them. The lower joining point in the center with the three rivets , I had to remove the pin, either the frame was slightly out or I was wrong , any way once glued it seemed ok.
That metal block is keeping a roller housing square while it dries. ( above, with the round section. top left )

View attachment 304206
Hard to focus but the brass bit is pe, this is the outer-face of the idler wheel mounting. Two per side.

View attachment 304207
About 2 / 3 mm long, and prone to taking flight at the first chance. This is what I spent some time crawling around the floor looking for it only to find it still on the bench !:angry: These had to be glued to the strip as shown below.
The tape held the strip still , just hope they all remain in place :sad:

View attachment 304208

Well that's as far as I have got.
Hope you found it interesting, more to follow in the next few days.
Thanks for looking in, comments most welcome.

John .
 

Attachments

  • IMG_2928.jpgX2.jpg
    IMG_2928.jpgX2.jpg
    2.8 KB · Views: 0
  • IMG_2932.jpgX5.jpg
    IMG_2932.jpgX5.jpg
    1.8 KB · Views: 0
  • IMG_2930.jpgX3.jpg
    IMG_2930.jpgX3.jpg
    1.7 KB · Views: 0
  • IMG_2936.jpgX7.jpg
    IMG_2936.jpgX7.jpg
    2.3 KB · Views: 0
  • IMG_2934.jpgX6.jpg
    IMG_2934.jpgX6.jpg
    2.2 KB · Views: 0
  • IMG_2935.jpgX6.jpg
    IMG_2935.jpgX6.jpg
    3.4 KB · Views: 0
  • IMG_2927.jpgX1.jpg
    IMG_2927.jpgX1.jpg
    2.1 KB · Views: 0
Nice to see you are off and running. Looks like you have some nice injector marks to keep you busy.:angry:
I spent ages looking for a part once only to find it was on my shirt front:smiling5:
Keep up the great work
 
Thread owner
Nice to see you are off and running. Looks like you have some nice injector marks to keep you busy.:angry:
I spent ages looking for a part once only to find it was on my shirt front:smiling5:
Keep up the great work
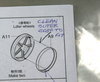
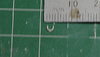
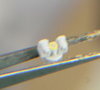
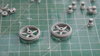
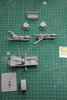
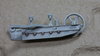
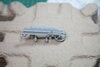
HI Steve , as I said they are underneath, so whats the point , once they get covered in mud ! Yes pesky bits once had a piece of PE stuck to my thumb while I spend several minutes worrying where it has gone to.:hugging-face:
John.
 
Oh yes, some parts do weird things to beat the carpet monster. I once dropped a return roller, spent ages crawling around on the floor - had to give up and scratch a replacement. I found the missing part in my slipper, as I turned in for the night!
Dave
 
JR

Looks like you have started a new thread - "Where is the strangest place you have found a kit part after searching for it for ages". Clean answers only of course:smiling2:

Steve
 
Thread owner
Dave, and I can imagine what you said.:flushed:
Steve .... yes sounds fun. :nerd:
John .
 
Hi John
You're up and running. Looks a challenging task with lots of fiddly bits but great start.
Jim
 
Thread owner
Yes indeed Jim.
Think this part on the lower half of the kit is the most fiddly, plus the tracks. The rest of the kit seems ok, some larger parts.But then have the engine, my first crack at resin. I have my mask read y and a new bottle of Flexi CA from VMS.
John ..
 
Thread owner
John just found this thread how you doing buddy great start , not a speed demon by any stretch but loads of Torque
Love it Bobby
 
Thread owner
Thanks.
Mick....... Your more than welcome..
Hi Bobby , good to have you along . Very slow indeed, ok when you were ploughing or carting through thick mud . Not good when the Germans were approaching ! Talking to a mate of mine who is an into engines, he said today it would have 16 cylinders , resulting in a much better hp .Very basic but did the job on farms well .

John.
 
Thread owner
Evening all . Steve has just pm 'd me to ask about the Earth Quake,we heard and felt nothing here last night.
Right onward. a good weeks building and some removal ! The lower section went well.
View attachment 304686
Instructions saisd to fit those retaining u bolts before fitting the rail.......... bad idea , on this side the end one came off as I tried to fit the rail, resulting in making a wire one .
The other side .
View attachment 304687
Made all wire ones, these will not be seen !
View attachment 304688
Its all very well tech writers showing the edge view
a no may have been smarter and more helpful .
View attachment 304689
Fitted these side deflectors for mud only to realise the engine kit has some nice PE ones , so off they will come .
View attachment 304690
This is where I had go to this morning, 2nd error I had fitted the base of the engine into the frame. The kit has no internal engine parts at all just the engine covers so the under side of the engine would show. Now removed !!!
This next part is the resin, my first attempt, apart from some 2 part accessories. Deciding that the pdf file was too small on my tablet I printed off the whole 26 one sided sheets.

View attachment 304698
Then put every part against the photos, the large ones are ok , but some of those smaller parts are really small . If you can see A7 on the center sheet left hand side its that small bit under the photoed part. Having the printed coppies was a real help. So sitting in the garden , mask and head set on I set too .
Using my new bottle of VMS Flexi PE ! I started to assemble.
All went ok I would fit those pipe like parts before the one in front if I was doing it again, as would have been easier to place the 4 parts on for gluing .

View attachment 304699
View attachment 304700View attachment 304701

Not as bad as I was expecting, very fiddly as you can expect for me, I had three attempts at lining one of the parts on , just couldn't judge the depth as I tried to line some .05 mm bolt heads up :nerd:
Hope to get a little more done tomorrow as having cleaned the patio we ( Me under instruction ) need to move every thing back into Managements desired placings ready for her birthday bash on Sunday. when the hoard from Devon are due in .
Right comments please, one request can I use some normal plastic filler to touch up a few blemishes in the resin ? and does any one know of a driver figure.
Thanks for looking in .
John .
 

Attachments

  • IMG_3018.JPG
    IMG_3018.JPG
    2.3 KB · Views: 0
  • IMG_3017.JPG
    IMG_3017.JPG
    2.4 KB · Views: 0
  • IMG_3012.JPG
    IMG_3012.JPG
    2.8 KB · Views: 0
  • IMG_3008.JPG
    IMG_3008.JPG
    2.5 KB · Views: 0
  • IMG_2963.JPG
    IMG_2963.JPG
    2.5 KB · Views: 0
  • IMG_2960.JPG
    IMG_2960.JPG
    2.1 KB · Views: 0
  • IMG_2957.jpgX2.jpg
    IMG_2957.jpgX2.jpg
    1.8 KB · Views: 0
  • IMG_2953.JPG
    IMG_2953.JPG
    2.1 KB · Views: 0
  • IMG_3019.jpgX5.jpg
    IMG_3019.jpgX5.jpg
    2.1 KB · Views: 0
Wow... That is superbly detailed engine and work.... more.... :smiling3::smiling2::smiling::smiling::smiling2::smiling3::smiling5::smiling6::smiling6:
 
Thread owner
Thanks Greg .
I'm enjoying this build , but haven't got to the tracks yet !
John .
 
Status
Not open for further replies.
Back
Top