Theme editor

Scale Model Shop

Trumpeter .Ch tz s65 Tractor Diorama

  • Thread starter Thread starter Guest
  • Start date Start date
Status
Not open for further replies.
John,
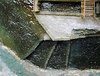
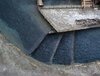
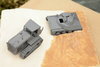
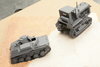
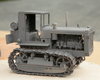
Seriously nice work very imaginative. It just shows you don't need to spend a fortune on after market stuff. I always have my eyes open and a bag when I'm out with the hound.
 
John, I've always used just gloss varnish - nothing else, for 'water surfaces'.

Don't be conned into thinking you need modeller's varnish for this sort of application. Just use ordinary household stuff from Wilco (other retailers are available......:rolling:)

Thin the first coat. Put plenty on and leave it alone! It will find its own level.

An easy way to produce a bit of surface movement is to wait until the last coat of water surface is tacky (gently touch the surface with your finger) Then with a dry brush just stroke and dab the varnish. This produces a matt surface, just like a bit of wind coming across the water making small ripples.
I hope this is of some help.

Ron
 
Thread owner
Missed a bit of late, the little tank looks great with the tracks and bling John.:thumb2::cool:
Very nice scratchery, what did you use for the tap, solder?
Great start on the base , with some nice bulrushes too, looking forward to see how they end up.:smiling:
Fernando I think it was , certainly for the tap spout itself, the handle was a short section of copper wire.
John .
 
Hi John
Great work on the base. Love those reeds and the bullrushes.
Jim
 
Thread owner
Steve..... Thanks mate and your more than welcome.
Paul........ There are times when that gives the best results.
Mick .... Hi, this is the part I really enjoy.
Jim..... Had to edit you in :thumb2: Hope when I paint the heads the paint stays on.:surprised:
John .
 
Thread owner
John, I've always used just gloss varnish - nothing else, for 'water surfaces'.

Don't be conned into thinking you need modeller's varnish for this sort of application. Just use ordinary household stuff from Wilco (other retailers are available......:rolling:)

Thin the first coat. Put plenty on and leave it alone! It will find its own level.

An easy way to produce a bit of surface movement is to wait until the last coat of water surface is tacky (gently touch the surface with your finger) Then with a dry brush just stroke and dab the varnish. This produces a matt surface, just like a bit of wind coming across the water making small ripples.
I hope this is of some help.

Ron

Ron.
I take it you colored the base first with the paints , the darker to give depth then lighter for the shallow areas, finishing with the varnish ?
Yes it will be Wilkos own again.
Any tips mate would be gratefully received
John .
 
Ron.
I take it you colored the base first with the paints , the darker to give depth then lighter for the shallow areas, finishing with the varnish ?
John .

Spot on John.
To help illustrate the process, here are two pictures of a stage build of a set of salmon steps for a diorama I made. The paint was applied direct to the polystyrene base. Hence the rippled surface to the water. Then I applied just two coats of ordinary varnish. As I mentioned in a previous post, you can get the same sort of texture by dabbing and dragging the tacky varnish with a dry paint brush.

View attachment 308923

View attachment 308922

And yes, the darker the paint the deeper the water. The process is very straight forward and a darn sight easier than that awful resin stuff, which can crack, lift at the edges, go milky etc...... Keep it simple - It's more fun that way!

Ron
 

Attachments

  • The Old Mill 111 (2).jpg
    The Old Mill 111 (2).jpg
    3.4 KB · Views: 0
  • The Old Mill 066 (2).jpg
    The Old Mill 066 (2).jpg
    2.7 KB · Views: 0
Thread owner
Ron.
Nice one , looks just the thing I was hoping to achieve, thank you. PM sent.

Si ...... Wondered where you were, well I hope.

Its a slow old thing, I've put another dob of glue on the reed heads, this time used a cocktail stick. Look good until an hr later its dried clear. When I paint the head it will suddenly take shape.
Figures have had the filler sanded down, only due to using arms from 4 differing sets , and the Tank crew a black primer.

Must get the varnish from Wilko tomorrow. ( Other shops do sell other makes ):smiling4:
John .
 
Remember to put the varnish on the base and not to use it for sniffing mate:thumb2::smiling5: I would hate to see arms as legs and legs as arms on your figures
 
Thread owner
Ha ! Steve :tongue-out3:.
Is only acrylic varnish mate.
Remember to put the varnish on the base and not to use it for sniffing mate:thumb2::smiling5: I would hate to see arms as legs and legs as arms on your figures

I can have enough mistakes with out any external help .
Now where's the TET . !!
The shop mentioned didn't have any in stock , so have reserved at another well known emporium.
Toast and coffee first !
John .
 
Thread owner
Jim there seems to be so much to do. I'm forever changing from doing those reeds, adding to the base sides, then back to figures. I've run out of heads that will suit, so had to order some Hornet.
I've used two Hornet heads up to now, they are so good regarding detail .
Varnish collected, so more sanding this morning, and then some paint on the river bed.
John.
 
John
Sorry haven’t been following at a steady pace but been very busy this summer in the garden and rebuilding my chicken pen. Every thing looking great liking what I see so far sorry for the truck. I had problems with a UM 1/48 truck kit just like it also.
 
Thread owner
Quite alright Lee, this time of year other things in life need to be done. Esp in the garden !

Good evening all .
A good day and end of the week , as I said above hopping about on various things. I cleaned down the back of the tractor wood work, sanded the side wall of the base again. Drilled out and fitted another Hornet head, and have another set on order. Only need one for this, so the others will come in at some point. Couldn't find any Russian troops with hats, or helmets.
In fact not a very good choice to be had, so went for SET HH/65 from Historex Agents, very European looking.

To day the primer went on, used the Stynylrez from Ultimate. Having had tip drying before with paints I had bought a bottle of Vallejo flow improver, this was the first time I have used it. No stoppages at all , so pleased, just added it as mentioned on the bottle, i'd put 30 drops of paint in a small plastic cup. added 6 drops of FI and stirred. Really pleased.
Figures have had more painting done since the photos, the bulrush have had the brown tips done, so all moving along.
Thought the ST65 looked great in the grey primer, of course If I want to do some chipping I shall have to do some brown sections, must remember that tomorrow.
View attachment 309268View attachment 309269View attachment 309270View attachment 309271View attachment 309272

Thanks for following, comments, abuse from other Rabble Members more than welcome
Oh it rained on Thursday........... for about a hr. so did no good what so ever.
John .
 

Attachments

  • _MG_3319.jpgP1.jpg
    _MG_3319.jpgP1.jpg
    2.5 KB · Views: 0
  • _MG_3320.jpgP2.jpg
    _MG_3320.jpgP2.jpg
    2.3 KB · Views: 0
  • _MG_3321.jpgP3.jpg
    _MG_3321.jpgP3.jpg
    2.8 KB · Views: 0
  • _MG_3322.jpgP4.jpg
    _MG_3322.jpgP4.jpg
    2.6 KB · Views: 0
  • _MG_3323.jpgP5.jpg
    _MG_3323.jpgP5.jpg
    2.9 KB · Views: 0
A terrific update mate. You certainly have been busy. I am certainly starting to get a flavour of what you trying to achieve. Good luck with the painting especially on all that engine detail:smiling3:
 
Thread owner
Hi John

You're certainly flying ahead with this one, and you've even started the figures! Terrific work.
 
Status
Not open for further replies.
Back
Top