Theme editor

Scale Model Shop

Hobby Boss M4A3

Status
Not open for further replies.

stillp

Active member
SMF Supporters
Joined
Nov 17, 2016
Messages
8,327
Reaction score
314
Points
83
Location
Rugby
1/3
Thread owner
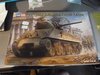
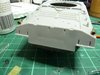
Well, after finishing my Tiger helichopper, I thought I'd try something simpler. After a browse among the stashes, I picked a 1/48 M4A3 Sherman from Hobby Boss. No canopy to mask, just a few simple decals... This'll be my first build in this scale as well as my first kit from this maker.
View attachment 309168
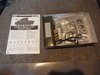
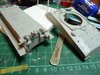
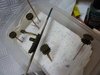
As you can see from the labels, I bought it cheap at a show somewhere.View attachment 309169
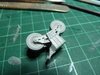
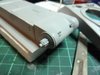
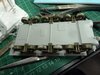
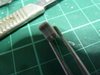
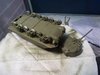
Rubber band tracks... Also a small etch fret. The lower hull is packed sitting in a card jig, which I assume is to help with assembly of the suspension.
View attachment 309170
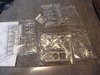
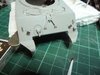
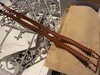
8 sprues, in 5 separate bags. Very little flash visible, quite a lot of ejector pin marks, but they seem to be in out-of-the-way places.
I'll make a start.

Pete
 

Attachments

  • P1140422.JPG
    P1140422.JPG
    3.4 KB · Views: 0
  • P1140423.JPG
    P1140423.JPG
    2.8 KB · Views: 0
  • P1140427.JPG
    P1140427.JPG
    2.9 KB · Views: 0
Does it really say Tamk on the box?
There's a good review of this on Terry's PMMS site with a few interesting points.
Jon.
 
Thread owner
Yes, it really does say "TAMK"! Then again, my spelling in Mandarin is even worse...
Thanks for the head-up Jon, I'll have a look at that.

I take back my statement about 'very little flash' - there's a fair bit, and some fit issues. First task is to assemble the suspension bogies, some of which have a bad step on one of the parts, leading to a nasty gap:View attachment 309333
Easily fixed by shaving off the step. There's some nice detail on these:
View attachment 309334
The wheels all needed filing out to fit on the axles. The parts of all 6 bogies have had a first coat of olive drab primer, since it'll be impossible to paint inside them after assembly.

Pete
 

Attachments

  • P1140432.JPG
    P1140432.JPG
    2.9 KB · Views: 0
  • P1140432.JPG
    P1140432.JPG
    2.9 KB · Views: 0
  • P1140431.JPG
    P1140431.JPG
    3.2 KB · Views: 0
Ahhhh....the joys of sanding and cutting things to fit. I am amazed some manufacturers stay in business with the quality of their kits. However the detailing looks okay. Look forward to seeing your progress. Good luck Pete
 
Thread owner
Thanks Steve. Taking a break for a few days, it's too hot!

Pete
 
Thread owner

Attachments

  • P1140454.JPG
    P1140454.JPG
    3.9 KB · Views: 0
  • P1140455.JPG
    P1140455.JPG
    3.3 KB · Views: 0
  • P1140456.JPG
    P1140456.JPG
    4.7 KB · Views: 0
  • P1140457.JPG
    P1140457.JPG
    3.4 KB · Views: 0
Pete.
Hobby Boss, as Allen Dewire told me on my T40S , plenty of small mini builds to achieve a part other manufactures would do in one . Detail is pleasing , I will follow along please .
John.
 
Thread owner
Hi John and Rick - since my audience is growing I'd better get on with it! Still too hot to paint, but I've managed to stick a few more bits together. HB kindly provide some stowage, but it'd be even kinder if the parts fitted together:
View attachment 309776
Still, nothing that a smear of filler won't fix.
Lower hull has had the suspension bogies added:
View attachment 309778
The instructions state to add the drive sprockets and idler wheels at this stage, but since they have to be glued on, I'll leave them until the tracks can be fitted. I'll brush pain the rubber on the road wheels after the hull is painted.
Upper hull has had lights, lifting rings, travel lock and machine gun added:
View attachment 309780
Next is some PE for headlight protectors and rear light covers. I'm leaving the tools off until the hull is painted. Anyone know if Mr Hobby Aqueous will be OK over Vallejo primer?

Pete
 

Attachments

  • P1140462.JPG
    P1140462.JPG
    2.9 KB · Views: 0
  • P1140461.JPG
    P1140461.JPG
    3.2 KB · Views: 0
  • P1140460.JPG
    P1140460.JPG
    3.3 KB · Views: 0
  • P1140458.JPG
    P1140458.JPG
    3 KB · Views: 0
Looking good Pete. No idea about Mr Hobby but hopefully one of the guys will help out soon. Great stuff
 
Thread owner
A little more done. Some of the detail on this model is really good - but then look at this awful attempt at a spotlight:
View attachment 310067
Looks as if they intended to provide a lens or something to go on it, but they haven't. The back of the spotlight is rather nice though.
View attachment 310068
First couple of bits of PE added, brush guards for the headlights
View attachment 310069

Sherman experts will have noticed in the first picture that the .30 calibre co-axial machine gun is missing, and the gunner's sight hole is filled in - that's because some idiot stuck the MG in the wrong hole, so cut it off flush. The hole has now been drilled back out, and a bit of styrene rod used to replace the .30 cal.

Pete
 

Attachments

  • P1140467.JPG
    P1140467.JPG
    2.9 KB · Views: 0
  • P1140468.JPG
    P1140468.JPG
    3.3 KB · Views: 0
  • P1140469.JPG
    P1140469.JPG
    2.9 KB · Views: 0
Thread owner
Well, one of the rear lights just fell into place. The other one had to be rescued from the carpet monster about 3 times, losing its PE lens in the process! Eventually got it fitted, and the guards bent up and glued on.
View attachment 310467View attachment 310468
Then some paint:
View attachment 310469View attachment 310470
Not very happy with the painting - I think the 0,2mm needle for my Infinity is damaged. Doesn't seem to be seating in the nozzle properly. I'm out at a classic car show tomorrow, but when I get back I'll give the nozzle a blast in the ultrasonic cleaner, but if that doesn't help I'll have to order a new set.
The rubber band tracks have had a coat of Holts' Plastic Primer, which seems to stick in spite of the flexibility of the tracks. It's a very bright reddish colour though, brighter than it looks here:
View attachment 310471 It'll all get covered up with a more appropriate colour, when I've decided what to use. Any suggestions anyone? Tamiya red brown?

Pete
 

Attachments

  • P1140472.JPG
    P1140472.JPG
    3.2 KB · Views: 0
  • P1140473.JPG
    P1140473.JPG
    2.8 KB · Views: 0
  • P1140474.JPG
    P1140474.JPG
    2.8 KB · Views: 0
  • P1140475.JPG
    P1140475.JPG
    2.9 KB · Views: 0
  • P1140476.JPG
    P1140476.JPG
    3.8 KB · Views: 0
In my mind Sherman tracks tend to rust more toward a sandy brown colour than to red brown, but Tamiya Red Brown tends to be a decent default choice for any type of track anyway :)
 
Hi Peter
Looks like you are making good progress. Great satisfaction from 'taming' a not so good kit.
And think of the value for money - cheap, poor kit - takes longer to build = more hours of fun for less money :smiling5:
Jim
 
Coming together very nicely Peter. Can’t help with exact paint colours for your tracks, I tend to paint all my tracks with a mix of Tamiya flat earth and flat black.
Si
 
Nice work on this Ta(m)nk Peter.:thumb2:
I've had the same like you with Hobbyboss before, parts made for something that isn't included in the kit...:upside:

Oh and Mr.Hobby works fine on VJ primer, used it a couple times now with a RAF coldwar scheme.:smiling4:
What colour did you use for the Sherman?
 
Status
Not open for further replies.
Back
Top