Theme editor

Scale Model Shop

CF Tank.

Status
Not open for further replies.

Rebelervi

New member
Joined
Sep 7, 2018
Messages
14
Reaction score
0
Points
0
1/3
Thread owner
Purchased a plastic 1/16th HL R/C tank, and used as a guide, to fabricate a larger version from CF.
Started with hatch, and layed up 4/5 layers on laminated chipboard, cut ends/sides of lower hull, and some wood flooring to use in makeshift jig.View attachment 313793
 

Attachments

  • CFStartturret %2810%29.jpg
    CFStartturret %2810%29.jpg
    3.7 KB · Views: 0
  • DSC_0099.jpg
    DSC_0099.jpg
    2.6 KB · Views: 0
  • DSC_0089 (1).jpg
    DSC_0089 (1).jpg
    2.4 KB · Views: 0
  • DSC_0092.jpg
    DSC_0092.jpg
    2.8 KB · Views: 0
Thread owner
Used scrap wood, easi sand filler to make pattern/mold for turret, and used around four layers of CF tape, added section for upper surface.
Used wood/filler for pattern, to lay up rear turret box.
 

Attachments

  • DSC_0086.jpg
    DSC_0086.jpg
    2.7 KB · Views: 0
  • DSC_0089.jpg
    DSC_0089.jpg
    3.2 KB · Views: 0
  • DSC_0093.jpg
    DSC_0093.jpg
    2.8 KB · Views: 0
  • DSC_0046.jpg
    DSC_0046.jpg
    2.7 KB · Views: 0
It took me a bit of thinking to work out that CF is probably carbon fibre … The tank seems to be a Tiger, based on hull and turret shape?
 
Chris.
I will follow this with interest, looks very technical so explanations would be helpful :smiling:
John.
 
Thread owner
Hi, thank you for your interest,yes carbon fibre , cloth, tape and sock. The sock is quite dense compared to cloth Im using, so after laying up sock, three layers? around wood/filler and sprayed pattern, was able to work with grinder to get a reasonable shape for hatch surround (0058) Added disc to top, layed some cf over old tax disc holder, which I hoped would be top layer, for hatch itself. then hoping to get some sealing, cut polo, held onto plastic pattern, and built up with strands to create an edge.
 

Attachments

  • DSC_0058.jpg
    DSC_0058.jpg
    2.7 KB · Views: 0
  • DSC_0059.jpg
    DSC_0059.jpg
    2.7 KB · Views: 0
  • DSC_0055.jpg
    DSC_0055.jpg
    2.8 KB · Views: 0
  • DSC_0201.jpg
    DSC_0201.jpg
    2.8 KB · Views: 0
Thread owner
After pulling the turret from wood/filler mold, added to front panel, built up alittle inner flats, and worked up sides. (0136)
layed up four layers, using turret mold, for front edge, added, blended in.
 

Attachments

  • DSC_0136.jpg
    DSC_0136.jpg
    2.9 KB · Views: 0
  • DSC_0177.jpg
    DSC_0177.jpg
    2.9 KB · Views: 0
  • DSC_0121.jpg
    DSC_0121.jpg
    2.6 KB · Views: 0
  • DSC_0125.jpg
    DSC_0125.jpg
    3 KB · Views: 0
Thread owner
Build is based on the Tiger, the turret front is alittle wider, hatch surround slightly taller, but lower hull hopefully is as intended. Scale is 1/8th.
After building up ends and sides, in laminated jig, layed up around four layers, to create base(0111)
Pulled, cut front sections, to start upper hull/lid.(0106/ 0139)
Cut some sides, added, epoxied on top surface, which was five layers, but sagged in middle.
 

Attachments

  • DSC_0131.jpg
    DSC_0131.jpg
    2.7 KB · Views: 0
  • DSC_0139.jpg
    DSC_0139.jpg
    3.4 KB · Views: 0
  • DSC_0111.jpg
    DSC_0111.jpg
    3.2 KB · Views: 0
  • DSC_0106.jpg
    DSC_0106.jpg
    3 KB · Views: 0
Hi, thank you for your interest,yes carbon fibre , cloth, tape and sock.
It’s an interesting way to build a model, one I certainly haven’t seen before and will likely follow if you post more about it. However, I think I need to point out that you appear to assume background knowledge on the part of your audience, that most of us probably don’t have :) I know the basics of carbon-fibre construction (hurrah for How It’s Made :) ) but I’m certainly not up to speed on the terminology. I think this goes for most of the people reading this thread.
 
Chris.
Think Jakko is right, most of us will have zero knowledge. Looks very technical and very intesresting will follow, but a bit blindly at the moment.
John.
 
Thread owner
I'll do my best.
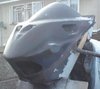
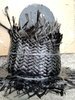
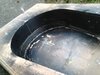
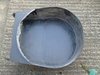
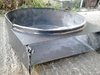
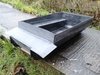
Can go with how it was explained to me....the process is similar to fiberglass. There, to fabricate a FB article, a mold is usually required, for that a plug is needed, a representation of finished article, in size and shape (Pluglast- plug made from wood,filler and spray) once plug is complete, take a mold (Fairingmold3.jpg) Lay up (Build up composite layers, FB = around 1mm of gelcoat, then layers of glass and polyester resin) in finished mold for an article.
CF though doesnt generally like corners, there is a method that can sometimes work, ie, apply epoxy, leave to go sticky, then add cloth, and more epoxy.
The more preferred method is vacuum bagging, which draws all air, and sometimes pulls resin through cloth.
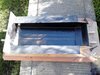
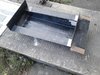
Most surfaces need release wax to prevent sticking, when laying up, although the laminated wood is usually non stick, but to be on safe side give a couple of coats.
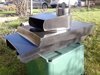
With bagging and oven, the panels weigh approx a third lighter than DIY.
If remember correctly, the ratio with CF is 55% Cloth-45% Epoxy, for best strength, so CF ya squeeze, FB ya saturate.
Glass transition temperature (The Glass Transition Temperature (Tg) is one of the most important properties of any epoxy and is the temperature region where the polymer transitions from a hard, glassy material to a soft, rubbery material.) is sometimes a concern, so there are a variety of resins for various apps.
The How its made, feature alot of pre-impregnated cloth http://www.easycomposites.co.uk/#!/prepreg
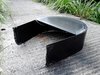
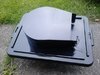
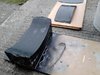
My efforts are basic, and require no real skills, nor specialised equipment, like ovens and bagging.
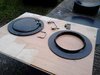
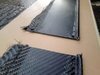
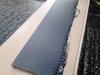
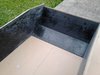
The laminated wood provides a great surface to create sheets of CF that can cut with hacksaw and bond together. Use paddle roller http://www.grptools.co.uk/laminating-rollers/paddle-roller/
 

Attachments

  • Pluglast.jpg
    Pluglast.jpg
    3.4 KB · Views: 0
  • Fairingmold3.jpg
    Fairingmold3.jpg
    3.7 KB · Views: 0
Thanks for that Chris.
Gives a good insight into what you are doing.
John,
 
Thread owner
As the top surface sags, it seemed feasible that a ring would add strength, and be able to blend into sides, for some support.
The hatch system,looked good to seal, with door hinges, to add.
Spotted a container, that raised possibility of mounting turret on bearings.
 

Attachments

  • DSC_0183.jpg
    DSC_0183.jpg
    3.3 KB · Views: 0
  • DSC_0176 %282%29.jpg
    DSC_0176 %282%29.jpg
    2.9 KB · Views: 0
  • DSC_0183ss.jpg
    DSC_0183ss.jpg
    2 KB · Views: 0
  • DSC_0184 %282%29.jpg
    DSC_0184 %282%29.jpg
    2.1 KB · Views: 0
Thread owner
Cut squares of CF cloth, stripped some threads out, and went to work on using "celebrations" lid for pattern.
Guesstimated placing of plastic pot, in centre, built up around four to five layers of scrappy pieces, CF + epoxy, all on a laminated chipboard.
Pulled, trimmed edges lightly, noticed few air bubbles, that will need repairing, once pattern is removed (0199)
 

Attachments

  • DSC_0188.jpg
    DSC_0188.jpg
    2.1 KB · Views: 0
  • DSC_0196.jpg
    DSC_0196.jpg
    2.7 KB · Views: 0
  • DSC_0197.jpg
    DSC_0197.jpg
    2.6 KB · Views: 0
  • DSC_0199.jpg
    DSC_0199.jpg
    2.6 KB · Views: 0
Thread owner
After repairs to lower bearing surface, and trim, sized up some bearings, purchased silicon sealer, added to lower surface, layed up some scrappy pieces of CF plus.
hopefully have upper and lower bearing surfaces (0244)
 

Attachments

  • DSC_0195.jpg
    DSC_0195.jpg
    2.9 KB · Views: 0
  • DSC_0197 (1).jpg
    DSC_0197 (1).jpg
    3 KB · Views: 0
  • DSC_0200.jpg
    DSC_0200.jpg
    2.8 KB · Views: 0
  • DSC_0244.jpg
    DSC_0244.jpg
    3 KB · Views: 0
Thread owner
Gave some thought to hinges, placed two pieces of laminated flooring next to one another, layed up two layers of CF, lined up ally tube, rolled one board, placed and clamped.
Used a brass pattern to fabricate ventilation opening/top of turret.
 

Attachments

  • DSC_0202.jpg
    DSC_0202.jpg
    2.7 KB · Views: 0
  • DSC_0206 %28600 x 450%29.jpg
    DSC_0206 %28600 x 450%29.jpg
    2.6 KB · Views: 0
  • DSC_0200 (1).jpg
    DSC_0200 (1).jpg
    3.3 KB · Views: 0
  • DSC_0203 (1).jpg
    DSC_0203 (1).jpg
    2.7 KB · Views: 0
Status
Not open for further replies.
Back
Top