Theme editor

Scale Model Shop

M2A1

Status
Not open for further replies.
Thread owner
Hi All,

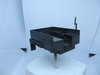
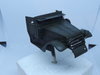
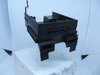
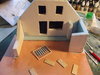
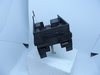
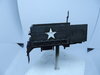
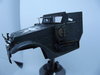
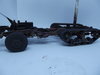
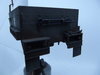
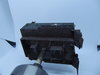
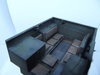
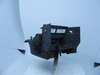
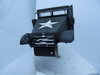
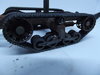
Not a lot of progress, but I have managed to put some paint on. The base colour was Tamyia Olive Drab, This was then lightened with some flesh. It appears a bit stark at the moment but the next processes should blend it in. The seats have been blocked in with dark leather brown. The whole lot has been sprayed with clear ready for the next stage. I have also done a little work on the base.
View attachment 314010View attachment 314011View attachment 314012
 

Attachments

  • DSCF1470.JPG
    DSCF1470.JPG
    1.8 KB · Views: 0
  • DSCF1472.JPG
    DSCF1472.JPG
    2.2 KB · Views: 0
  • DSCF1471.JPG
    DSCF1471.JPG
    2.2 KB · Views: 0
Paul .
Love it, the pre shading looks great, the paint work looks up to your normal high standard.
Is the kettle back on yet ? :smiling2:
John .
 
Thread owner
Paul .
Love it, the pre shading looks great, the paint work looks up to your normal high standard.
Is the kettle back on yet ? :smiling2:
John .
Thanks John,
Hopefully the mojo is back and the tea is on.
 
Thread owner
A little bit more done on the weathering using the dot technique. It looks a little garish under the light but it will be blended back by further processes. Also picked out the details on the radio.
View attachment 314123View attachment 314124
 

Attachments

  • DSCF1481.JPG
    DSCF1481.JPG
    2.8 KB · Views: 0
  • DSCF1482.JPG
    DSCF1482.JPG
    2.5 KB · Views: 0
WELL WELL WELL... Paul is back... lovely detailing... keep it coming..
 
Great to see you back at the bench mate. Send some of your mojo my way was I havnt looked at my Quad tractor for about a month:disappointed:
 
Thread owner
WELL WELL WELL... Paul is back... lovely detailing... keep it coming..
Great to see you back at the bench mate. Send some of your mojo my way was I havnt looked at my Quad tractor for about a month:disappointed:
Greg, Thanks mate.
Steve, I have put some mojo in an envelope so when you get it get the quad out.
 
Thread owner
Another small update,
Decals have been applied, the pioneer tools have had the colours blocked in and the first pin wash has been applied. This has now been put to one side. The next job will be to work on the chassis and to make the stowage. The finish looks a bit rough but still lots to do. Chipping and weathering to come.
View attachment 314414View attachment 314415View attachment 314416View attachment 314417

also plodding on slowly with the base it has been covered in plaster and have started on the shop window and shutters. Please ignore the bad fit and gaps the sections have not been attached yet they are just resting against each other.
Ant tips or suggestions will be very welcome.
View attachment 314418

cheers
Scottie
 

Attachments

  • DSCF1488.JPG
    DSCF1488.JPG
    3.6 KB · Views: 0
  • DSCF1487.JPG
    DSCF1487.JPG
    1.5 KB · Views: 0
  • DSCF1486.JPG
    DSCF1486.JPG
    1.9 KB · Views: 0
  • DSCF1485.JPG
    DSCF1485.JPG
    2 KB · Views: 0
  • DSCF1483.JPG
    DSCF1483.JPG
    2.4 KB · Views: 0
So sorry for not commenting sooner Scottie, and it's one of my favorite vehicles....:upside:
All the etch work looks great:smiling:, so neat and clean.
Paintjob and weathering is great too, very smart to keep all the major parts separated for the painting, will keep it in mind.:thumb2:
 
Thread owner
So sorry for not commenting sooner Scottie, and it's one of my favorite vehicles....:upside:
All the etch work looks great:smiling:, so neat and clean.
Paintjob and weathering is great too, very smart to keep all the major parts separated for the painting, will keep it in mind.:thumb2:
Fernando, No worries there are a lot of excellent builds on here to keep up with, but glad your here now.
 
Thread owner
The process continues slowly. I have added another pin wash and highlights also some light chipping . I have added accumulated dirt to the chassis and the underside of the body work. I was hoping to achieve a dryish look not actual mud. The weathering will be inished when it is assembled. The next stage will be to make some stowage. et me know what you think warts and all
.View attachment 314480View attachment 314481View attachment 314482View attachment 314483View attachment 314484View attachment 314485View attachment 314486
I have noticed a few things I have missed from the pictures so I will put them right. I have left the decal of the fire extinguisher and I need to touch up one of the seat backs.
 

Attachments

  • DSCF1494.JPG
    DSCF1494.JPG
    2.1 KB · Views: 0
  • DSCF1493.JPG
    DSCF1493.JPG
    2.2 KB · Views: 0
  • DSCF1492.JPG
    DSCF1492.JPG
    2.2 KB · Views: 0
  • DSCF1491.JPG
    DSCF1491.JPG
    2.5 KB · Views: 0
  • DSCF1490.JPG
    DSCF1490.JPG
    1.9 KB · Views: 0
  • DSCF1489.JPG
    DSCF1489.JPG
    2.1 KB · Views: 0
  • DSCF1495.JPG
    DSCF1495.JPG
    2.7 KB · Views: 0
Hiya Scottie,
Good to see some progress on the halftrack. Like what you’ve done with the weathering....coming along nicely mate:thumb2:
 
Status
Not open for further replies.
Back
Top