Theme editor

Scale Model Shop

Dragon Wagon.

That would be helpful mate. So far I have only used the some of the internal parts of the photoetch set.
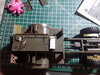
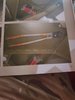
This is what I had left after finishing my tractor + trailer:

View attachment 324785

That’s one set on the left, the other set on the right. The majority of these parts are left over because I didn’t see the point of replacing the perfectly good (or even better) plastic ones.

Basically, I could just have made the cab shutters from thin plastic card and improved a few other kit pieces and saved myself the expense of these two sets.
 
Thread owner
Jakko,
Thanks mate, I am just going to swap the parts out that i think will make the model look better. To be honest i brought all the stuff together for 115 pounds off someone on facebook so i actually saved myself some money.

I did a bit more last night as i have to wait for the kids to go to bed i will post the pictures later today.

Marty
 
Marty thanks I forgot about the Hall- Scott engine they ran a lot of those engines in the Western States in the 40s and 50s in trucks mostly logging.
 
Rick i will be or trying to anyway. Im gonna spend a little time justlooking at the oiling system for the rear axle chains.

Martyn
Martyn, I had a look for my photos and don't have any build pictures so don't know where they went. As to the oiler I just drilled some small holes on the tanks and added copper wire bent to the right shape.

Although this is the soft top the chassis details are the same. Link
 
I am just going to swap the parts out that i think will make the model look better.
That’s what I did too, and that’s why I had most of the etched parts left :) The majority of them, if you ask me, didn’t look better than the plastic parts did. The ammo bins, for example, would look good if you want to show a pile of empty ones, but they’re totally pointless for a stack of cans in a rack inside the cab, IMHO.

i brought all the stuff together for 115 pounds off someone on facebook so i actually saved myself some money.
Definitely. I bought mine new in a shop for the (then) princely sum of around 300 guilders (€135 in today’s money, without correcting for inflation), plus whatever it is I paid for the etched sets (that I bought in the USA when I was over there in 1999, after I’d gotten the base kit but hadn’t started building it yet). £115 for the lot sounds like a fairly good deal — it’s about what the base kit cost me, again without considering inflation correction so you’ve actually spent less than that :)
 
Thread owner
Lee,
I believe the manufacturers at the time did build logging wagons and i have never seen another truck that has chain driven rear axles like this.

Scottie,
I have had a go at the chain oilers last night i took it from the tankograd book that i have, I'm not that good to make the fittings so i got a little plastice drilled a hole and inserted some wire. As soon as my boys go to bed i will post some more pictures of what o have done today.

Jakko, thats good news that i saved myself even more money then i had thought. As for the grwnade boxes and other ammo boxes in side, i can't see how i could replicate those so that they look like they have something in them.
Personnally i thing with these particular models its what you put on the back of it that gives it the interest.

Marty
 
Thread owner
So its a bit late in the day but here we go the first picture is of the chain oilers and the second is of the brake lines for the rear brakes.
 

Attachments

  • 20190104_005550.jpg
    20190104_005550.jpg
    3.1 KB · Views: 0
  • 20190104_005532.jpg
    20190104_005532.jpg
    3 KB · Views: 0
  • 20190104_005542_001.jpg
    20190104_005542_001.jpg
    3.3 KB · Views: 0
  • 20190104_005522.jpg
    20190104_005522.jpg
    3.4 KB · Views: 0
As for the grwnade boxes and other ammo boxes in side, i can't see how i could replicate those so that they look like they have something in them.
First question is: what would they have in them? Next, if you can’t see the contents, what’s the point of putting anything in at all? :)

Personnally i thing with these particular models its what you put on the back of it that gives it the interest.
Agreed. Mine was going to be in a diorama of American troops recovering a Panther from a French farmyard, with civilians looking on. I’ve got the M26 built and painted but not weathered, I’ve got the Panther built but not painted, I’ve got a bunch of figures built and half-painted … but twenty years later, that’s still as far as I’ve got :)
 
Welcome back Marty. I hope Oman wasn't to mush of a trial for you. You have certainly surged ahead with the build. I pull up a chair and watch on avidly with the rest of the rabble. Good luck
 
Thread owner
Steve,
To be honest Oman was a bit like a holiday seeing as most of the helicopters broke out there. But it is good to be home, you are most welcome to join in.
 
Hello Martyn,
Just pulling up a chair to follow your build, got the tin of compo boiled sweets at the ready...
Oman, sun, sea and sand sand sand....
Cheers, Mike.
 
Hi Martyn,
The oilers look spot on as do the brake lines. I don't know if the wheels are fixed yet but I found the best way to remove the seam around the middle was to use some roughish emery paper then scotchbrite scourers.(other manufacturers are available) It gives the vinyl tires a nice matt rough worn finish.
 
Thread owner
Mike,
Your always welcome mate as long as you have some red ones for me.

Scottie,
I'm glad you like the oilers, i just haven't found a place to secure the other end of the airlines yet but i will. I will give the tyres a bit of wearing down I didn't think to use scotchbrite thatnks mate.

Martyn
 
Thread owner
Good afternoon/evening to everyone,

Sorry it's been a while since I posted anything but two weeks of exercise on Longmoor and Salisbury plain during the snow that we had at the beginning of the month and then having a nice viral infection has left me a bit behind on my build and posting any progress.

Last night I swapped the dash out for the photo etch piece and the Jerry can straps on the drivers side.

I put the passenger side together with the map table and map holder with the angle neck torch bracket and I scratched the torch to fit in it.

I will post some pictures as soon as my kids are all I bed.

Narty
 
Marty,
Oh those winter exercises I remember them well. Glad to hear your on the mend. I added a lot of details inside as well, but you can see virtually nothing even though I left the door open. Still it is worth it because you know its there.
 
Thread owner
Good evening all,

It's been ages since I have been able to post anything. I have taken a couple pictures of where I am at, I'm just about to start the cab roof interior. I have also made the stowage box for the cab interior from plastic card.

Marty
 

Attachments

  • 20190408_180556.jpg
    20190408_180556.jpg
    3.7 KB · Views: 0
  • 20190408_180547.jpg
    20190408_180547.jpg
    3.2 KB · Views: 0
Marty, struck down eh, cold and wet after being burnt and dry ! Glad you feeling better and able to return to the build .
The photos look good mate ,some progress at least .
John .
 
Thread owner
I have had leave this week so I have been able to get some more work done on the dragon. The crew compartment is done for now and I have started the cab roof and rear wall interior. I have added a set of bolt cutters to the ceiling and brackets to hold it. I have also posted the picture out of the book as a reference. I also realised I hadn't posted a picture of the tool box that is inside so I have attached a picture of that as well.
But do have one question when putting a sling on a rifle do people put the sling loops on the weapon or just glue the sling straight onto the weapon.

I hope you enjoy the pictures.

Marty
 

Attachments

  • 20190413_081649.jpg
    20190413_081649.jpg
    2.3 KB · Views: 0
  • 20190413_081319.jpg
    20190413_081319.jpg
    2.6 KB · Views: 0
  • 20190413_081308.jpg
    20190413_081308.jpg
    2.6 KB · Views: 0
  • 20190413_081622.jpg
    20190413_081622.jpg
    1.9 KB · Views: 0
Back
Top