Theme editor

Scale Model Shop

Dave Ward's 1/35 Trumpeter SU-152 Heavy SPH

Status
Not open for further replies.

Dave Ward

New member
Joined
Apr 27, 2018
Messages
10,549
Reaction score
43
Points
0
1/3
Thread owner
After trying my dexterity, with the 1/72 Revell Leopard & cleanliness with the natural metal 1/48 Expeditor, I felt like something a bit bigger, and that could be made a little 'lived in'.
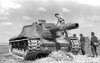
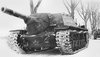
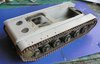
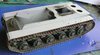
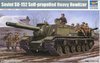
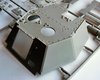
Having seen Matija's KV-2, I decided that the Trumpeter SU-152 had been propping up the stash for long enough
View attachment 326411
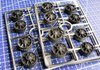
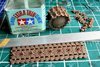
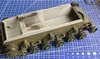
One of Trumpeters earlier models, it may be a bit crude in places - but so was the SU-152.
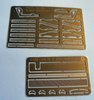
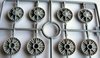
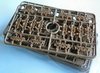
I'll put up some sprue shots before starting - especially the gun barrel! Oddly there is a decal sheet, but the colour chart doesn't show any decals at all
Dave
 

Attachments

  • trumpy su-152.jpg
    trumpy su-152.jpg
    2.9 KB · Views: 0
Dave.
I remember building this a few years ago, not a bad kit, you'll make a better job than I did.
Will follow and learn.
John.
 
Thread owner
A few detail pictures of the parts...................
View attachment 326452
Basic Hull - as in all Trumpeter KV models - this needs a bit of surgery for the SU ( simple )
View attachment 326457
Nicely detailed road wheelsView attachment 326458
Massive superstructure - it looks a bit to smooth to me............
View attachment 326453
The mantelet has a bit of a cast texture.
Now, the gun barrel you can either have an all plastic split barrel
View attachment 326456
OR, you can have an aluminium barrel, and a slide moulded one piece muzzle brake!View attachment 326451View attachment 326454
I can't decide which one to use ( not! ) :rolling:
What may put some modellers off is the individual track linksView attachment 326459
Half with a guide horn, the others not...........
And two pieces of PEView attachment 326455some of which will NOT be used, it'll be invisible when assembled , as experience of previous KV builds showed.
My Expeditor is awaiting it's final touches, but I may make a start on SU running gear whilst I am waiting for things to dry
Dave
 

Attachments

  • Al Barrel.jpg
    Al Barrel.jpg
    1.6 KB · Views: 0
  • hull.jpg
    hull.jpg
    1.9 KB · Views: 0
  • mantelet.jpg
    mantelet.jpg
    2.6 KB · Views: 0
  • mozzle brake.jpg
    mozzle brake.jpg
    2.7 KB · Views: 0
  • PE.jpg
    PE.jpg
    3.2 KB · Views: 0
  • plastic barrel.jpg
    plastic barrel.jpg
    1.6 KB · Views: 0
  • road wheels.jpg
    road wheels.jpg
    3.2 KB · Views: 0
  • superstructure.jpg
    superstructure.jpg
    3.1 KB · Views: 0
  • tracks.jpg
    tracks.jpg
    3.3 KB · Views: 0
Massive superstructure - it looks a bit to smooth to me............
Rolled armour plate doesn’t necessarily have much texture to it, so I wouldn’t worry overly much about it if it were my model.

Now, the gun barrel you can either have an all plastic split barrel
View attachment 326456
OR, you can have an aluminium barrel, and a slide moulded one piece muzzle brake!View attachment 326451View attachment 326454
I can't decide which one to use ( not! ) :rolling:
Kind of makes you wonder why they bothered to include the plastic barrel, really. Or at the very least, why it comes with a muzzle brake moulded on when there’s another one in the kit too.

What may put some modellers off is the individual track links
Having built a Dragon IS-2 (many years ago), KV-style tracks are pretty painless. Sure, you have to watch out with this one that you alternate the links, but they’re nice and big and it’s just one link into the next — not like you’re building a Sherman track with small end connectors or a Universal Carrier where each link is smaller than those of a 1/72 scale KV :)
 
Thread owner
Off and running - about an hour - minimum clean up, most parts clicking into position, and TET wicked into the joints.............
View attachment 326592
At this rate it'll be a quick build ( or will be until I get to the tracks! )
Dave
 

Attachments

  • su hull.jpg
    su hull.jpg
    2.4 KB · Views: 0
Thread owner

Attachments

  • roadwheels primed.jpg
    roadwheels primed.jpg
    4.3 KB · Views: 0
  • sprocket primed.jpg
    sprocket primed.jpg
    3.3 KB · Views: 0
  • hull primed.jpg
    hull primed.jpg
    2.7 KB · Views: 0
Thread owner
Basecoat applied - all wheels dry fitted.......................View attachment 326880
One thing that can catch you out is the ( very ) minor overlap of the last road wheel & sprocket ( above - this side only ), it makes assembly a bit of a jiggling test, as the road wheel fits between the sprocket toothed sides. Only one side, as the torsion bar suspension means that the road wheel axles are staggered.
Onto the most tedious part of assembly - the tracks. Luckily these are great big chunky things that even my fat fingers can deal with!View attachment 326879
No need for any jigs, just a straight edge to build them against, remembering to alternate the guide horns. The tracks are a nice snug fit, and can be joined dry, and wrapped around the sprocket, then TET applied to the centre of the track. Leave this to set, and you should be able to remove the track section for painting...............
Dave
 

Attachments

  • track build.jpg
    track build.jpg
    4 KB · Views: 0
  • hull basecoated.jpg
    hull basecoated.jpg
    3 KB · Views: 0
Hi Dave
Great start on this beast. Looks a rather decent kit despite any accuracy shortcomings.
Jim
 
Thread owner
One side tracks complete (apart from the top run). This is still loose, and I'll prime before final fixing.View attachment 327025
Even though these are individual links, they must be added in pairs, otherwise somewhere you will end up with two guide horns, or two flat links next to each other.
The next step is to build the top run of track, with sag! Now, looking at ref. photos - for reference purposes only............View attachment 327026View attachment 327027
There seems to be quite a range of sag - that gives me plenty of leeway to fit an even number of links along the top. Once that's sorted, I can duplicate the process on the other side.
Dave
 

Attachments

  • bottom track run.jpg
    bottom track run.jpg
    1.9 KB · Views: 0
  • su-152 01.jpg
    su-152 01.jpg
    2.3 KB · Views: 0
  • su-152 02.jpg
    su-152 02.jpg
    2.3 KB · Views: 0
Even though these are individual links, they must be added in pairs, otherwise somewhere you will end up with two guide horns, or two flat links next to each other.
This is not an unknown thing on the real tanks, though, so if you happen to be forced to do it like that on your model, it’s not a major issue. If you don’t like the look of it, you can of course hide it fairly well by putting the two adjacent links on the idler or drive sprocket.
 
Dave, it looks good, I used the plastic barrel just needed a slight clean up after gluing. Your probably a cleaner builder than me so it wouldn't pose you a problem. The tracks were not bad, even for me !
John.
 
Thread owner
One side finished ( just about) - now all I have to do is duplicate this for the other sideView attachment 327139
No problems ( apart from glueing my fingers together ). It's much easier, when the links are large enough for my big hands.
Dave
 

Attachments

  • lh track fin.jpg
    lh track fin.jpg
    2.2 KB · Views: 0
Thread owner
Tracks finished, and fenders attached.........................View attachment 327284View attachment 327285
Proceeding apace, when the superstructure is added, I'll spray the upper hull - not that many big bits to add.
Dave
 

Attachments

  • running gear fin 01.jpg
    running gear fin 01.jpg
    2.8 KB · Views: 0
  • running gear fin 02.jpg
    running gear fin 02.jpg
    2.6 KB · Views: 0
Hello Dave,
Phew, caught up again, love the tracks and they will look so realistic under a coat of paint.
Seat reservation made for next episode.
Cheers, Mike.
 
Status
Not open for further replies.
Back
Top