How about an extra fine sanding stick then?Thanks Peter , I might have some fine wet and dry, though I doubt that fine . Oil stone went years ago .
Pete

How about an extra fine sanding stick then?Thanks Peter , I might have some fine wet and dry, though I doubt that fine . Oil stone went years ago .
OH No !, it still sprays ok, did that primer using it so might just leave it, and use the better Evolution. If it does need one then so be it, but worth a shot.Hi John
Always worth trying to repair the needle and it may work but without being too pessimistic I think you'll have to let the moths out of the wallet :rolling:
Jim
Cheers Ralph.Very nice John :smiling3:.
Hi Lee, bad luck on that happening with the wash, been there myself, don't know why it happens apart from maybe a too heavy mix. The first wash I ever did was so thin when it dried I couldn't see the difference. :smiling2:.Very nice. I’ve done several washes on my subjects still new at it all was good till the other day I did my Autocar Half Track and the washes wouldn’t work had to repaint don’t have a clue what happened the wash turned it dark good luck
Thanks Paul, think you right on the winter camo, just need to see a few ref photos first to refresh.John,
Nice work on the bonnet, it would have been a shame to cover all that fine work on the motor. As to the cammo, I to would leave it as is with perhaps a winter wash.
Hey Dude 2, There isn't really much to think about in reference to camo. Trust me, how can you let a guy down who lives in a Plymouth station wagon??? I'm sure he'll understand that a winter wash finish will look fantastic and you are very good at doing it buddy!!!...
Prost
Dude 1

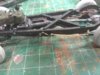
That's wheelie good news :tongue-out3: Ah the old ones are the best.Wheels we have wheels :smiling3: !
Thank you Jim, have you by any chance been out in the sun, Matron is on her way ( shes been at Steve's since Monday .) :smiling3:Hi John
That's wheelie good news :tongue-out3: Ah the old ones are the best.
Jim


Thanks Paul.John,
That is looking seriously good. It is a shame to bury things out of site we have worked on so hard.


Thanks Neil.That's looking excellent John! :thumb2:
Thanks Rick, and thanks for always following.:thumb2:.Nice bit of progress JR. Rick H.
Cheers Steve, the build part always is a struggle, the next and the base are something I look fwd to , still not decided what will be the theme.Superb result mate. I am so pleased it went together in the end. You now have a nice base to do all the weathering. Looking gooooooooood!
Thank you Peter.That's a smart bit of work John - very clean looking. Once again your tenacity has payed off.
Thanks buddy.Gonna be a beaut. PaulE
Strange thing Si, think the varnish was not completely dry, seem ok now, once there a bit of weathering all will be well. Love those wheels .Can’t offer any advice on the decal thingy but I can say it’s all coming together nicely.
The replacement wheels look superb...good call:thumb2:
Looking real nice John :smiling3:.
scalemodelling.co.uk is a privately operated online discussion forum. All content posted by members reflects their own views and opinions and does not necessarily represent those of the forum owners or administrators. While reasonable efforts are made to moderate content, no responsibility is accepted for user-generated material. By using this site, you agree to comply with UK law and the forum rules.