The stand is a commercially available one. There are a few on the market. I cannot remember where I got it and would suggest some on line searches for stands or jigs. I will take a look to see if I can identify where it’s from and if I find it will post a link.

You are using an out of date browser. It may not display this or other websites correctly.
You should upgrade or use an alternative browser.
You should upgrade or use an alternative browser.
Tamiya's Masterpiece - Their 1/32 scale Mosquito
- Thread starter BarryW
- Start date
- Status
- Not open for further replies.
G
Guest
Guest
cheers Barry
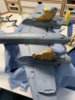
I have airbrushed an overall base coat of Medium Sea Grey. I sprayed in sections with light coats building up colour gradually ensuring some modulation with the slightly darker sections at the outer edges of panels.
Then I did my favourite MRP trick, I sprayed a cup of Mr Levelling Thinner as a mist coat all over. It does a number of things, it blends the overall finish giving it a even light sheen that is good for decal application. It also is the first stage of cleaning the airbrush. After all why waste that thinner by just blowing it into a jar!!
Here are a couple of pics.
View attachment 343777
View attachment 343778
I am planning to mask for the dark green rather than freehand it.
Attachments

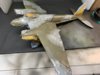
I masked up with white tac snakes for the sides where a reasonably straight demarcation lines are needed, Clever Putty where curved camo shapes are needed and masking tape and blue tissue in some ‘odd’ places. I then sprayed Dark Green, modulated the colour by adding some white which was then blended by two mist coats, one of the green and the other MLP.
View attachment 343875
View attachment 343876
View attachment 343875
View attachment 343876
Attachments

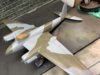
Masking removed. Not a lot of touch ups to do, looking good.
I will mask up next to paint the main markings before applying the decals for the rest. No need for a gloss coat with MRP. There are also some details to hand paint.
View attachment 343990
I will mask up next to paint the main markings before applying the decals for the rest. No need for a gloss coat with MRP. There are also some details to hand paint.
View attachment 343990
Attachments
G
Guest
Guest
Really enjoying watching this progress. I'm learning a lot just by reading your text and studying the pictures.
If you don't mind a question - I remember you saying that MRP is ready to spray out of the bottle. Do you ever find the need to thin it more for really up-close detailed work, and if so, do you prefer Mr Levelling Thinner to MRP's own slow thinner?
If you don't mind a question - I remember you saying that MRP is ready to spray out of the bottle. Do you ever find the need to thin it more for really up-close detailed work, and if so, do you prefer Mr Levelling Thinner to MRP's own slow thinner?
The only time I have thinned MRP is when I have done a mist coat. Otherwise no thinner, even for close up work.Really enjoying watching this progress. I'm learning a lot just by reading your text and studying the pictures.
If you don't mind a question - I remember you saying that MRP is ready to spray out of the bottle. Do you ever find the need to thin it more for really up-close detailed work, and if so, do you prefer Mr Levelling Thinner to MRP's own slow thinner?
MLT has its uses, mostly for the thinned mist coat or, sometimes I do a mist of MLT ‘neat’ in order to improve the finish.
G
Guest
Guest
Thanks Barry, I read above about your final mist coat of thinner. Interesting stuff and I can understand how it would work from a technical point of view. Another one to add to my list of things to try in the future.
I have run a polishing stick over the camo as part of surface prep for painting the markings.
I first masked up to paint the codes, white in this instance plus black for the serial number. The photo makes the M look odd, I think it is just the picture angle as I dont remember it looking like that 'in life'

Then, after allowing plenty of drying time I went over the area again with a polishing stick and masked up ready for the rest of the markings.

These are the paints being sprayed

I decided to use the white as the base for the yellow in the end and this is after spraying the white.

And yellow

Masks are great but these I am using are vinyl. If at all possible get paper not vinyl as vinyl have a tendency to lift over detail. You can see it here, just a few minutes after trying to push it down onto the detail for spraying.

I will almost certainly have to do some further masking after to tidy up the edges.
I first masked up to paint the codes, white in this instance plus black for the serial number. The photo makes the M look odd, I think it is just the picture angle as I dont remember it looking like that 'in life'
Then, after allowing plenty of drying time I went over the area again with a polishing stick and masked up ready for the rest of the markings.
These are the paints being sprayed
I decided to use the white as the base for the yellow in the end and this is after spraying the white.
And yellow
Masks are great but these I am using are vinyl. If at all possible get paper not vinyl as vinyl have a tendency to lift over detail. You can see it here, just a few minutes after trying to push it down onto the detail for spraying.
I will almost certainly have to do some further masking after to tidy up the edges.
Some tips for using decal replacement masks.
Spray at very low pressure close in from directly above. Build up colour slowly and avoid flooding, ideally you want the paint almost dry when it hits the model. This will minimise touching up.
When removing masking elements place them carefully on the backing paper. You will often need to put them back on the model ready for the next colour. Then you may need to use some elements for touch ups as well
Make sure the paint is fully dry and cured before remasking for the next colour. Take your time and don’t hurry.
Use a cocktail stick to remove elements carefully. if possible. You might have to use a knife, if so be very careful not to scratch paint.
Always finish off with a polishing stick when fully dry and cured. Then if using MRP reactivate the paint with a light mist coat of MLT to improve the finish and look before decals. With MRP you can decal direct onto the paint, no need for gloss varnish. Then do a gloss varnish to seal the decals before weathering washes.
G
Guest
Guest
It looks a lot like the lower left upward pointing bit of of the mask got moved to the right somewhat when you applied it, throwing off the angles in the left leg and the downward diagonal stroke of the M. To illustrate:The photo makes the M look odd, I think it is just the picture angle as I dont remember it looking like that 'in life’
View attachment 344523
The black line is the way the letter is supposed to be, the blue line more or less how the mask appears to have shifted.
It’s already looking great, though, and a very good explanation of how to do this.I will almost certainly have to do some further masking after to tidy up the edges.
You may be right on that but it certainly was not apparent when I looked at it and applied the polishing stick. It will be easy enough to correct though.It looks a lot like the lower left upward pointing bit of of the mask got moved to the right somewhat when you applied it, throwing off the angles in the left leg and the downward diagonal stroke of the M. To illustrate:
View attachment 344523
The black line is the way the letter is supposed to be, the blue line more or less how the mask appears to have shifted.
It’s already looking great, though, and a very good explanation of how to do this.
G
Guest
Guest
My experience is that photographs often show things you didn’t notice about the actual model, but that you wish you had before you took the pictureit certainly was not apparent when I looked at it
")
- Status
- Not open for further replies.
Legal Notice
scalemodelling.co.uk is a privately operated online discussion forum. All content posted by members reflects their own views and opinions and does not necessarily represent those of the forum owners or administrators. While reasonable efforts are made to moderate content, no responsibility is accepted for user-generated material. By using this site, you agree to comply with UK law and the forum rules.