Theme editor

Scale Model Shop

Revell Heinkel He111 H-6 1:48

Defiant911

New member
Joined
Feb 25, 2020
Messages
640
Reaction score
0
Points
0
1/3
Thread owner
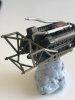
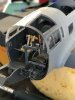
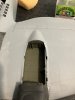
I have started on my build which is my sixth build and have decided to use a few small Eduard trim bits for this one. You need good magnifying glass and steady hands . I read several sources and it appears that the interior is a grey colour where as some people seem to have used an olive drab. I’ve stuck to the grey although it’s not the most interesting of colours.
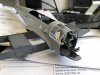
I’ve also cheated and ordered the eduard masking for the windows this time to see if that offers a more accurate frame work after painting.
 

Attachments

  • 5A63877A-8730-4FFB-AE64-5C42FC643120.jpeg
    5A63877A-8730-4FFB-AE64-5C42FC643120.jpeg
    3.6 KB · Views: 0
  • 06E3BF38-589B-4F9E-B0A8-EF97A8730A89.jpeg
    06E3BF38-589B-4F9E-B0A8-EF97A8730A89.jpeg
    3.4 KB · Views: 0
Carl,

Your off to a good start - looks fairly detailed cockpit for 48th scale.:thumb2::thumb2:
Don't blame you for ordering the masks - there's just as much glass on the front
as there is on a greenhouse!! ;)

Paul.
:smiling2:
 
Thread owner
Carl,

Your off to a good start - looks fairly detailed cockpit for 48th scale.:thumb2::thumb2:
Don't blame you for ordering the masks - there's just as much glass on the front
as there is on a greenhouse!! ;)

Paul.
:smiling2:
Yeah, I have done it from scratch for my previous models, using a pencil to scribe and then cutting each individual shape but thought I’d try the easy route this time around And as you say, theres a lot of glass
 
If I did my 111 gain I would order some masks. Mine was OK with tape but nice to have something fitted. I had the excellent ICM kit but given my time again I would fit the glass after the painting as its a bugger to mask up for that funny enough and easy to warp the various glass sections as I had in the ICM. Not sure if the Revel is a one piece glass which is better
 
Thread owner
If I did my 111 gain I would order some masks. Mine was OK with tape but nice to have something fitted. I had the excellent ICM kit but given my time again I would fit the glass after the painting as its a bugger to mask up for that funny enought and easy to warp the various glass sections as I had in the ICM. Not sure if the Revel is a one piece glass which is better
There are some windows they have made two into one but there’s still quite a few to fit. I have been using this humbrol clearfix glue which doesn’t effect the glass clearness but to be honest it doesn’t seem the best bonding glue and if your not careful you end up pushing windows into the inner model which can be problematic. I’m starting to go back to the old Tamiya extra thin glue now. What do you use ?
 
The H6 model does indeed have a grey (RLM 66) internal colour for the cockpit. the green cockpit colour (RLM 02) was only used on the P1 (Battle of Britain version).
 
using a pencil to scribe and then cutting each individual shape
I find it much easier to mask the whole canopy and then cut out the framing with a sharp knife. This may be awkward on an He 111, though, because of the shape of the glazed nose.
 
Thread owner
I’ve also noticed that there are many additional parts that are included but not in my instructions. One set of these parts are the Bombay racks and bombs. I quite like the idea of fitting these. What would be the reason for not showing them as an option in my instruction ms despite supplying the parts. Surely all heinkels has the bomb racks as they were bombers after all?
 
Thread owner
I find it much easier to mask the whole canopy and then cut out the framing with a sharp knife. This may be awkward on an He 111, though, because of the shape of the glazed nose.
I’ve not tried that method, I presume you must be careful not to scratch the glass with the sharp knife.
 
Wasn't the H6 an external bombs and torpedo aircraft? Therefore the bomb bay would have been removed?
 
I’ve not tried that method, I presume you must be careful not to scratch the glass with the sharp knife.
You will want to be careful not to press too hard on the knife, but at the same time, any cut you make in the clear plastic will be exposed after you remove the tape from the canopy frame and get painted over, so it shouldn’t be a real problem.
 
Thread owner
If I did my 111 gain I would order some masks. Mine was OK with tape but nice to have something fitted. I had the excellent ICM kit but given my time again I would fit the glass after the painting as its a bugger to mask up for that funny enought and easy to warp the various glass sections as I had in the ICM. Not sure if the Revel is a one piece glass which is better
Hi Gary, you mentioned you built this model yourself. Was yours also a revell 1:48?
out of curiosity was the fit of parts good on yours as I’m finding it really quite dreadful.
i follow instructions which in hind site is working out bad for me as you glue say the main wings, e.g. Under part of wing and then when you come to glue top part of wing nothing lines up and gaps everywhere.
this is probably the worse fitting model I’ve made yet and all the filler won’t really improve it. I’m going to have to live with some of the miss aligned parts as unless I pull things apart possibly damaging the model further it’s just going to have to stay as is.
im a little disappointed to be honest.
as I say, in hind site I should of dry fitted and taped everything first so i guess that’s my biggest error but that said I followed instructions so this should not have really occurred.

carl
 

Attachments

  • image.jpg
    image.jpg
    2.5 KB · Views: 0
  • image.jpg
    image.jpg
    3.1 KB · Views: 0
Was yours also a revell 1:48?
out of curiosity was the fit of parts good on yours as I’m finding it really quite dreadful.

Carl. I'm building the 1/48 Revell He111 H22. I feel your pain regarding the gaps and non-lining up. Check my signature for proof lol
 
Thread owner
Carl. I'm building the 1/48 Revell He111 H22. I feel your pain regarding the gaps and non-lining up. Check my signature for proof lol
Well I’m glad I’m not alone then. As I mentioned , if I had checked first how bad the fit was I could of at least evened up the gaps to make filling a little easier but its a bit late for me now.
it was all going fine right up to the wing and engine cowling figment.
id be interested to see pictures of your progress Alan.
carl
 
Thread owner
I thought I’d take a picture of the Heinkel engines just before covering them up with the engine cowling panels.
 

Attachments

  • BFE3DD19-FE63-48CF-8CA6-D1214DE51CF6.jpeg
    BFE3DD19-FE63-48CF-8CA6-D1214DE51CF6.jpeg
    3 KB · Views: 0
  • 1F1E7060-F300-4547-BCB2-FCFD85AE714F.jpeg
    1F1E7060-F300-4547-BCB2-FCFD85AE714F.jpeg
    2.9 KB · Views: 0
Thread owner
Thought I’d try a tiny sample of the proposed camouflage on a spare bit. Ignoring the grey bits where I never painted the whole piece I think it’s promising.
Looking closely I need to make sure enough pressure is applied to each piece and that each join actually joins for consistency. May do another test piece before attempting whole
Model
 

Attachments

  • 74A8A7EF-436F-4345-B06B-43FF9F1FD4EC.jpeg
    74A8A7EF-436F-4345-B06B-43FF9F1FD4EC.jpeg
    3.8 KB · Views: 0
Thread owner
So after a fair bit of trouble with this one, repainted twice and many other rookie errors I’ve finally completed this model. Well there are a couple more decor and the the final varnish and possibly a bit of weathering but basically it’s finished.
I thought I’d post some
Pictures of it anyway. As I say, it was far from
Perfect and many more lessons learnt hopefully towards improving my next build.
 

Attachments

  • A5E87403-2E68-4BD0-87FC-84FD673F0658.jpeg
    A5E87403-2E68-4BD0-87FC-84FD673F0658.jpeg
    4.2 KB · Views: 0
  • F038748E-A425-4148-8A97-8465FED96A2C.jpeg
    F038748E-A425-4148-8A97-8465FED96A2C.jpeg
    4.3 KB · Views: 0
  • 8A75FDD8-D57B-4C66-9F48-57EDF418541B.jpeg
    8A75FDD8-D57B-4C66-9F48-57EDF418541B.jpeg
    4.4 KB · Views: 0
  • A57793F0-0D5D-4BA2-B8F7-961BE908F292.jpeg
    A57793F0-0D5D-4BA2-B8F7-961BE908F292.jpeg
    4 KB · Views: 0
We're always learning Carl. The He111 came out nicely in the end though. Well done
 
Back
Top