Theme editor

Scale Model Shop

Revell 1/32 Messerschmitt bf110

I think Mr Color also goes for a more green shade of Graugrun......and wasn't there two versions?

I don't really want to get in a debate about colours on someone's thread Karl. PM me if you are interested in a discussion. I just wanted to be sure that this was indeed MRPs's RLM 74
 
I have been working on the subs.
Detail painting and a few
View attachment 395869

I am waiting for decal solution to dry, then I will be weathering. But, in the meantime some subs need ‘pulling together‘.
View attachment 395870
I have been working on the subs.
Detail painting and a few decals


I am waiting for decal solution to dry, then I will be weathering. But, in the meantime some subs need ‘pulling together‘.
hi Barry, how do you go about getting the thin red line on the bombs?
 
Thread owner
I have been getting on with the decals

Because the Revell decals showed themselves to be pretty good I decided to go with the ‘box’ scheme with the bee nose thinking that I could get the four decals that make up the nose art to work. Decals are very much my weak point and is the area in which I always have most problems. Even though the kit decals are indeed very good, I spent 20 plus minutes trying to get the first into position without success and it started to tear. I decided to cut my losses and go back to using the Eagle Cal set with the rather splendid Wolfs Head nose art.

To be accurate to the Eagle Cal scheme I would need to strip the paint completely and respray. Eagle Cal themselves though do point out that the topside scheme for this aircraft is Itself speculative.... As such, even if I did go to the bother to re-do the paint, I still could not claim accuracy (the wolf’s head also was a D and I built a C-7 also).

Consequently, this is now a ‘what if’ build, what if the ‘wolfs head’ unit had been equipped with a C-7 a bit earlier in the war.....

I have to say though, i really do like this scheme....

The decals are among the best I have ever had, they lay down beautifully and with a couple of solvent applications conform perfectly to the detail. If only all decals were like these Eagle Cals.

so....

The wolf’s head itself....
B3586481-2EB7-438D-90A1-2CD2873E1C14.jpeg

fuselage sides...
B0BBA197-2370-4575-9D0E-5733030B8849.jpeg

wings....
A41CBA1E-BDED-4378-982E-C1CF32547F3B.jpeg

I left off, until later, a few decals that are applied close to the wing root In case I need to do some work there.

I will be cementing into place the wings next.
 
Those decals do look good Barry, I can't see any carrier film.
Pete
 
Thread owner
They are indeed excellent. I will be looking for Eagle Cal again in future.
 
It's looking very good Barry.

You are a braver man than I am, attaching the wings after all that work on the paint and decals.
 
Thread owner
It's looking very good Barry.

You are a braver man than I am, attaching the wings after all that work on the paint and decals.
Only because I remember how good the fit was on the original Dragon Steve. Test fits suggested it would be OK to do this.

It worked, just. The fit is not as good as the Dragon though despite being the same moulds. I think it’s because of the Revell plastic, while not as bad as the crap Airfix use, is nevertheless prone to a little shrinkage and warping. It’s the only explanation for the ‘different’ fit. I would not describe Revell’s plastic as being unfit for large scale planes as I would Airfix though. Theses problems are minor and easily corrected for this kit.

You can see here, I had some very small gaps at the wing roots which I filled with Vallejo Plastic Putty removing the surplus with damp cotton buds. I will have to do a little local masking to spray the roots. Easy enough and not unexpected hence the reason I left off a few decals close to the roots.

View attachment 396541View attachment 396542View attachment 396543View attachment 396544
 

Attachments

  • 09B43337-01DA-49BA-9AFC-708785D1F1A9.jpeg
    09B43337-01DA-49BA-9AFC-708785D1F1A9.jpeg
    3.6 KB · Views: 0
  • 7ABFE137-2229-4463-AB03-B796A7E29DBB.jpeg
    7ABFE137-2229-4463-AB03-B796A7E29DBB.jpeg
    3.2 KB · Views: 0
  • FB04F0AE-9916-4F29-9778-7D3F2BF7BCB8.jpeg
    FB04F0AE-9916-4F29-9778-7D3F2BF7BCB8.jpeg
    3 KB · Views: 0
  • 2DD4B427-7DED-41C8-8892-16311CCAFA77.jpeg
    2DD4B427-7DED-41C8-8892-16311CCAFA77.jpeg
    3.1 KB · Views: 0
Thread owner
I have been sneaking off for the odd 30 minutes at the bench all day. Making the most of it as I will be reopening my office on the 14th September and from then I will only get my hour each evening... lockdown has been good for something.....

I sprayed the wing roots and did the final decals on the inner wing.

View attachment 396557View attachment 396558View attachment 396559
 

Attachments

  • E384160C-DF4B-4A99-B8A7-402CCFA58A02.jpeg
    E384160C-DF4B-4A99-B8A7-402CCFA58A02.jpeg
    3.5 KB · Views: 0
  • 773CD638-883A-4CA9-9DB9-84DEF61ED3A3.jpeg
    773CD638-883A-4CA9-9DB9-84DEF61ED3A3.jpeg
    2.9 KB · Views: 0
  • EB2C9236-E08E-48FF-8C45-96BE4822D619.jpeg
    EB2C9236-E08E-48FF-8C45-96BE4822D619.jpeg
    3.2 KB · Views: 0
Thread owner
Now I need to seal the decals with a gloss varnish before doing a panel line wash.

One problem with lacquer varnishes which spray as beautifully as the lacquer paint, is that they can reactivate the lacquer paint underneath. If you flood the model with varnish it can ruin the paint scheme but even if you have not flooded it there can still be minor issues. I have often found that, in patches where the paint is thinnest, it reveals more of the black base increasing the contrast between the darker and lighter areas. I have often had to go back over these areas with a light coat of the base colour. A bigger problem can arise with decals simply because the paint under the decals is not reactivated at all and you get a contrast with the paint under the clear carrier film. Not it is not so easy to spray in these areas without overspray.

The solution is obvious, to use water based acrylic varnish instead of the lacquer or to, at least, put a water based barrier between the paint and any subsequent lacquer varnishes.

I decided to try the latter. The lacquer varnishes spray so much better I really don’t want to stop using them.

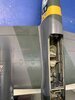
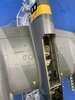
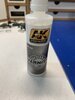
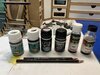
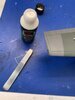
So, instead of sealing the decals with my MRP varnish I decided to use this:
View attachment 396583
It needs thinning and I did a 50:50 mix with Vallejo Airbrush Thinner. I usually spray MRP at about 10-12 psi or less but I had to wind up the pressure to between 25-30 psi to get proper atomisation.

While spraying it really did not give me that nice ultra smooth result I get from MRP. It did self-level eventually to an acceptable finish. The other difference being the length of time needed for it to cure. AKI suggest 6 hours but that is pushing it and I will leave it 24 hours. That is not a problem as I am in the office all day today anyway. MRP dries almost instantly and 30 minutes is plenty of time....

It did remind me of just how good MRP varnishes and paint really are and I will never go back to these water based acrylics. But if this works and reduces or eliminates the problem of paint reactivation then it will be worth doing. What I don’t want to do is use this AKI varnish any more than this one coat.

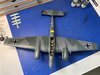
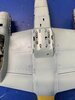
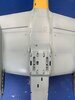
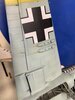
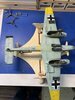
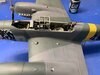
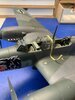
This is how I left the model with the varnish curing.

View attachment 396584

Tonight I will start enamel panel line washes.
 

Attachments

  • C296B113-C8EA-4C44-B29C-563A9F278EFC.jpeg
    C296B113-C8EA-4C44-B29C-563A9F278EFC.jpeg
    3.7 KB · Views: 0
  • D22D6419-E9DD-4EFE-A931-7F49E3A94E9D.jpeg
    D22D6419-E9DD-4EFE-A931-7F49E3A94E9D.jpeg
    3 KB · Views: 0
Barry, what do you clean your airbrush with after using MRP?
Pete
 
Thread owner
Hi Pete

I use mainly i.p.a. as it is cheap bought in reasonably large quantities but I also have some Mr Tool Cleaner which is very powerful stuff, I use a small amount when the airbrush needs that little extra without going for a full strip clean.
 
Thread owner

Attachments

  • 19E332F4-25EB-44CD-ACED-EB417B3FB1E3.jpeg
    19E332F4-25EB-44CD-ACED-EB417B3FB1E3.jpeg
    3.5 KB · Views: 0
  • 8246474A-C388-4DE3-B47A-9F1524AFE22C.jpeg
    8246474A-C388-4DE3-B47A-9F1524AFE22C.jpeg
    3.5 KB · Views: 0
  • F77DFCA8-CE7B-4D30-9EE5-E73CA5A463E8.jpeg
    F77DFCA8-CE7B-4D30-9EE5-E73CA5A463E8.jpeg
    2.9 KB · Views: 0
  • 4F28453B-376D-4A83-8169-D0944822D6F7.jpeg
    4F28453B-376D-4A83-8169-D0944822D6F7.jpeg
    4 KB · Views: 0
  • 2BF30691-57B7-41B3-892D-ECB2E9349EB3.jpeg
    2BF30691-57B7-41B3-892D-ECB2E9349EB3.jpeg
    3.9 KB · Views: 0
  • B09DC1FA-346A-4A1A-A4F4-D1FC4E76D6F2.jpeg
    B09DC1FA-346A-4A1A-A4F4-D1FC4E76D6F2.jpeg
    3.3 KB · Views: 0
  • A306D2BF-E1BB-43B7-B470-2BD72D1A9081.jpeg
    A306D2BF-E1BB-43B7-B470-2BD72D1A9081.jpeg
    2.7 KB · Views: 0
Hi Barry
Super paintjob and great looking decals. Weathering is off to a fine start.
Does lacquer varnish reactivate the underlying lacquer paint even when the paint is fully cured?
Jim
 
Barry some very fine spray work there, and those decals are so sharp, quite different to the normal run of themill.
 
Thread owner
I have been working now on the top, first using AK Kerosene leaks and spills. This is always the last weathering job, after the last matt coat, to leave the correct sheen.
View attachment 396816
View attachment 396819

Drilled some holes for the aerial rigging
View attachment 396817

Small wing tip lights done. I have the perfect tweezers for these small round parts.
View attachment 396818

The the canopy parts. This will be done in two sessions as I will need the first sections to dry before the last three open sections.

View attachment 396820
View attachment 396821
 

Attachments

  • 83128C97-1A1D-4FF1-85F9-83FB30D98194.jpeg
    83128C97-1A1D-4FF1-85F9-83FB30D98194.jpeg
    3.5 KB · Views: 0
  • 44BD4A91-2FAE-46FC-969F-BD56968F5ADD.jpeg
    44BD4A91-2FAE-46FC-969F-BD56968F5ADD.jpeg
    3.3 KB · Views: 0
  • 06137BFF-FD1C-4D26-AAE2-A1EA24110534.jpeg
    06137BFF-FD1C-4D26-AAE2-A1EA24110534.jpeg
    3 KB · Views: 0
  • 428C4A56-3104-4874-9806-15BAEF1A7CAA.jpeg
    428C4A56-3104-4874-9806-15BAEF1A7CAA.jpeg
    2.9 KB · Views: 0
  • 3A41C0C7-BBB1-4D34-A8BB-6071661F179A.jpeg
    3A41C0C7-BBB1-4D34-A8BB-6071661F179A.jpeg
    3.7 KB · Views: 0
  • 1E9489A3-C5DF-4490-B7CF-4FE2E6841A52.jpeg
    1E9489A3-C5DF-4490-B7CF-4FE2E6841A52.jpeg
    3.8 KB · Views: 0
Back
Top