Hi all, just thought I'd document this build as I find it quite a revelation and interesting. I say a revelation due to the fact that I have been modelling for years, started with airfix and matchbox in the 90s, mainly planes and boats, then i moved on to 1/35 Tamiya tanks and then in the mid 2000 I purchased my first big 1/16 Tamiya Tiger RC and have been building in 1/16 scale ever since. if it wasn't for the fact that a client approached me with regards to his 1/25 Tiger I wouldn't even have looked at this scale, then one came up on ebay for a good price and i decided to take a chance on it. Boy and am I glad I did, I love this scale, just wish that manufacturers gave this scale more of a look really as there aren't much available at this scale, both kits and aftermarkets!?
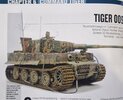
Which is why I'm having to design most of the parts myself. I want to base my kitty on Angus Creighton's amazing rendition of Tiger 009 late Command tank (incidentally, I also used Angus' Fehrmann's F01 Tiger for my Tamiya 1/16 Tiger). I suspect that this is going to be a long project as I still haven't decided whether to model and improve the interior detail as well!? Just seems soo involved!?
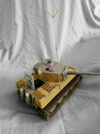
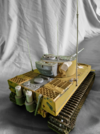
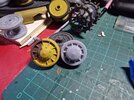
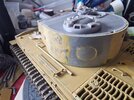
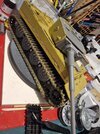
So to begin with, I started with the wheels, I could use the existing axles/arms but I couldn't bring myself to modify them so I decided to CAD them as well, the steels wheels aren't glued on or fixed in place - can't actually think how to do that yet but since this is a static model and the tracks hold them in place, I think I'm okay to leave them as they are?! The late sprocket, i created two versions one with 15teeth (suitable for the existing tracks) and the more accurate 21teeth sprocket that uses my own designed individual tracks. Currently I'm just using the 15tooth sprocket so I can use the existing tracks, the small 600mm idler wheel I also designed and fitted. Thankfully most of this designs I already have when I was working on my 1/16 tanks so it was a simple matter of just resizing and adapting them for this project =)
View attachment 481958View attachment 481949View attachment 481961View attachment 481950
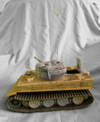
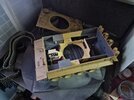
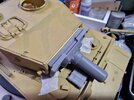
Then the mantlet - might actually be nice to get an aftermarket aluminum barrel for this but not sure where to get them in the UK?! This design is a simple plug and go to make it easier, it simply replaces the existing early style mantlet.
View attachment 481951View attachment 481952View attachment 481953
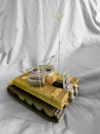
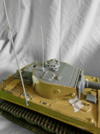
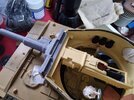
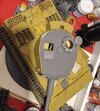
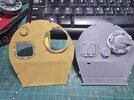
The turret roof, another part that needs updating, hatches are workable as I like them workable =) the air filter i think needs resizing and I'm working on that atm. I could use the current stowage bin as it looks good enough but it does need a few details added on - not sure what my plans are yet for this bin?!
View attachment 481954View attachment 481956View attachment 481955View attachment 481960
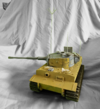
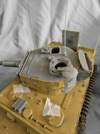
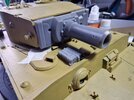
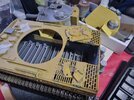
I quickly moved on to the deck - again, lots of things need changing here - didn't really want to touch the deck too much but the engine cover is just a detail that I simply could not ignore so out it goes, thankfully i managed to cut it out cleanly and this is where I'm at - just finished printing the new cover and we shall see if it fits or not?! haha
View attachment 481957View attachment 481959
Which is why I'm having to design most of the parts myself. I want to base my kitty on Angus Creighton's amazing rendition of Tiger 009 late Command tank (incidentally, I also used Angus' Fehrmann's F01 Tiger for my Tamiya 1/16 Tiger). I suspect that this is going to be a long project as I still haven't decided whether to model and improve the interior detail as well!? Just seems soo involved!?
So to begin with, I started with the wheels, I could use the existing axles/arms but I couldn't bring myself to modify them so I decided to CAD them as well, the steels wheels aren't glued on or fixed in place - can't actually think how to do that yet but since this is a static model and the tracks hold them in place, I think I'm okay to leave them as they are?! The late sprocket, i created two versions one with 15teeth (suitable for the existing tracks) and the more accurate 21teeth sprocket that uses my own designed individual tracks. Currently I'm just using the 15tooth sprocket so I can use the existing tracks, the small 600mm idler wheel I also designed and fitted. Thankfully most of this designs I already have when I was working on my 1/16 tanks so it was a simple matter of just resizing and adapting them for this project =)
View attachment 481958View attachment 481949View attachment 481961View attachment 481950
Then the mantlet - might actually be nice to get an aftermarket aluminum barrel for this but not sure where to get them in the UK?! This design is a simple plug and go to make it easier, it simply replaces the existing early style mantlet.
View attachment 481951View attachment 481952View attachment 481953
The turret roof, another part that needs updating, hatches are workable as I like them workable =) the air filter i think needs resizing and I'm working on that atm. I could use the current stowage bin as it looks good enough but it does need a few details added on - not sure what my plans are yet for this bin?!
View attachment 481954View attachment 481956View attachment 481955View attachment 481960
I quickly moved on to the deck - again, lots of things need changing here - didn't really want to touch the deck too much but the engine cover is just a detail that I simply could not ignore so out it goes, thankfully i managed to cut it out cleanly and this is where I'm at - just finished printing the new cover and we shall see if it fits or not?! haha
View attachment 481957View attachment 481959
Attachments
-
 20230429_053418.jpg4.6 KB · Views: 0
 -
 20230509_060651.jpg5.7 KB · Views: 0
 -
 20230514_055022.jpg6 KB · Views: 0
 -
 20230514_055122.jpg5.3 KB · Views: 0
 -
 20230514_055446_resized.jpg6 KB · Views: 0
 -
 20230517_221033.jpg5 KB · Views: 0
 -
 20230519_064022.jpg5.1 KB · Views: 0
 -
 20230519_134313.jpg6 KB · Views: 0
 -
 20230520_053350.jpg6.2 KB · Views: 0
 -
 20230520_061114.jpg4.9 KB · Views: 0
 -
 Capturedww.JPG2.8 KB · Views: 0
 -
 20230517_220842.jpg6.6 KB · Views: 0
 -
 PhotoRoom-20230507_213058.png14.3 KB · Views: 0
")
")