
You are using an out of date browser. It may not display this or other websites correctly.
You should upgrade or use an alternative browser.
You should upgrade or use an alternative browser.
- Status
- Not open for further replies.
G
Guest
Guest
Nice work Scott, I vote night fighter scheme")
G
Guest
Guest
Iam edging that way myself although might use German grey for horizontal surfaces tp add some definition to it.
Scott
Scott
When I did my mosquito nightfighter when I did my research the RAF used an anti glare black paint top coat so I tried to tame down the black by adding a touch of grey to the mix ( believe it was revel number 43 to tame the Matt black look, will try to get some pics on for ref for you
Regards
Robert
Regards
Robert
G
Guest
Guest
Cheers Robert much appreciated, black is one of those difficult colours to paint well.
Scott
Scott
Looking very good Scott your doing some Stirling work.
I would like to see the Africa colours love the colours but not to worry if you go for the night fighter scheme I've done my Hercules Africa colours
I would like to see the Africa colours love the colours but not to worry if you go for the night fighter scheme I've done my Hercules Africa colours
G
Guest
Guest
It doesn't just have to be those two choices I was thinking something with invasion stripes possibly.
Scott
Scott
G
Guest
Guest
Good work Scott, are you re-scribing this or replacing the lines that have been sanded
G
Guest
Guest
Replacing the likes, iam going to try using fine copper wire to do it, if it is too big I will scribe a line between the two raised panel lines and sit the wire in it hopefully to make everything match up.
Scott
Scott
G
Guest
Guest
Cheers Barry, that means a lot mate as you know iam a tanky don't often do things with wings so if you have an idea for a colour scheme iam taking suggestions.
Scott
Scott
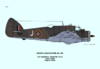
I have given you some pics that I ref for my beau I did to help you along with your decision Scott
Hope this can help you I a decision
RobertView attachment 119964
View attachment 119965
View attachment 119966
View attachment 119967
View attachment 119968
View attachment 119969
View attachment 119970
View attachment 232986
View attachment 232987
View attachment 232988
View attachment 232989
View attachment 232990
View attachment 232991
View attachment 232992
Attachments
A bit late now and anyway you've fixed the issue . I've not made this kit but many old aircraft kits can have some nasty steps, either in the wing to fuselage join or, as here, at the outer wing. I usually join the upper and lower wing parts separately to whatever they attach to with no step. This will leave a gap along the leading edge of the wing. This is much easier to deal with than a step at the join and almost all aircraft had a smooth leading edge meaning your repair shouldn't involve losing any detail.
Cheers
Steve
Cheers
Steve
G
Guest
Guest
Steve, Barry and Robert thanks for all your input and help and the great pics, she is getting there and I have to say maybe the whole things with wings isn't as scary as I once thought I actually like this kit.
scott
scott
Hi Scott
Just a query question for you. You say your using copper wire on the beaufighter as it has raised lines etc.( think that's right.
Well at the weekend I snapped up an old 1982 Airfix GRumman Prowler ( very cheap) it's all there I think and has raised panel lines. When I get round to building it I'm thinking would the copper wire work the same for this kit once the sanding etc is done ( where I may lose panel lines
I'm not proficient with jets and raised lines even worse for weathering etc so thinking if I ca the copper wire where lost panel lines are and then sand down a wee bit? I don't fancy going down the road of sanding the complete structure and then re scribing as this would be very hard for me
Regards
Robert
G
Guest
Guest
Hi Robert let you in on something Monica told me, test a piece of copper wire against the original raised panel lines, if it stands out too much then scribe a line joining the to halves of the panel line where you have sanded, then try sitting the wire into the scribed line with CA, now I test fitted my copper wire against the raised lines on my beaufighter last night and it all fits and blends beautifully no trouble at all. Before this sand all your seam lines away then try this idea, you should only be applying small amounts of copper wire where you have sanded to get rid of your seam lines.
scott
scott
G
Guest
Guest
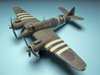
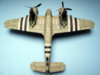
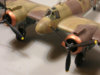
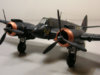
Here is where iam up to with the beaufighter, I have replaced lost raised panel line with copper wire and fashioned a new exhaust with miliput, what do you think so farView attachment 120236
View attachment 120237
View attachment 120238
View attachment 120239
View attachment 120240
View attachment 120241
View attachment 120242
View attachment 120243
View attachment 233258
View attachment 233259
View attachment 233260
View attachment 233261
View attachment 233262
View attachment 233263
View attachment 233264
View attachment 233265
- Status
- Not open for further replies.
Legal Notice
scalemodelling.co.uk is a privately operated online discussion forum. All content posted by members reflects their own views and opinions and does not necessarily represent those of the forum owners or administrators. While reasonable efforts are made to moderate content, no responsibility is accepted for user-generated material. By using this site, you agree to comply with UK law and the forum rules.