Theme editor

Scale Model Shop

1/35 Warrior

Status
Not open for further replies.

Steve Brodie

New member
Joined
Sep 17, 2014
Messages
4,652
Reaction score
0
Points
0
1/3
Thread owner
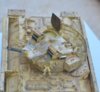
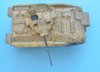
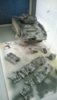
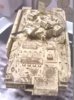
Finally managed to get my warrior into the 'paint shop' on Saturday, Vallejo grey primer, left to dry for 4 hours with fans running in booth, then a pre shade of Vallejo panzer grey ready for the desert yellow coat. I had already sprayed the side panels when i got the airbrush and compressor in September, couldnt wait to try it out. happy with the settings and coverage, think may have to respray the camo when i unmask the sides , uhmmView attachment 93488

View attachment 93489


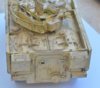
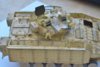
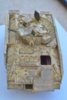
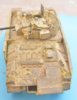
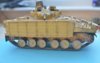
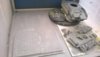
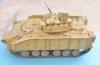
Also pre shaded side nets and a few bits of stowage along with the base, not sure will use both side nets yet.

View attachment 206511

View attachment 206512
 

Attachments

  • WP_20141129_003.jpg
    WP_20141129_003.jpg
    2 KB · Views: 0
  • WP_20141129_002.jpg
    WP_20141129_002.jpg
    1.8 KB · Views: 0
Nice start Steve, looking forward to how this turns out, got one of these in the stash somewhere, popcorn at the ready;)
 
Be really interested in this one as I used to look after these babies in real life [emoji16] What kit is this if that's ok to ask?
 
Thread owner
\ said:
Be really interested in this one as I used to look after these babies in real life [emoji16] What kit is this if that's ok to ask?
Academy Warrior IRAQ 2003 - http://www.academy.co.kr/eng/1p/1p_plaview.asp?pView=PLA0000003&pCode=512&pScale=SCALE00001
 
Thread owner
\ said:
Looking great Steve, what accessories are you using?
Black Dog warrior set - various bags and fuel cans and side nettings. Tank crew from blast models, infantry figure from Accurate armour and afghan civilian (man) from MAIM (i think) Base is from Phoenix models.
 
Thread owner
Managed to get back to the ‘paint shop’ last night, Monday evening was spent helping (well taking over – that’s what us dads do) my son finish of his sword and shield for a school project. The VA sand came out to dark – photos I have of Iraq vehicles show them to be more of a yellow colour, so put a coat of thinned MC desert yellow over the top – this then looked to clean, so after I had finished painting the tracks and adding a dust layer (AK-Interactive) thought I would try a layer on the Warrior – this messed it up, so had to put a further coat of MC desert yellow over the top and left it at that, letting some of the dust be visible in places, so quite happy. Next will be a filter to darken things down a touch and remove masking from the side panels and hope they are pretty close. Will try and get some ‘proper’ photos at the weekend, as these are less than perfect – taken at 10pm at night L. Final thing – I am sure I read somewhere that the side armour on warriors in Iraq / Afghanistan were never 100% match for the rest of the tank – hope that’s true!!

Lessons learned;

1. If it looks ok, STOP!

2. Don’t try and do it all in one go

3. You don’t need to fill the cup up with paint, it goes a lot further than you think

a. The cup lid id there for a reason

4. MC is hard to spray

5. MA and AK are brill for spraying

pre

View attachment 93597


top colour and dusty tracks

View attachment 93598


View attachment 206620

View attachment 206621
 

Attachments

  • pre.jpg
    pre.jpg
    2.1 KB · Views: 0
  • post.jpg
    post.jpg
    2 KB · Views: 0
Thread owner
View attachment 93707


Chipping work started last night, built up in various layers with different bits of sponge, now need to get the sanding sticks out and cut back on some bits, next will be a pin wash (DAK Yellow) followed by an overall wash of the same colour, then a coat of True Earth faded yellow wash and will see where we are before adding the side netting and clobber onto the vehicle. Base and figures to follow – still a way to go.

View attachment 206730
 

Attachments

  • warchip.jpg
    warchip.jpg
    3.2 KB · Views: 0
Now that's some heavy chipping Steve! Looks good & the further weathering will tie it all together.

Cheers

Patrick
 
Thread owner
few more photos of progress - used my 'real' camera not phone, so these are 'a bit better' (photo wise !), overall faded wash applied, and then built up in areas, first dusting of Gulf war sand and European dust added - tried fixing with thinners but turned the pigments a dark brown, so out with the toothbrush - good base for dust build up, next ; sand pigments (fixed with correct fixer), touch up around the glass commanders sight(s), touch in fire extinguishers,streaks and add wear and tear to rear door ;

View attachment 94084

View attachment 94085

View attachment 94086

View attachment 94087

View attachment 94088

View attachment 94089


View attachment 207107

View attachment 207108

View attachment 207109

View attachment 207110

View attachment 207111

View attachment 207112
 

Attachments

  • SJB_9940.JPG
    SJB_9940.JPG
    2.2 KB · Views: 0
  • SJB_9939.JPG
    SJB_9939.JPG
    2.9 KB · Views: 0
  • SJB_9938.JPG
    SJB_9938.JPG
    2.7 KB · Views: 0
  • SJB_9933.JPG
    SJB_9933.JPG
    2.5 KB · Views: 0
  • SJB_9935.JPG
    SJB_9935.JPG
    2.3 KB · Views: 0
  • SJB_9936.JPG
    SJB_9936.JPG
    3.1 KB · Views: 0
Nice work Steve, really like the chipping and weathering, looking good buddy;)
 
Thread owner

Attachments

  • FUJ_1060.jpg
    FUJ_1060.jpg
    2.5 KB · Views: 0
  • FUJ_1061.jpg
    FUJ_1061.jpg
    2.1 KB · Views: 0
  • FUJ_1062.jpg
    FUJ_1062.jpg
    2.1 KB · Views: 0
  • FUJ_1063.jpg
    FUJ_1063.jpg
    2 KB · Views: 0
  • FUJ_1065.jpg
    FUJ_1065.jpg
    2.2 KB · Views: 0
Status
Not open for further replies.
Back
Top