Thanks Ian.....Good to have you along.\ said:Nice one Peter I'm in watching this one, great start.

You are using an out of date browser. It may not display this or other websites correctly.
You should upgrade or use an alternative browser.
You should upgrade or use an alternative browser.
1/72 MK 1 Male Tank -EEF
- Thread starter takeslousyphotos
- Start date
- Status
- Not open for further replies.
Thanks Jim...... much appreciated.\ said:Looking good so far Peter")
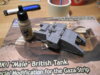
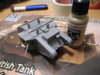
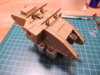
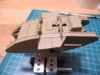
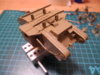
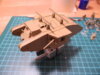
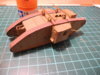
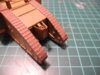
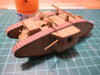
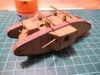
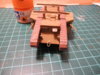
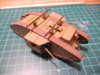
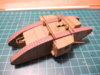
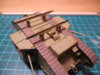
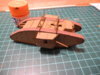
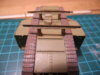
Well this little fella (and is is little) is all in one piece. ........... I enjoyed putting this together. Masterbox have done a fine job on this. Lost of detail and the kit goes together superbly. The hardest part was cleaning up the two girders on the top. The only bit I screwed up on was the three vent covers on top, they were so fine that I busted two of 'em getting them off the sprue. So I made up three from an odd piece odd photo etch I had in the spares box............ tomorrow he'll see some paint .......... and then I'll make a start on the Tommies.................
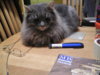
.................. and Eric likes to watch while I'm modelling.
View attachment 240511
View attachment 240512
View attachment 240513
View attachment 240514
View attachment 240515
View attachment 240516
View attachment 240517
.................. and Eric likes to watch while I'm modelling.
View attachment 240511
View attachment 240512
View attachment 240513
View attachment 240514
View attachment 240515
View attachment 240516
View attachment 240517
Attachments
G
Guest
Guest
Who is the calmly modeller master....? 
This is looking really cool! Nice challenge weathering a small tank like that
This is looking really cool! Nice challenge weathering a small tank like that
I'm hoping to get some chipping and rust going on as well as some "Desert induced Grime" ..... and yep, I like a challenge.\ said:Who is the calmly modeller master....?
This is looking really cool! Nice challenge weathering a small tank like that
")
G
Guest
Guest
Coming along real well Peter,can't wait for the painting.
And Eric is gorgeous.
And Eric is gorgeous.
Thanks Ralph .. Eric thinks he is rather gorgeous as well.\ said:Coming along real well Peter,can't wait for the painting.
And Eric is gorgeous.
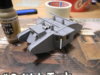
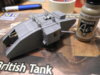
Well it's had a couple of coats of "Khaki Brown" (looks more like "Dysentry" to me) ........... I'll let that cook off for a few days. Then I can start beating it around. I'm looking forward to the challenge of weathering and brining out the detail, rivets and stuff.
View attachment 240637
View attachment 240638
View attachment 240639
View attachment 240640
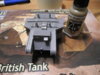
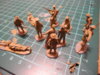
.......and the Tommies have all had an all-over coat of "Khaki Green" so I can see where they need cleaning up. There are a few mould seams and a little flash to get rid of............ Quite how I'm going to get the little buggers of those bases without damaging them (particularly the "prone" ones) is looking to be a bit difficult right now ???? If anyone has any answers to that, I'd appreciate the advice... I'm not sure how man of these I'll use in the small dio I have planned but I'll paint them all. It'll be good practice.
View attachment 240641
View attachment 240637
View attachment 240638
View attachment 240639
View attachment 240640
.......and the Tommies have all had an all-over coat of "Khaki Green" so I can see where they need cleaning up. There are a few mould seams and a little flash to get rid of............ Quite how I'm going to get the little buggers of those bases without damaging them (particularly the "prone" ones) is looking to be a bit difficult right now ???? If anyone has any answers to that, I'd appreciate the advice... I'm not sure how man of these I'll use in the small dio I have planned but I'll paint them all. It'll be good practice.
View attachment 240641
Attachments
G
Guest
Guest
Coming along well Peter.
Using a nice sharp blade cut around the prone figures and when you place them in the dio build up dirt/sand around them to make them look as if they are lying in it.
Hope this helps.
Someone will come up with something better..probably.
Using a nice sharp blade cut around the prone figures and when you place them in the dio build up dirt/sand around them to make them look as if they are lying in it.
Hope this helps.
Someone will come up with something better..probably.
Thanks Ralph....... I did figure the sharp blade route was how I was going to have to attack these.\ said:Coming along well Peter.
Using a nice sharp blade cut around the prone figures and when you place them in the dio build up dirt/sand around them to make them look as if they are lying in it.
Hope this helps.
Someone will come up with something better..probably.
Thanks for that Ian.\ said:Nice work Peter and I'd go with Ralph's idea with the figures
Thanks Phil. Good to have you on board for this.\ said:Looking forward to seeing this duo, now watching
Phil
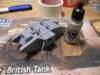
A bit more on this............. Nearly done. Some rust streaks and a bit of dry brushing. It'' get a bit more wear and tear when the base is finished (I've made a start on that) so I know hat colour dirt and dust we are looking at............
View attachment 240860
View attachment 240861
View attachment 240862
View attachment 240863
View attachment 240864
View attachment 240865
View attachment 240866
View attachment 240867
View attachment 240868
View attachment 240869
View attachment 240870
View attachment 240860
View attachment 240861
View attachment 240862
View attachment 240863
View attachment 240864
View attachment 240865
View attachment 240866
View attachment 240867
View attachment 240868
View attachment 240869
View attachment 240870
Attachments
-
 DSCN2227.JPG3.3 KB · Views: 0
 -
 DSCN2228.JPG3.2 KB · Views: 0
 -
 DSCN2229.JPG3.4 KB · Views: 0
 -
 DSCN2230.JPG3.4 KB · Views: 0
 -
 DSCN2231.JPG3.3 KB · Views: 0
 -
 DSCN2232.JPG3.4 KB · Views: 0
 -
 DSCN2233.JPG3.3 KB · Views: 0
 -
 DSCN2234.JPG3.4 KB · Views: 0
 -
 DSCN2235.JPG3.2 KB · Views: 0
 -
 DSCN2226.JPG3.2 KB · Views: 0
 -
 DSCN2236.JPG3 KB · Views: 0
Nice work there Peter I like the tracks with the dirt in the crevices. Love the overall paintwork too. Lumbering along in the dessert sun. Can't wait to see this finished and in the dio to see what you come up with. Didn't see from the pics but have you bleached the panels( lying in the sun) but that's a personnel opinion
Cracking work as ever
Robert
Cracking work as ever
Robert
G
Guest
Guest
I see that you enjoy the whole approval Mr. Whiskers,\ said:Well this little fella (and is is little) is all in one piece. ........... I enjoyed putting this together. Masterbox have done a fine job on this. Lost of detail and the kit goes together superbly. The hardest part was cleaning up the two girders on the top. The only bit I screwed up on was the three vent covers on top, they were so fine that I busted two of 'em getting them off the sprue. So I made up three from an odd piece odd photo etch I had in the spares box............ tomorrow he'll see some paint .......... and then I'll make a start on the Tommies.................
.................. and Eric likes to watch while I'm modelling.
View attachment 139951 View attachment 139952 View attachment 139953 View attachment 139954 View attachment 139955 View attachment 139956 View attachment 139958
Greetings- Status
- Not open for further replies.
Legal Notice
scalemodelling.co.uk is a privately operated online discussion forum. All content posted by members reflects their own views and opinions and does not necessarily represent those of the forum owners or administrators. While reasonable efforts are made to moderate content, no responsibility is accepted for user-generated material. By using this site, you agree to comply with UK law and the forum rules.