Theme editor

Scale Model Shop

1/72 Revell 1966 Boeing PT-13D Kaydet/Navy N2S-5 NAS Copus Christi Texas U.S.A.

Lee Drennen

New member
SMF Supporters
Joined
Apr 29, 2018
Messages
7,746
Reaction score
131
Points
0
1/3
Thread owner
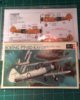
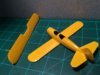
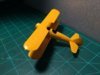
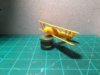
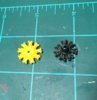
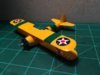
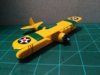
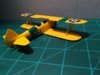
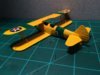
Taking a break from my Japanese Fighters so I won’t get burned out on them I’ve decided to build my last Kaydet trainer. I built one of these last year and was a lot of fun but some of the parts was missing so I bought a bag one cheap after completing the build I found the lost parts so I added them to the donor kit. Sorry guys no rigging on this one either I’m just not up to it with my eyes, hands and patients. The decals I’ll be using is from XTradecal the Trainer will be the U.S. Navy one based at NAS Corpus Christi Texas Yr 1943. View attachment 344785
 

Attachments

  • D5B29190-E0AA-4AEE-B42A-54D617C855C2.jpeg
    D5B29190-E0AA-4AEE-B42A-54D617C855C2.jpeg
    3 KB · Views: 0
Thread owner
Thanks Ralph for stopping by I will post some update pics later
 
Hi Lee, seems the wingy bug has bit again! I'll try to keep up with this one, looks a fun build.

Rick H.
 
Who needs rigging in this scale anyway? Looking forward to this.
Pete
 
Thread owner
Rick. I don’t know what is going on with me and these “Wingys” when I was a young boy I love building planes of all kinds they say you can never go back to your youth but I thing I am.

Paul. Yes it’s a oldie but it’s fun thanks for stopping by have a seat there’s plenty

Pete. Thanks for stopping by have a seat and that’s what I was thinking the rigging would have to be almost hair thin like trout line Tippett not up to that.

John. Thanks for stopping by glad your up front this time on the build. Did you bring any “York” tea?? I think you know the kind
 
Thread owner
I got some progress done today. First the Aircraft didn’t have a floor or a cockpit dash so I made them and painted the cockpit. Second I got some paint on it and added the top wing going to let this set up good before moving forward on this. And Third is the engine I didn’t like the way the one in the kit look it did not have a good enough cone on the end so I had an extra Zero engine I cut the cone off and glued on the kit engine then painted it I’m gonna let this dry good before I start to details on the engine enjoy the pics View attachment 344840View attachment 344841View attachment 344842View attachment 344843View attachment 344844View attachment 344845View attachment 344846View attachment 344847View attachment 344848View attachment 344849View attachment 344850
 

Attachments

  • 9A982599-0B71-4BBA-91CF-3E862B584FF2.jpeg
    9A982599-0B71-4BBA-91CF-3E862B584FF2.jpeg
    2.1 KB · Views: 0
  • 5FFE2974-32E8-4868-90E0-5F7EE0C1D39F.jpeg
    5FFE2974-32E8-4868-90E0-5F7EE0C1D39F.jpeg
    2.4 KB · Views: 0
  • 3E2A72C7-2172-4CFE-BF1A-6BCF8594E58C.jpeg
    3E2A72C7-2172-4CFE-BF1A-6BCF8594E58C.jpeg
    2.4 KB · Views: 0
  • 19FDD436-5B9B-421F-8647-F22AA134B164.jpeg
    19FDD436-5B9B-421F-8647-F22AA134B164.jpeg
    2.8 KB · Views: 0
  • EFF6D538-A06E-4232-8CB0-3FA236312969.jpeg
    EFF6D538-A06E-4232-8CB0-3FA236312969.jpeg
    2.4 KB · Views: 0
  • 2A11B0D0-E4F8-4C8B-85A0-5E630F0B7ED7.jpeg
    2A11B0D0-E4F8-4C8B-85A0-5E630F0B7ED7.jpeg
    2.3 KB · Views: 0
  • 0C90EF15-E296-4A1C-A3DA-C2D1BDAB0CBB.jpeg
    0C90EF15-E296-4A1C-A3DA-C2D1BDAB0CBB.jpeg
    2.9 KB · Views: 0
  • B4501209-FC0F-49C0-B45D-1DECA08F4199.jpeg
    B4501209-FC0F-49C0-B45D-1DECA08F4199.jpeg
    2.8 KB · Views: 0
  • 4291666E-E6F9-4CC9-921A-C0216DCF9C22.jpeg
    4291666E-E6F9-4CC9-921A-C0216DCF9C22.jpeg
    2.4 KB · Views: 0
  • 28A35441-E215-45A2-BD3F-0056A20FCE36.jpeg
    28A35441-E215-45A2-BD3F-0056A20FCE36.jpeg
    2.5 KB · Views: 0
  • 91D50295-B0F0-4487-A520-41130BA51F93.jpeg
    91D50295-B0F0-4487-A520-41130BA51F93.jpeg
    2.7 KB · Views: 0
Thread owner
Thanks Rick
Here’s a small update. Engine is finished. I highlighted the Engine with a pencil and chromed the engine cowel and mounted the top wing added. I didn’t like the supports that came with the kit do I made some out of half round styrene. Well that’s it for today tomorrow I’ll hand paint the green stripes and maybe decal it. Enjoy the pics.View attachment 344852View attachment 344853View attachment 344854View attachment 344855View attachment 344856View attachment 344857View attachment 344858View attachment 344859View attachment 344860
 

Attachments

  • BAADE34B-B4C6-4042-B03C-A276D96328A1.jpeg
    BAADE34B-B4C6-4042-B03C-A276D96328A1.jpeg
    2.5 KB · Views: 0
  • 3D94A3D7-9E59-4A4A-B899-F5B2C0758FD2.jpeg
    3D94A3D7-9E59-4A4A-B899-F5B2C0758FD2.jpeg
    2.2 KB · Views: 0
  • 84CEBA54-27E4-4526-AD9D-BF34A2B1A84D.jpeg
    84CEBA54-27E4-4526-AD9D-BF34A2B1A84D.jpeg
    2.7 KB · Views: 0
  • 16D61EE0-AC8F-4326-AF78-1D6A15F97BB6.jpeg
    16D61EE0-AC8F-4326-AF78-1D6A15F97BB6.jpeg
    2.7 KB · Views: 0
  • 74C98D3D-1310-4EA9-B754-D0C736AB3672.jpeg
    74C98D3D-1310-4EA9-B754-D0C736AB3672.jpeg
    2.2 KB · Views: 0
  • A7D3A639-10E7-4852-B6C5-B91CA703FA23.jpeg
    A7D3A639-10E7-4852-B6C5-B91CA703FA23.jpeg
    2.3 KB · Views: 0
  • 6004EDF4-9B5C-4EEF-8770-B42A2FF446D9.jpeg
    6004EDF4-9B5C-4EEF-8770-B42A2FF446D9.jpeg
    2.5 KB · Views: 0
  • D38CBA69-F23D-49D3-9DE6-4D8450050772.jpeg
    D38CBA69-F23D-49D3-9DE6-4D8450050772.jpeg
    3 KB · Views: 0
  • C7A0E716-0292-48A7-8249-908C60C10C26.jpeg
    C7A0E716-0292-48A7-8249-908C60C10C26.jpeg
    2.5 KB · Views: 0
Thread owner

Attachments

  • 057A835A-8E64-4EC0-94AB-63DEB5C5E0B6.jpeg
    057A835A-8E64-4EC0-94AB-63DEB5C5E0B6.jpeg
    2.8 KB · Views: 0
  • 4F95B9C2-9291-43A7-80C1-E6EE30D9FC1C.jpeg
    4F95B9C2-9291-43A7-80C1-E6EE30D9FC1C.jpeg
    2.5 KB · Views: 0
  • 68454BF0-7EB3-413E-9117-39D01CC9E7E2.jpeg
    68454BF0-7EB3-413E-9117-39D01CC9E7E2.jpeg
    2.5 KB · Views: 0
  • 7FBDC136-DB00-4176-BC0A-DEC23305BCCA.jpeg
    7FBDC136-DB00-4176-BC0A-DEC23305BCCA.jpeg
    2.5 KB · Views: 0
  • 32B83625-B9E8-40F8-B613-0001DAADCE5D.jpeg
    32B83625-B9E8-40F8-B613-0001DAADCE5D.jpeg
    2.6 KB · Views: 0
Lee,
My word this is looking good, like the changes to the nose cone and struts , decals look the business and that colour !!!!! Is it anything like painting with white or does the pigment cover well ?
 
Thread owner
Jakko. Thanks for stopping by I’m sure it will this has to my second prettiest Aircraft

John. Thanks for the complement I use Acrylic paints I had no trouble. The nose cone made a big difference I agree. Going to put the landing gear on then going have to wait to order my aftermarket wheels and tires
 
Thread owner
It’s been 6 months since I gave a update on this one I worked a little on it tonight.
I added the wind screen and wheels I still have some touch up painting to do and add the exhaust and prop.The wheels I got from another kit

A0683B1E-672D-43B5-8077-A1F7441E75C7.jpegAF29D783-B70F-476A-A1DD-30D1630DB54A.jpegDEBABAA5-B7A2-4F58-92B5-905D186889DE.jpeg
 
Lee that's looking smart , those struts you changed look far better. Who needs rigging ! :thumb2::thumb2::thumb2:
 
Back
Top