Theme editor

Scale Model Shop

A Summer Schwimm (Tamiya 1/48 Schwimmwagen)

Status
Not open for further replies.
Thread owner
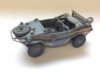
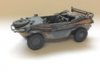
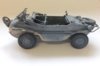
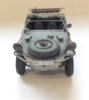
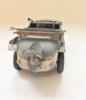
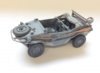
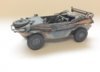
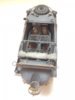
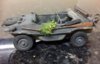
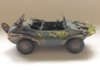
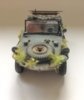
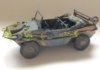
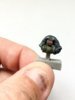
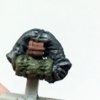
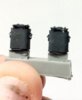
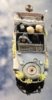
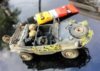
After spending Friday night photographing a junior football team presentation and then spending all weekend photographing a junior ice hockey tournament ( and picking up a couple of injuries !!), I managed to get some time last night to add some weathering to the little schwimmer, mud and dust added along with paint chips. Got her on her wheels, so now need to weather up the wheels, add the windscreen/shield and also a steering wheel. Was looking a bit bare in the back so ordered this set from blackdog models - http://www.blackdog.cz/products/t48/t48025/1.jpg

View attachment 282947 View attachment 282948 View attachment 282949 View attachment 282950 View attachment 282951 View attachment 282952 View attachment 282953 View attachment 282954

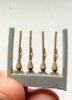
Got some camo foliage to add to her as well.;

View attachment 282955

Thanks for looking(again)
 

Attachments

  • IMG_0150.JPG
    IMG_0150.JPG
    1.9 KB · Views: 0
  • IMG_0151.JPG
    IMG_0151.JPG
    1.7 KB · Views: 0
  • IMG_0152.JPG
    IMG_0152.JPG
    1.9 KB · Views: 0
  • IMG_0153.JPG
    IMG_0153.JPG
    2.2 KB · Views: 0
  • IMG_0154.JPG
    IMG_0154.JPG
    1.9 KB · Views: 0
  • IMG_0155.JPG
    IMG_0155.JPG
    1.9 KB · Views: 0
  • IMG_0156.JPG
    IMG_0156.JPG
    1.7 KB · Views: 0
  • IMG_0157.JPG
    IMG_0157.JPG
    1.8 KB · Views: 0
  • FullSizeRender.jpg
    FullSizeRender.jpg
    2.4 KB · Views: 0
Thread owner
Steering wheel and windscreen finally added. Put some 'in field' camouflage on her last night, it was very green (bright), so toned down with the same dust mix i had used on the actual car, seemed to help and tie it in better. After all, why would the grass, flowers be nice and clean when the vehicle is dusty and muddy;

View attachment 283047 View attachment 283048 View attachment 283049
Will have to post a photo of the schwimmwagen next to a bottle of Tamiya paint, this thing is tiny, only 82mm long !!

Now i am just waiting for my mobile to ping to say the Blackdog set have arrived at Argos and i can pick them up.
 

Attachments

  • 3.jpg
    3.jpg
    1.8 KB · Views: 0
  • 2.jpg
    2.jpg
    2.1 KB · Views: 0
  • 1.jpg
    1.jpg
    2 KB · Views: 0
Thread owner
Go some of the blackdog gear painted up last night;

Panzerfaust, base coated - next step is shadows and highlights ;

View attachment 283323

Duffel Bags (?) - i did start to paint these wih AK canvas, but it just would not adhere to the resin, so base coated them with Tamiya German grey and then repainted with the AK colour, has left quite a nice affect - next step shading and highlight washes

View attachment 283324

Back pack - painted and highlighted (washes) - next shadow wash to be added and dusted up.

View attachment 283325 View attachment 283326

Mess Canteens - base painted - next

View attachment 283327

Apologies for my 'paint pot thumb' in some of the shots, but it does add a sense of scale to the gear.
Items are Matt, just the light has given them a gloss coat !!, will all be dullcoated later
 

Attachments

  • IMG_0216.JPG
    IMG_0216.JPG
    2.1 KB · Views: 0
  • IMG_0215.JPG
    IMG_0215.JPG
    1.8 KB · Views: 0
  • IMG_0213.JPG
    IMG_0213.JPG
    1.8 KB · Views: 0
  • IMG_0214.JPG
    IMG_0214.JPG
    2.3 KB · Views: 0
  • IMG_0217.JPG
    IMG_0217.JPG
    1.9 KB · Views: 0
Great work Steve and some very nice additions. I know how small it is but it's coming along nicely, or should I say schwimmingly. :).
 
Thread owner
ordered some decals to finish of the Panzerfaust (from the states), so no updates for a week or so. back to the Takom ZSU it is.
 
Liking the additions it really makes a difference to the look of the build,great job Steve looks fab
 
Thread owner
Thanks all for the kind comments, still waiting for the Panzerfaust decals to arrive from Uncle Sam :D
 
Thread owner
The decals for the Panzerfaust’s arrived from the states yesterday, so thought I would have a bash at decaling some of the resin items. So cut the decals as would normally, leaving a fair amount of backing paper so I could slide the decal across onto the items. :mad:
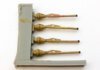
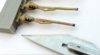
WRONG, the decals are printed as one sheet, so I ended up with a very small decal on a huge piece of decal paper :oops:. Lesson learned I trimmed the next decal right down to the edge of the print, dipped in water and then – how do I get it off the backing paper, can’t pull it forward as nothing to grip on as the decal is the whole back as well and some of these are minute, very, very fiddly, but did manage to use a brush and slowly paint the decal off the paper. I had read recently that Tamiya thinners work brilliantly as a decal fixing medium and also acts as a setting agent, so have tried that method to seat the decals in place. Will need to check later if it worked or destroyed the decals. ;)

View attachment 284121 View attachment 284122
 

Attachments

  • 1.JPG
    1.JPG
    1.8 KB · Views: 0
  • 2.JPG
    2.JPG
    1.7 KB · Views: 0
Steve those decals and panzer shrek look the business mate.
Do they do the decals in 1/35 scale?
 
Thread owner
Status
Not open for further replies.
Back
Top