G
Guest
Guest
Hi John sorry to have caused you any trouble.
Pete.
Pete.

Pete.Hi John sorry to have caused you any trouble.
Pete.
Thanks Peter....... Just me I suppose, proberly comes from having to find a way when working . Does get wearing though.Well John, I'm full of admiration. You really do push yourself. Inspiring.
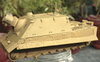
Cheers Graeme. .... Be worth it in the end. !Having a bit of a catch up, it's looking good John, even with all the troubles.:thumb2:
Peter.... Thank you , esp when you have so much on your plate, good luck with the show :thumb2:John - coming along fine. nice job so far.
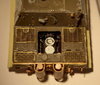
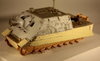
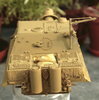
Fernando... Cheers, next time I will do the rear before adding things !Very nice pe and zim work John.:thumb2:
Oh and don't worry about the glue stains, just cover it up in the weathering.:tongue-out3:
What do you use to take these pictures? If it’s a phone or a tablet, you can probably tap the screen where you want it to focus (at least on an iPhone and iPad, no idea about Android or others), which is very handy if the device gets it wrong. Just don’t move it (much) after getting it to focus rightSorry , but blurred
")
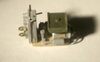
Jakko that was done the other day using a cheap old tablet so for your edification I present .:smiling3::smiling3:What do you use to take these pictures? If it’s a phone or a tablet, you can probably tap the screen where you want it to focus (at least on an iPhone and iPad, no idea about Android or others), which is very handy if the device gets it wrong. Just don’t move it (much) after getting it to focus right :smiling3:
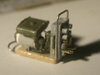
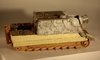
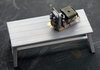
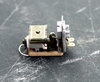
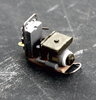
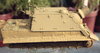
My question now is: what is this thing? It looks like it could be a generator, but I’m not sure.Jakko .... you win the prize, yes indeed. Glad you prefer those photos.:smiling3:Much clearer :smiling3: My question now is: what is this thing? It looks like it could be a generator, but I’m not sure.
Thanks Mick.... one of those times when bits seem to fall into place.Some great Scratchery JR
Dear Winnie , so glad you approve.Nice zimmerit John and a very cute Genny!
Top work
Yours,
Winnie Atwell
Just missed you Si sorry.Evening John,
Looks to be coming together nicely mate and smashing work on scratching the generator:thumb2:
I don’t think extra thin goes off....more likely it’s evaporated too much before melting the plastic of maybe the plastic has something on it?
Keep it coming sir:smiling4:
Si
scalemodelling.co.uk is a privately operated online discussion forum. All content posted by members reflects their own views and opinions and does not necessarily represent those of the forum owners or administrators. While reasonable efforts are made to moderate content, no responsibility is accepted for user-generated material. By using this site, you agree to comply with UK law and the forum rules.