Theme editor

Scale Model Shop

And In The Gates...... It's A Whippet

Status
Not open for further replies.

Robert1968

New member
Joined
Mar 2, 2015
Messages
3,596
Reaction score
0
Points
0
1/3
Thread owner
Hi guys and gals.


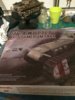
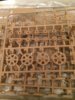
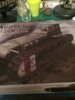
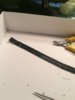
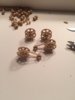
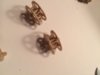
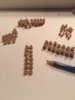
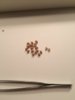
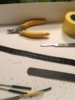
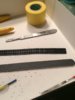
Well after my depth into the World war tank experience and weathering and painting lesson I thought a bigger tank. So I'm doing the 1/35 Panzer IV ( destroyed ) and this in itself is a challenge to get it right( burns etc ) so while that's going on I thought back to WW1 and armour and looked at the Whippet MkA Medium tank. Now it's a new idea and was deciding which one to get the Tacum or the Meng as these seemed to be the only decent kits of this tank in 1/35. Asking advice I decided on the Meng and so now here it is with a few sprue shots


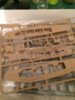
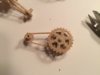
The detail is unbelievable, the rivot detail and Hotchkiss MG x 4 you get. The Indi track looks impressive too as its no cement!!


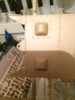
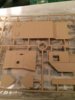
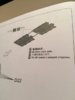
The build looks simple but I'm guessing it's not as I've never built a Meng kit before or a Whippet so any advice welcome. Comments as per normal


The pics


View attachment 241227


View attachment 241228

View attachment 241229

View attachment 241230

View attachment 241231

View attachment 241232
 

Attachments

  • image.jpeg
    image.jpeg
    2.7 KB · Views: 0
  • image.jpeg
    image.jpeg
    2.7 KB · Views: 0
  • image.jpeg
    image.jpeg
    2.4 KB · Views: 0
  • image.jpeg
    image.jpeg
    2.5 KB · Views: 0
  • image.jpeg
    image.jpeg
    3 KB · Views: 0
  • image.jpeg
    image.jpeg
    2.5 KB · Views: 0
Thread owner
I thought I'd start slowly so jumped in the deep end ( new scalpel No 10 ) clippers and enter the hell of Individual tracks ( it says 68 per side so clip clip etc


They are attached to the runner in 3 places so lots of cleaning up to do once off sprue. Ravaged my thumb with a few cuts and eventually got 1 line of one side done. The no cement side of the track link is easy to click to click once each piece is cleaned up but they don't seem to stay attached in length as the next is only as strong as the next piece ( Dubster said that I remember the track is only as strong as the pin.) well no pins but overall not a bad start. When it comes to fitting on the vehicle I may use a strip of tape to attach and glue but at the moment I'll put them on a strip of Tamiya tape and start the other sides tracks


View attachment 241237

View attachment 241238

View attachment 241239
 

Attachments

  • image.jpeg
    image.jpeg
    2 KB · Views: 0
  • image.jpeg
    image.jpeg
    1.7 KB · Views: 0
  • image.jpeg
    image.jpeg
    3.3 KB · Views: 0
Thread owner
Update


While waiting for some 1/35 figs to cure in the panzer IV dio I thought I'd do some more on the whippet.


Wheels wheels wheels and more wheels.!!!!


After finishing the construction of the tracks ( click click ) I thought I'd get on with the wheel assembly. This is a simple stage although very time consuming but I will say therapeutic. I'll add that all the individual wheels aalthough will be hidden have fantastic detail You start with top rollers x 10 which are 20 pieces ( clean up test fit and cement ) then road wheels (A ) x18 = 36 ( clean test fit and cement ) then road wheels ( B) x14 = 28 ( clean up test fit and cement )


Then I tackled the idler and running gear which are really well sculptured and the running gear has a chain piece that attaches to the central mount ( Really well thought of and beautiful design but it's all going to be hidden.


I'm sure if I was as skilled as some you could open up a panel to expose this ( after market thought ) possibly Meng , comments as always


View attachment 241370

View attachment 241370

I'm View attachment 241379

View attachment 241380

View attachment 241381

View attachment 241382

View attachment 241382

View attachment 241383

View attachment 241384


View attachment 241385
 

Attachments

  • image.jpeg
    image.jpeg
    1.8 KB · Views: 0
  • image.jpeg
    image.jpeg
    1.5 KB · Views: 0
  • image.jpeg
    image.jpeg
    2 KB · Views: 0
  • image.jpeg
    image.jpeg
    1.3 KB · Views: 0
  • image.jpeg
    image.jpeg
    1.4 KB · Views: 0
  • image.jpeg
    image.jpeg
    2.5 KB · Views: 0
  • image.jpeg
    image.jpeg
    2.4 KB · Views: 0
  • image.jpeg
    image.jpeg
    1.8 KB · Views: 0
probably very boring work, but ... necessary :( , good progress so far, Greetings ;)
 
Now that's a lot of wheels! Maybe like me, you find doing such repetitive tasks almost like meditation... my mind always wanders off!
 
Thread owner
\ said:
Now that's a lot of wheels! Maybe like me, you find doing such repetitive tasks almost like meditation... my mind always wanders off!
Thanks Patrick


I'm thinking of painting them all and giving weathering to a point even though they hidden but to know they are there and not doing seems pointless ( such a weath of derail ) to waste


What you think
 
Thread owner
\ said:
probably very boring work, but ... necessary :( , good progress so far, Greetings ;)
Thanks for the kind words Francis really worth the time me thinks and very relaxing now done.


Robert
 
Thread owner
Got hold of John at SMS and he's got me the right paints on order ( want it to be the correct colours and shades


Valllejo of course ( model air )


It's going to be a fun time when it comes to weathering all those rivets ( don't ask me how many


Robert
 
\ said:
Thanks Patrick
I'm thinking of painting them all and giving weathering to a point even though they hidden but to know they are there and not doing seems pointless ( such a weath of derail ) to waste


What you think
That all depends on the time you're happy to spend on it. Personally I'd do it because I'm a firm believer in " even though it's not visible, I know it's there" philosophy ;)
 
Thread owner
\ said:
That all depends on the time you're happy to spend on it. Personally I'd do it because I'm a firm believer in " even though it's not visible, I know it's there" philosophy ;)
I'm with your Phil ( thought your Patrick!! :P :p
 
You could always build it:


A) UNDER CONSTRUCTION IN THE FACTORY


B) UNDERGOING MAINTENANCE


C) HAVING TAKEN A "RIGHT WALLOPING" FROM GERMAN ARTILLERY.


All three would give to the opportunity to have the running gear on show.......... Or could you build it with at least one of the side frames detachable ?
 
Thread owner
\ said:
You could always build it:
A) UNDER CONSTRUCTION IN THE FACTORY


B) UNDERGOING MAINTENANCE


C) HAVING TAKEN A "RIGHT WALLOPING" FROM GERMAN ARTILLERY.


All three would give to the opportunity to have the running gear on show.......... Or could you build it with at least one of the side frames detachable ?
Your spot on the money with the thoughts Peter.


I'm a bit concerned at the first suggestion ( A ) as I think it's going he first to be hard to remove a panel it hour destroying a lot of surface detail,and my research has not found any cutaway diagrams of a whippet so unsure what's underneath panels ( no Haynes manual to hand


(B ) is similar to the first part


( C ) sounds a little easier as I could fabricate the odd bend etc


Thinking cap on and a wee shot of malt for the ideas to think out


Cheers


Robert
 
Ah but the beauty of a lack of information is that no-one can say you're wrong Robert! ;)


I like Peter's maintenance idea. Perhaps with some careful scribing you could open up a panel? If it was one that had taken a shell hit, any damage would be explainable.


Here's a couple of pics I found showing some detail


View attachment 241399

View attachment 241400


I don't think that there's much beneath the exterior skin other than the tracks & wheels.
 
Status
Not open for further replies.
Back
Top