Theme editor

Scale Model Shop

Andrea's Takom BV206S 1/35 for Simon

Andy the Sheep

SMF Supporters
Joined
Apr 7, 2019
Messages
1,864
Reaction score
66
Points
0
Age
62
Location
North Eastern Italy
1/3
Thread owner
Started today.
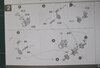
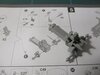
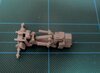
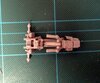
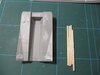
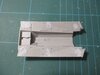
The kit is rather good but... the interiors are a bit sketchy. Here you can see the back module as provided by Meng and the real one.
View attachment 402909View attachment 402910
I will definitely move out from my comfort zone and try to add as much details as my skills allow :cold-sweat:.
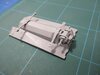
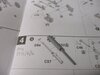
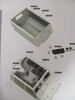
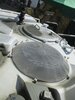
My main concern is about an external detail, the vent intake on the forward module: as you can see from the pics,
View attachment 402911View attachment 402912
the kit one is really far away from the real one.
The problem is that the vent parts are already very thin in 1/1 scale and scratch building a new one, beginning with choosing the best way to do it, is something that is already giving me headaches :worried:.

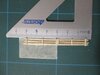
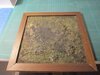
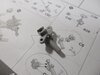
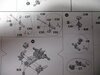
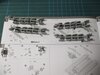
Anyway, the first steps went well, even if cleaning and glueing the 40 wheels with their suspension arms was a 3 hrs job... but now it's done followed by the filling of several injections marks (sanding still to come) and the first step in scratch building the floor planks for the back module.
View attachment 402913View attachment 402914View attachment 402915
Hope to progress faster than usual but I'm in a weird situation: my modelling cave is already in the new house but we still live in the old one thanks to COVID inducted delays in furnishings delivery, so I'm commuting every time I want to build or paint. It's just 5 km away but I must plan my sessions and cannot take advantage of every bit of spare time as if I was already living there. :sad:

Andrea.
 

Attachments

  • IMG_6598r.JPG
    IMG_6598r.JPG
    2.2 KB · Views: 0
  • IMG_3010r.JPG
    IMG_3010r.JPG
    3 KB · Views: 0
  • IMG_6543r.JPG
    IMG_6543r.JPG
    3.1 KB · Views: 0
  • IMG_3029r.JPG
    IMG_3029r.JPG
    3.1 KB · Views: 0
  • IMG_6593r.JPG
    IMG_6593r.JPG
    2.5 KB · Views: 0
  • IMG_6595r.JPG
    IMG_6595r.JPG
    2.1 KB · Views: 0
  • IMG_6596r.JPG
    IMG_6596r.JPG
    2 KB · Views: 0
A good start given your unusual circumstances Andrea.

This kit is on my to do list so will follow along and see how it comes together.
 
Thread owner
This morning I abruptly woke up with the following howl in my head: It'sa TAKOM model, not a Meng's, you #*&! (fool is a printable translation of the word ending my sudden awakening inner yell).
Thus the due ERRATA CORRIGE: THE KIT IS TAKOM, not MENG as previously stated in the title (now edited) and in the first post :flushed:.
Sorry for the mistake. I hope Takom will not sue me.... :cold-sweat:.
 
No sweat Andy.....I made the same mistake years ago. They haven't come for me yet! Rick H.
 
Wow,I saw this kit in our local hobby shop earlier,Something different and not seen it built up.Will watch with interest.
Richard
 
Thread owner
Steve, Andy, Rick, Lee, Paul and Richard, thank you for your interest.
I'll try not to be boring... ;)
 
Zzzzzzzzzzzzzz......wazzat???......somebody say something? ;) Cheers Andy, looking forward to it. Rick H.
 
Thread owner
Some VERY little progress:
View attachment 403412View attachment 403413View attachment 403414
In the first pic my attempt to scratch build the plank floor of the back module. I used balsa wood, thinnned down to 1 mm (more or less :thinking:) then cut to 2 mm wide strips and glued. Not really up to expectations...I think I will give it another try (if not tackled before... ;)).
Then I decided to recycle an old base (there was a Tamiya PAK 40 there in it's early days). The plan is to cover it with snow. A BV without snow is like a stirred Martini :cool:.
Finally, the transmission block on the back module is on.
A lesson learned from this first phase:
In step 2
View attachment 403422
it is simpler to mount the two brakes (named B and C) on the central block (named A) first and only then add the two arms (parts B6). This procedure allows to handle the two brakes without too many concerns and use some force to press them into position (not really needed as the fit is definitely good, but I think that an adquate amount of pressure both by fingers or clamps is useful when the parts belong to the transmission).

Thank you for your attention.
Andrea
 

Attachments

  • IMG_6620r.JPG
    IMG_6620r.JPG
    2 KB · Views: 0
  • IMG_6617r.JPG
    IMG_6617r.JPG
    2.2 KB · Views: 0
  • IMG_6600r.JPG
    IMG_6600r.JPG
    2.1 KB · Views: 0
  • IMG_6610r.JPG
    IMG_6610r.JPG
    2.5 KB · Views: 0
Never boring Andrea, love the timber work, hard to work in Balsa at that thickness, think its good.
 
Andrea,
Balsa can be hard to use at this size, have you tried using plastic strip and scoring it with the tip of a blade to impart the wood grain.
 
Thread owner
Andrea,
Balsa can be hard to use at this size, have you tried using plastic strip and scoring it with the tip of a blade to impart the wood grain.
Paul, thank you. Plastic strip will be my alternate cunning plan. I will go for it if my second attempt with balsa wood would fail.
 
Thread owner
Yesterday another little step forward
View attachment 403692View attachment 403693View attachment 403694
Cleaning all those small parts is time (and fingertips) consuming and when it comes to analyse the pics... there's always an unsatisfying seam or a too marked junction . Anyway, very few (or almost none) of them will be in sight.
The fit is good but a dry fit test is strongly recommended.
As in my previous post, a suggestion:
View attachment 403695
the two cylinders (parts # C62 and C63 + C27, C28, C33 and C32) should be joined to their respective supports (parts # C6 and C7) before inserting the pistons C48 and C49. The latter, in fact, if fitted when prescribed in the destruction sheet, being not glued, will be an easy prey to the carpet monster; moreover, parts C27, C28, C33 and C32 get easier into their correct position with the help of parts # C6 and C7.

While writing those suggestions, I felt I was nearing James May (Captain Slow) standards ... If I'm boring you, please let me know, but, please, not in a Jeremy Clarkson way :tongue-out2:.

Today no progress. SWMBO directed me to a 1:1 scale model produced by an infamous yellow and blue scandinavian brand... anyone needing some Allen keys...? :rolling:.
 

Attachments

  • IMG_6623r.JPG
    IMG_6623r.JPG
    2.3 KB · Views: 0
  • IMG_6624r.JPG
    IMG_6624r.JPG
    2.1 KB · Views: 0
  • IMG_6625r.JPG
    IMG_6625r.JPG
    2.2 KB · Views: 0
  • IMG_6626re.JPG
    IMG_6626re.JPG
    2.3 KB · Views: 0
You seem to be making a great job of reworking the instructions. Something you'll definitely need and that larger project!
 
Thread owner
Paul, Andy and Steve: thank you for your kind support.

Unfortunately I will have to take as long as someone else wants...
Due to anti-COVID measures, my region has been downgraded from "Yellow" to "Orange", (nothing to do with Great Los Angels area Counties ;)) thus any movement between different towns is not allowed unless backed by serious reasons. This means that I'm no more allowed to commute from the old to the new house for modelling purposes. This state will last at least for a couple of weeks so...be even more patient (as an adj., not as a n. :face-with-thermometer:) than ever to see further progresses.
The state of the art at the moment of this partial but already very limiting lockdown is the following:
View attachment 404798View attachment 404799
the central driving and steering block is complete (including bad quality pics View attachment 404800), the parts are ready for the hissing stick (all the undersides will be painted in black) but that is all, for the moment, unless you want to wake up the sleeping James May in me View attachment 404801 to give a lecture about how the central driving and steering block works, making the BV a peculiar tracked vehicle (and, at the same time, enjoy a rather peculiar written English View attachment 404802).

As a last move on the eleventh hour, I took some paints and some hairy stick with me to work on some figures and improve my skills in that part of the modelling world while waiting the current condition Orange paling down to the jolly good Yellow one.

Andrea.
 

Attachments

  • IMG_6628r.JPG
    IMG_6628r.JPG
    2 KB · Views: 0
  • IMG_6629r.JPG
    IMG_6629r.JPG
    2.5 KB · Views: 0
  • Disappointed2.png
    Disappointed2.png
    1.1 KB · Views: 0
  • Thinking.png
    Thinking.png
    1.2 KB · Views: 0
  • Hugging_Face.png
    Hugging_Face.png
    1.2 KB · Views: 0
Back
Top