
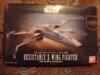
Here's the first of the Bandai Star Wars kits I've bought over the last few weeks. I did a brief review when I posted in Latest Acquisitons so straight on with the build.
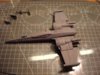
The box
View attachment 247556
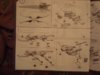
Instruction page
View attachment 247561
Clear and easy to understand despite being in Japanese.
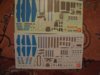
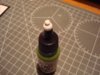
Markings
View attachment 247562
You get both waterslide decals and paper stickers - lots and lots! Some of these I won't use as they're too small for me. Here's BB8 sat on top of a Vallejo bottle. He has 6 decals all to himself! I think I'll just try to drybrush his markings as there is raised detail.
View attachment 247564
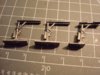
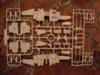
Sample sprue
View attachment 247563
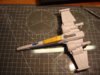
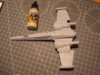
The build was a piece of cake. The parts snap fit together beautifully but I used a little glue here and there to make sure it doesn't fall apart on me. You can build it gear down or gear up and they provide a stand for the latter.
It took me about an hour to get it built and masked. They supply two canopies. One is transparent and can be shown open (my plan). The other is moulded in grey plastic and closed. I used this to mask the cockpit and Clever Putty for the recessed engine parts. Apologies but I forgot to take pictures so you'll have to wait to see these and the cockpit when I unmask.
View attachment 247559
I'm not sure if I'll paint the blue parts. I'll see what it looks like after doing the grey. Here it is primed with Stynylrez (thinned with IPA it gives a beautiful finish - what do you guys use to clean your A/B after using it?)
View attachment 247560
The undercarriage painted and washed
View attachment 247558
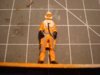
There are two pilot figures. One sitting and one standing. I'll probably put this on a simple base with this figure talking to the pilot
View attachment 247557
Painted light grey. I mixed this from Vallejo Light Grey and White - about 30% : 70%. It may still be too dark. I'll have a look when I've given it a coat of Klear.
View attachment 247569
That's it for now.
The box
View attachment 247556
Instruction page
View attachment 247561
Clear and easy to understand despite being in Japanese.
Markings
View attachment 247562
You get both waterslide decals and paper stickers - lots and lots! Some of these I won't use as they're too small for me. Here's BB8 sat on top of a Vallejo bottle. He has 6 decals all to himself! I think I'll just try to drybrush his markings as there is raised detail.
View attachment 247564
Sample sprue
View attachment 247563
The build was a piece of cake. The parts snap fit together beautifully but I used a little glue here and there to make sure it doesn't fall apart on me. You can build it gear down or gear up and they provide a stand for the latter.
It took me about an hour to get it built and masked. They supply two canopies. One is transparent and can be shown open (my plan). The other is moulded in grey plastic and closed. I used this to mask the cockpit and Clever Putty for the recessed engine parts. Apologies but I forgot to take pictures so you'll have to wait to see these and the cockpit when I unmask.
View attachment 247559
I'm not sure if I'll paint the blue parts. I'll see what it looks like after doing the grey. Here it is primed with Stynylrez (thinned with IPA it gives a beautiful finish - what do you guys use to clean your A/B after using it?)
View attachment 247560
The undercarriage painted and washed
View attachment 247558
There are two pilot figures. One sitting and one standing. I'll probably put this on a simple base with this figure talking to the pilot
View attachment 247557
Painted light grey. I mixed this from Vallejo Light Grey and White - about 30% : 70%. It may still be too dark. I'll have a look when I've given it a coat of Klear.
View attachment 247569
That's it for now.
")
")