\ said:
I dont know but does the D version have the photo etch parts?
I would be surprised if it does not have the seatbelt. The problem is it is very thick and far from well detailed. Eduard would be better but, of course a lot more fiddly.
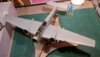
I attach a couple of pics of my build at is was at the end of my session last night.
Some tips:
Some reviewers had problems fitting the cockpit tub. Do not build it as a tub. Glue the side walls to the fuselage (there are good locating pins) when it is all painted and ready fit the floor with the remaining interior to the side of the fuselage mated up to the floor. Dry fit it first then mate up the other fuselage half, taping the fuse halves together to hold them in the normal way. You can then fiddle and move the cockpit interior around until it all clicks into the right place - I found it a perfect fit. You can then use Tammy Extra Thin or Mr Cement S to glue the fuse halves together and the cockpit interior into place using capillary action.
There are some struts to glue into the wheel wells in the top half of the wing. be careful about getting them in the right order, the narrower 'base' being to the rear of the wing but that creates a problem of fitting the landing gear assembly into the wing. The landing gear assembly is complex and it is best fitting it together before fitting the floor to the wing. The problem is the front strut is a long one and is in the way of the landing gear. You will need to snip the tip off the strut to get the landing gear in past it. Don't worry nothing of the surgery will be seen on the completed kit.
The engines are not designed to be fitted with the access panels closed so I left out the engine assembly. Some reviewer had fit issues with the panels but if you leave the engines out and do it this way it will be problem free. Fit the panel to the rear of the exhausts to the lower wing first and before joining the wing halves and you will have a perfect fit. The top 'inner panel' can fit the top of the wing once the wings are joined, again perfectly.
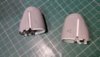
I glued together the top and bottom engine panels and then glued into place a piece of plastic strip to give something for the exhausts to be attached to and to strengthen the assembly. I then painted and fitted some relevant pieces of the engine where there are gaps/holes in the underside so when looking at it there is not a yawning empty gap. The grill glues easily to the cowling and the bottom of the engine will easily glue to that. I then glued on some more pieces of plastic strip to make it easy to locate the assembly to the front of the wing - I did cut off two small tabs from the wing side as these were in the way and the fit is better without them.
One of the pictures show the engine casing assemblies ready to be fitted to the wing, the plastic card can be seen in white. I will fit them when I have filled a small gap in the front wing root. There will also be a small amount of filler needed in the bottom half of the engine casing assembly to wing join.
I will glue the props to the front of the engine casing.
Take a look at the pics...
I hope you enjoy the build as much as I am. It really is a great kit, shame about the instructions which, in the case of the C model can best be described as
'A
rough guide to where
most parts
probably fit' and with the added warning 'the sub assemblies should not be taken too literally'.
View attachment 74687
View attachment 74688
View attachment 187710
View attachment 187711
")
")