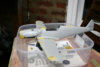
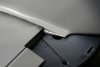
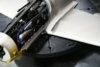
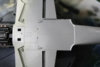
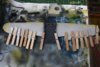
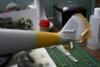
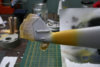
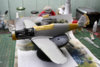
Theme editor

Scale Model Shop

Bf109G6 Early Version

Status
Not open for further replies.
Thread owner

Attachments

  • _MG_0212bf109g6bits.jpg
    _MG_0212bf109g6bits.jpg
    3.4 KB · Views: 0
  • bf109g6.jpg
    bf109g6.jpg
    3.6 KB · Views: 0
Nice work there Vaughan.

When you come to do the armour behind the pilot you might want to cut out the centre of the kit part and fit a bit of clear plastic. On your version of the Bf109 there was a panel of armoured glass inserted into the plate. I know Trumpeter somehow missed this. It was supposed to help the view to the rear but was later discontinued. I''ve managed to crop a half decent image of it from one of the photos on my HD.

Cheers

Steve
 
Thread owner
Hi Steve

Thanks for the image. Someone else had mentioned to me about the glass panel it's going to be fun trying to cut out the panel as the plastic is very thick but will give it a go. Any hints on cutting only have a scalpel and a pin vice with different size bits.

Vaughan
 
\ said:
Any hints on cutting only have a scalpel and a pin vice with different size bits.Vaughan
I'd take my time with a scalpel and not try to cut too close to the edge. You can always work out towards the edges with some filing and sanding. I've heard of people using clear decal paper to simulate the glass rather than trying to inlay some clear styrene. Presumably one piece on each side.

Cheers

Steve
 
Thread owner
Hi Steve Thanks will take your advice and let you know how I get on.

Vaughan
 
Thread owner

Attachments

  • glass2.jpg
    glass2.jpg
    2.4 KB · Views: 0
  • glass1.jpg
    glass1.jpg
    2.4 KB · Views: 0
Thread owner
Hi there Steve I noticed on the image you posted that the ariel mast appears slightly offset to the centre line of the fuselage? or is it a shadow from the ariel wire?

Vaughan
 
MMMMmmm! Initially I thought that the line was the panel line which runs down the spine of the Bf109 and that the mast was off set which would be odd. This is a reconnaisance aircraft and I suspect that the panel line (where the skins from the port and starboard sides meet) has been filled and smoothed because I can't see it at all.

On close examination you can see the shadow of the insulator (just at the join between the rear part of the hood and fuselage) which is inline with that line which I think is indeed the shadow of the aerial wire. The mast is on the centreline. The sun was high in the sky when the photo was taken.

Cheers

Steve
 
Hi

I really like the Me 109 G6, I am following this closely. I have one, started to ten months and stopped because I did not like how was doing. It may be that this re-touch it.

One question, because the problem is the same. As the simulated glass to protect the pilot?

Thanks
 
\ said:
Hi One question, because the problem is the same. As the simulated glass to protect the pilot?

Thanks
Yes Antonio,it was armoured glass and formed part of the back protection for the pilot. It was deleted on later dash numbers (I'm not at home so I can't look it up at the moment) and they went back to a steel armour plate with no "window".

It was supposed to make it easier for the pilot to look behind.

Cheers

Steve
 
Thread owner
Hi all

Slow progress so far weather is too nice at the moment and gets too hot once the sun is round to my garden room so early starts or evening times. Anyway have the fuselage halves together a bit of a struggle with the engine and cockpit as it's a long bit of plastic with lots of glueing points plus photo etched rudder hinges to contend with. Got there in the end. Wing halves together opted for the wing canons(yet to be attached) more photo etched hinges on the flaps fitted well though lots of pegs and tape used.

Wings and fuselage mated tape used to maintain the correct dihedral and close the seams up looking good.

Have got some Modelair thinners on order so will start masking off ready for spraying so guess that will be next week before there is any more progress.

Vaughan

View attachment 34588

View attachment 34589

View attachment 34590

View attachment 34591

View attachment 34592

View attachment 147614

View attachment 147615

View attachment 147616

View attachment 147617

View attachment 147618
 

Attachments

  • wingroot.jpg
    wingroot.jpg
    2.3 KB · Views: 0
  • wings f.jpg
    wings f.jpg
    3.8 KB · Views: 0
  • wingsf2.jpg
    wingsf2.jpg
    3.3 KB · Views: 0
  • wingf1.jpg
    wingf1.jpg
    2.7 KB · Views: 0
  • wingsg6.jpg
    wingsg6.jpg
    3.4 KB · Views: 0
Looks very nice. I always enjoy the bit where you get something that looks like an airplane. I hope you're not planning to hang out the washing any time soon!

Cheers

Steve
 
Thread owner
Hi Steve

Thanks for the comments I agree with you, you feel like your getting somewhere.

On a side note regarding cleaning your model prior to construction? I notice that when you built your JU88 that you washed the sprus with parts attached. They were sat on your draining board and I think you made comment about the fact that you struggled to get them on all at once. How important is it as considering you will handle the parts through the construction process.? I know it's obvious that your hands should be clean and free from grease otherwise it may affect paint adhesion. I might have answered my own question there. But are there chemicals or lubricants used in the molds during manufacture? and so it's a good idea to wash them. I might of answered another question there again.

Vaughan
 
Taking shape nicely now Vaughan.

You certainly did answer your own Questions lol! It's the release agent put on the moulds you have to remove.

When you have washed them, let the sprues dry naturally, don't use a cloth or bits will stick to the plastic....you might not see them with the naked eye, but you sure will when paint gets put on!

Don't like I did, start to build a model after eating a bacon butty, forgetting to wash my hands first....

Cheers,

Ron
 
Thread owner
Thanks for that Ron

Yeah I know I should have of worked that one out but I think it's good to have confirmation from other modellers.

Vaughan
 
As Ron said. I've always washed my models but I know people who don't. I just feel safer knowing that any potential hazard to my painting has been removed. As far as handling goes I always try to minimise it and as Ron says make sure your hands are clean. Some people wear latex gloves to handle the model but I'm afraid that's a step too far for me.

I prime with Halfords plastic primer and this can be given a wipe with a cloth (lint free) moistened with alcohol before final painting which also helps remove bacon butty type fingerprints!

Cheers

Steve
 
Thread owner
Hi Steve

Another obvious question but do you wash them with a detergent such as washing up liquid? or just water?

Vaughan
 
Thread owner
Hi all

Impatience has got the better of me and I started spraying again (couldn't wait till the thinners arrived and the thought of not being able to work on it over the W/E as will be too busy). White went on ok on the tail section allowed to dry and masked off to allow to carry on with the demarcation band in yellow. Started ok (having flushed through the brush ready to spray the yellow) but once again that old droplet started appearing on the needle tip. Wiped several times and eventually flushed through the brush again. I must admit that the yellow is getting low in the bottle so don't if it is starting to thicken up(should've waited for the thinners). Got there in the end and it doesn't look too bad.

Anyway that's all until I get the modelair thinners.

Vaughan

View attachment 34613

View attachment 34614

View attachment 34615

View attachment 147639

View attachment 147640

View attachment 147641
 

Attachments

  • tail1.jpg
    tail1.jpg
    3.7 KB · Views: 0
  • tail2.jpg
    tail2.jpg
    3.5 KB · Views: 0
  • G6fu.jpg
    G6fu.jpg
    4 KB · Views: 0
\ said:
Hi Steve Another obvious question but do you wash them with a detergent such as washing up liquid? or just water?

Vaughan
Good old Fairy Liquid!

It looks good,which markings did you decide to do in the end?

Cheers

Steve
 
Status
Not open for further replies.
Back
Top