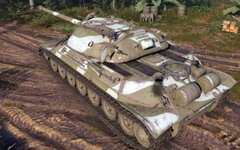
Kit box art ,no boring spru shots but it was full of yellow plastic.
Got as far as lower running gear no big shakes here just the usual snip and glue

So next up was the tracks.
Make a 168 units comprising 2 parts per link
168 links with 2 sprue gates per link=336 gates to be snipped/cut
168links with 2 clean up points = 336 clean ups
168 track teeth with 1 sprue gate = 168 gates to be snipped/cut (though these were easily removed from spru with a scalpel)
168 track teeth with 1 clean up point = 168 clean ups
Then build the links allowing 84 per side(set of tracks)
So a 168 teeth to be fixed to 168 links with 2 cement fixing points per link = 336 points to glue ,I took the tooth to the glue then the tooth to the link

Yippee the last one

Two sets of 84 ready to go. Its not as bad as it seem get a little method/rhythm going got it done in two sessions takes longer to prep all the pieces glueing themselves the easy bit. Dave
") ) just as hard work as what I've just done once painted all look the same. Link and length are OK especially like the 1/48 stuff in the hobbyboss kits got the sag all built in ive seen people moan they don't fit thats because they haven't read the instructions plus a bit obvious if the high points in the sag don't fit the return rollers you've either got it the wrong way round or the wrong side still waiting for someone to do 35th tracks like the zvesda 1/72 ones these are tremendous absolutely fool proof but ive seen them slagged off for not fitting but once again they won't fit if you put them on the wrong side they are numbered in the instructions. Tanks need tracks so for all partys its either a win win or a lose lose the old cant please all of the time the wingy people have the same probs with seat belt /instrument panels I love what some of thoes 3d stick on do but does detailing a cockpit dont get me wrong some of what the guys do is outstanding but bolt it up fit a canopy most of it cant be seen does it warrant ending up paying more for that pleasure than the kit its self might have cost.
) just as hard work as what I've just done once painted all look the same. Link and length are OK especially like the 1/48 stuff in the hobbyboss kits got the sag all built in ive seen people moan they don't fit thats because they haven't read the instructions plus a bit obvious if the high points in the sag don't fit the return rollers you've either got it the wrong way round or the wrong side still waiting for someone to do 35th tracks like the zvesda 1/72 ones these are tremendous absolutely fool proof but ive seen them slagged off for not fitting but once again they won't fit if you put them on the wrong side they are numbered in the instructions. Tanks need tracks so for all partys its either a win win or a lose lose the old cant please all of the time the wingy people have the same probs with seat belt /instrument panels I love what some of thoes 3d stick on do but does detailing a cockpit dont get me wrong some of what the guys do is outstanding but bolt it up fit a canopy most of it cant be seen does it warrant ending up paying more for that pleasure than the kit its self might have cost.