
You are using an out of date browser. It may not display this or other websites correctly.
You should upgrade or use an alternative browser.
You should upgrade or use an alternative browser.
Bowcat's 1/35 Meng Panther A
- Thread starter Mr Bowcat
- Start date
- Status
- Not open for further replies.
Hi Jim, after a lot of research into the matter I settled on using Pritt Stick, with a little CA around the edges to keep it secure.
It seemed like a strange choice when I read it, but it actually seems to have worked really well.
It seemed like a strange choice when I read it, but it actually seems to have worked really well.
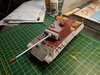
Got the last of the Zim on the hull. It's gone on well with only a small gap on one front corner, which was down to me rather than the kit or resin.
View attachment 307134View attachment 307135View attachment 307136
View attachment 307134View attachment 307135View attachment 307136
Attachments
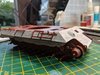
Bit of fill and file and you won't notice that gap.
Does the zimmerit allow for accurate placing of the overlying bits?
Looking very good.
Jon.
Does the zimmerit allow for accurate placing of the overlying bits?
Looking very good.
Jon.
Cheers Steve. ")
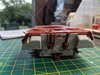
Got quite a lot done this weekend. First job was to paint up and dry brush the engine fans.
View attachment 307716
Ultimately this was pointless as you can't see them once they and the PE grills are installed.
View attachment 307717
I also finished building the hull, other than some grab handles which I will add just before painting. I will also paint all the tools separately and add them at the end.
View attachment 307718View attachment 307719
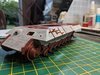
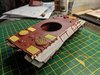
As it was all going so well I also got the turret built and started on the Zim. Just got the large side panels to add.
View attachment 307720
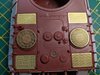
One thing I found strange was the Zim for the rear of the turret. Is the bit at the top right supposed to be missing? This is how the piece came, there's no other pre-cut piece to add in. I have got some spare from the mud guard extensions that I didn't use so I could make a piece, but it seems strange that Atak would mold the piece this shape if it wasn't supposed to be??
View attachment 307721
Got quite a lot done this weekend. First job was to paint up and dry brush the engine fans.
View attachment 307716
Ultimately this was pointless as you can't see them once they and the PE grills are installed.
View attachment 307717
I also finished building the hull, other than some grab handles which I will add just before painting. I will also paint all the tools separately and add them at the end.
View attachment 307718View attachment 307719
As it was all going so well I also got the turret built and started on the Zim. Just got the large side panels to add.
View attachment 307720
One thing I found strange was the Zim for the rear of the turret. Is the bit at the top right supposed to be missing? This is how the piece came, there's no other pre-cut piece to add in. I have got some spare from the mud guard extensions that I didn't use so I could make a piece, but it seems strange that Atak would mold the piece this shape if it wasn't supposed to be??
View attachment 307721
Attachments
Evening Bob.
This is looking very good.
Meng have their own sheets of zimmerit-3 different patterns-and they have that top right bit missing as well.I'll have to try and find out why.a
Jon.
This is looking very good.
Meng have their own sheets of zimmerit-3 different patterns-and they have that top right bit missing as well.I'll have to try and find out why.a
Jon.
Looking very nice Bob.
I suspect it's a bit of artistic licence and omitted on purpose. Zimmerit did fall off.
When I did my homemade version, I left a chunk off my Panther. It adds a bit of a 'well used' look. Personally I wouldn't be bothered if your missing piece is meant to be there or not.
View attachment 307723
Cheers.
Ron
Attachments
Cheers gents.
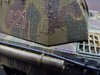
I found this picture which would seem to show the Zim wasn't applied to this section.
View attachment 307724
Either way, I'm going to attack the Zim before paint to give it a chipped up look.
I found this picture which would seem to show the Zim wasn't applied to this section.
View attachment 307724
Either way, I'm going to attack the Zim before paint to give it a chipped up look.
Attachments

Bob, just been having a look at the above picture - And I thought my application was rough!
Cheers chaps.
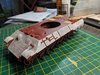
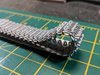
Got the last of the Zim panels on tonight and made up the MG and mount. Few more odds and sods to get off the sprue and cleaned up and should be ready for some primer.
Actually, having said that, I've also got the Fruil tracks to put together first.
Got the last of the Zim panels on tonight and made up the MG and mount. Few more odds and sods to get off the sprue and cleaned up and should be ready for some primer.
Actually, having said that, I've also got the Fruil tracks to put together first.
G
Guest
Guest
Right just found the door so I'm in .!
Looks pretty good to me Bob, and nicely fitted .
John .
Looks pretty good to me Bob, and nicely fitted .
John .
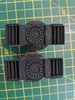
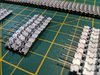
This weekend I have mostly been getting to grips with the Friul tracks. :smiling3:
I have to say, I'm a little disappointed. Although they are very nice I wasn't anticipating the amount of clean-up required on each link. I knew I would be drilling out the holes for the links, but I've also had to clean up flash from the hollow guide horns, the holes for the drive sprocket teeth and various little nubs on almost every one!
One side down, the other 2/3'rds of the way there.
View attachment 308706View attachment 308707View attachment 308708
Attachments
- Status
- Not open for further replies.
Legal Notice
scalemodelling.co.uk is a privately operated online discussion forum. All content posted by members reflects their own views and opinions and does not necessarily represent those of the forum owners or administrators. While reasonable efforts are made to moderate content, no responsibility is accepted for user-generated material. By using this site, you agree to comply with UK law and the forum rules.