LOL Laurie\ said:Wow Barry very worried about what you store in those racksLaurie
")
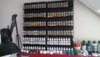
see for yourself - perfect for Vallejo...
View attachment 75895
View attachment 188918

LOL Laurie\ said:Wow Barry very worried about what you store in those racks
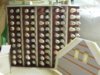
Those look really neat.\ said:Made some pictures of my home made rack.I really like this because I can turn the rack around once in a while so the paint i am not using very much is moved to.
Cheers Richi
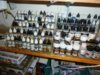
Looks great Barry but at nearly £30 it's a tad on the expensive side. Think how much Vallejo bottles you could buy for that price.\ said:Here is what I use Steve, holds 11 Vallejo bottles per row, 6 rows per rack. I have two of them and they are the perfect size. I store the bottles in number order on the racks and they are very easy to identify.http://www.amazon.co.uk/Avonstar-classic-range-cosmetic-storage/dp/B004X5B7XM/ref=sr_1_8?ie=UTF8&qid=1388998204&sr=8-8&keywords=nail varnish racks
I would like to see a photo, please. (No pressure!)\ said:Nice racks gents, you've given me some ideas for mine that will (hopefully) be made in the next week or two.
Lol. no problem Steve, the photography is the easy bit.\ said:I would like to see a photo, please. (No pressure!)

Surely not Steve ! But come on Steve it looks a bit sparse. Get on the "Shop" and get them in.\ said:So here is my masterpiece:View attachment 75985
There is plenty of capacity for even as many Vallejo bottles as you have Laurie.

scalemodelling.co.uk is a privately operated online discussion forum. All content posted by members reflects their own views and opinions and does not necessarily represent those of the forum owners or administrators. While reasonable efforts are made to moderate content, no responsibility is accepted for user-generated material. By using this site, you agree to comply with UK law and the forum rules.